## Day18 Web前端实战(案例):修改删除员工、登录打包
---
* 员工管理-修改
*
员工管理-删除
*
登录退出
*
打包部署
### 1. 员工管理-修改
#### 修改员工-查询回显
* 点击 “编辑” 按钮,执行根据ID查询员工信息,页面回显。
* 点击 “保存” 按钮,执行修改操作。
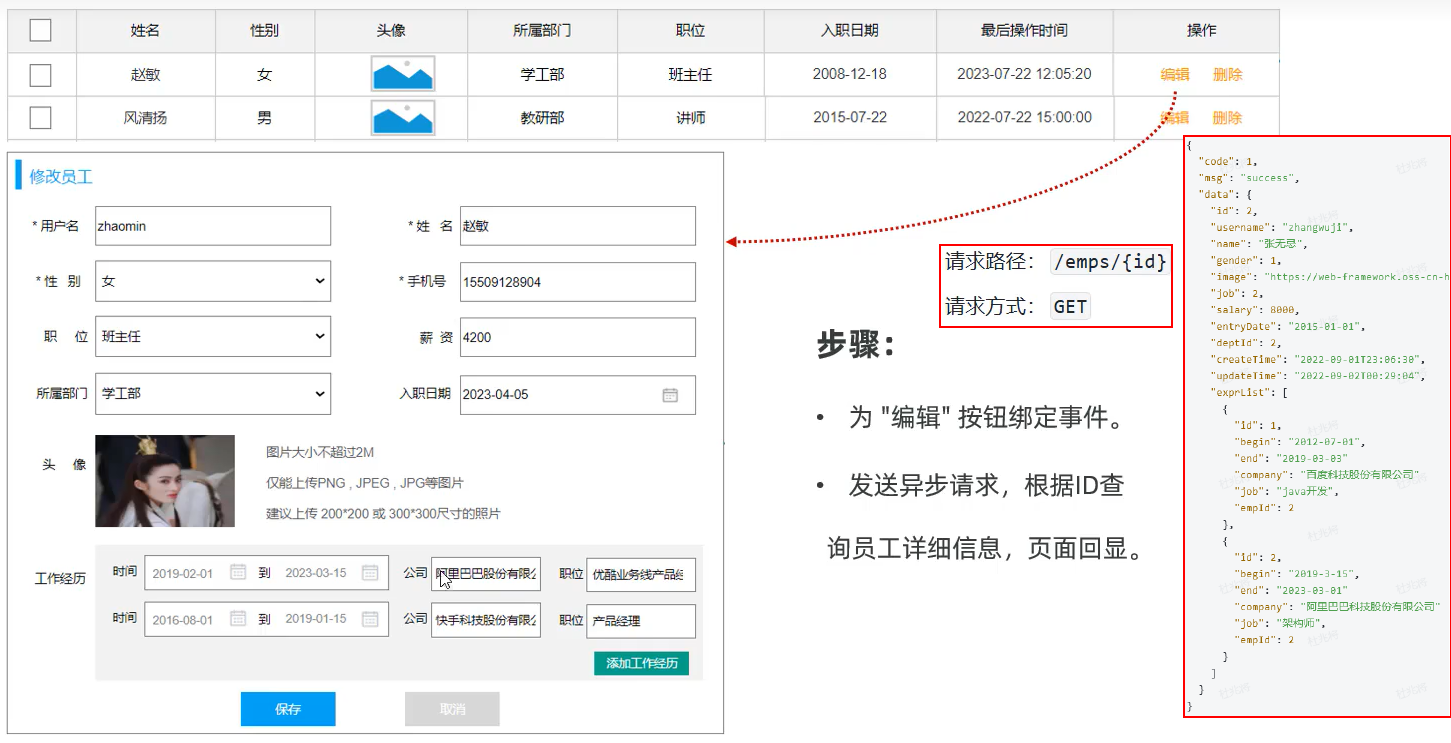 图1 修改员工-查询回显
##### src\api\emp.js 添加如下代码
```javascript
//根据ID查询员工
export const queryByIdApi = (id) => request.get(`/emps/${id}`);
```
##### src\views\emp\index.vue 添加或修改如下代码
```vue
编辑
...
```
图1 修改员工-查询回显
##### src\api\emp.js 添加如下代码
```javascript
//根据ID查询员工
export const queryByIdApi = (id) => request.get(`/emps/${id}`);
```
##### src\views\emp\index.vue 添加或修改如下代码
```vue
编辑
...
```
 图2 修改员工-查询回显验证
#### 修改员工-保存数据
* 点击保存按钮,执行修改数据操作。
* 备注:添加员工与修改员工使用的是同一个表单,需要根据id判断到底执行新增还是修改。
图2 修改员工-查询回显验证
#### 修改员工-保存数据
* 点击保存按钮,执行修改数据操作。
* 备注:添加员工与修改员工使用的是同一个表单,需要根据id判断到底执行新增还是修改。
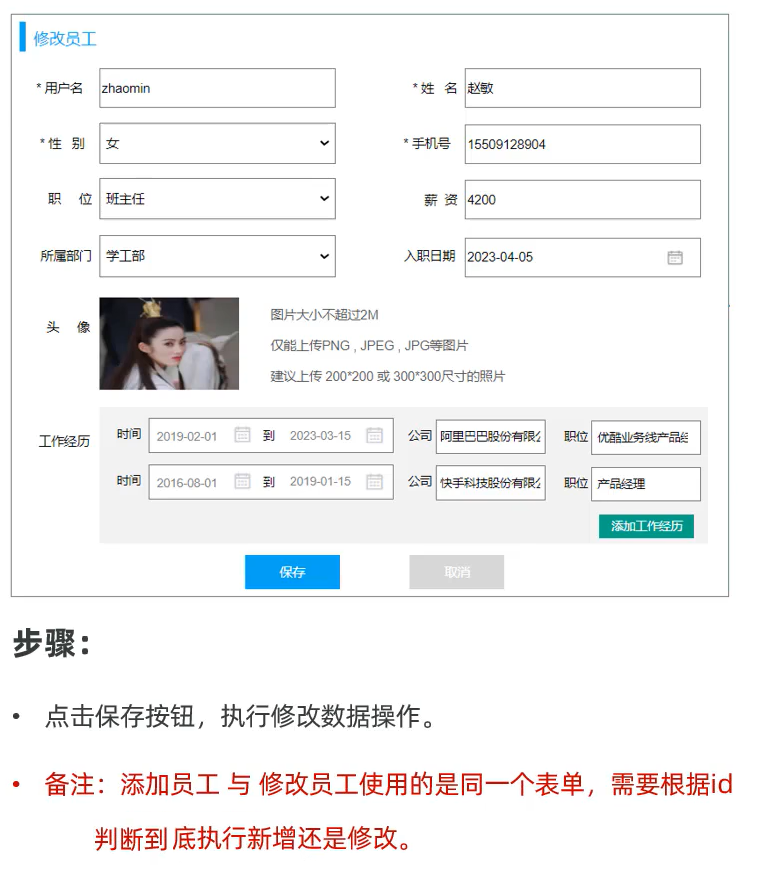 图3 修改员工-保存数据
##### src\api\emp.js 添加如下代码
```javascript
//修改员工
export const updateApi = (emp) => request.put('/emps',emp);
```
##### src\views\emp\index.vue 添加或修改如下代码
```vue
```
图3 修改员工-保存数据
##### src\api\emp.js 添加如下代码
```javascript
//修改员工
export const updateApi = (emp) => request.put('/emps',emp);
```
##### src\views\emp\index.vue 添加或修改如下代码
```vue
```
 图4 修改员工-保存数据验证
### 2. 员工管理-删除
* 点击每条记录之后的“删除”按钮,删除当前这条记录;
* 选择前面的复选框,选中要删除的员工,点击“批量删除”之后,会批量删除员工信息;
图4 修改员工-保存数据验证
### 2. 员工管理-删除
* 点击每条记录之后的“删除”按钮,删除当前这条记录;
* 选择前面的复选框,选中要删除的员工,点击“批量删除”之后,会批量删除员工信息;
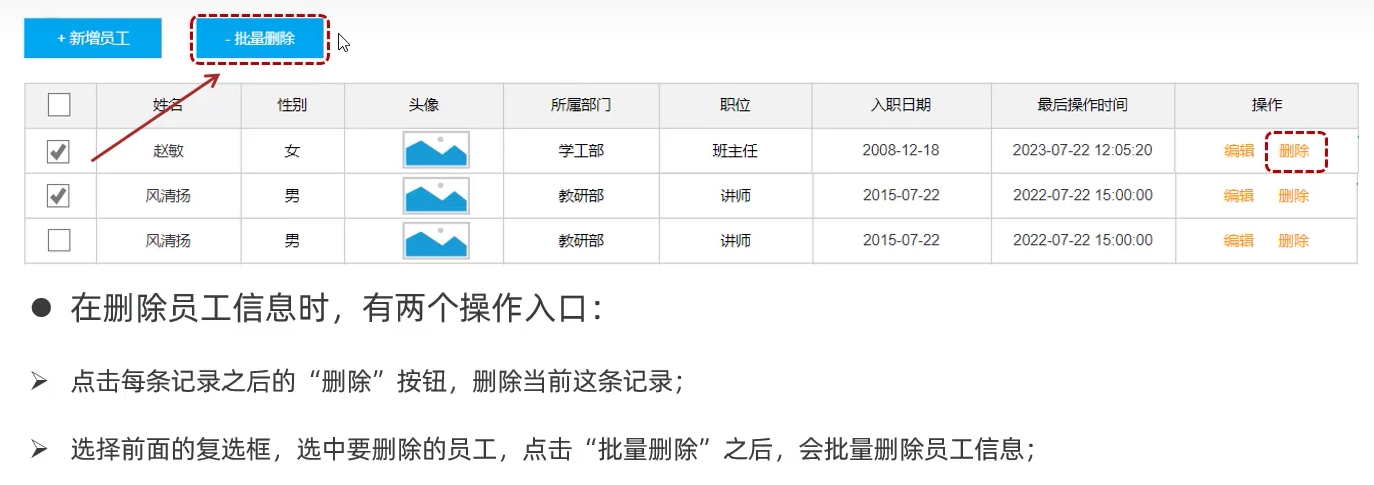 图5 员工管理-删除
#### 删除员工-删除单个
* 为 "删除" 按钮绑定事件,触发事件,调用函数
* 发送异步请求到服务端,根据id删除员工信息
##### src\api\emp.js 添加如下代码
```javascript
//删除员工
export const delApi = (ids) => request.delete(`/emps?ids=${ids}`);
```
##### src\views\emp\index.vue 添加或修改如下代码
```vue
...
删除
```
图5 员工管理-删除
#### 删除员工-删除单个
* 为 "删除" 按钮绑定事件,触发事件,调用函数
* 发送异步请求到服务端,根据id删除员工信息
##### src\api\emp.js 添加如下代码
```javascript
//删除员工
export const delApi = (ids) => request.delete(`/emps?ids=${ids}`);
```
##### src\views\emp\index.vue 添加或修改如下代码
```vue
...
删除
```
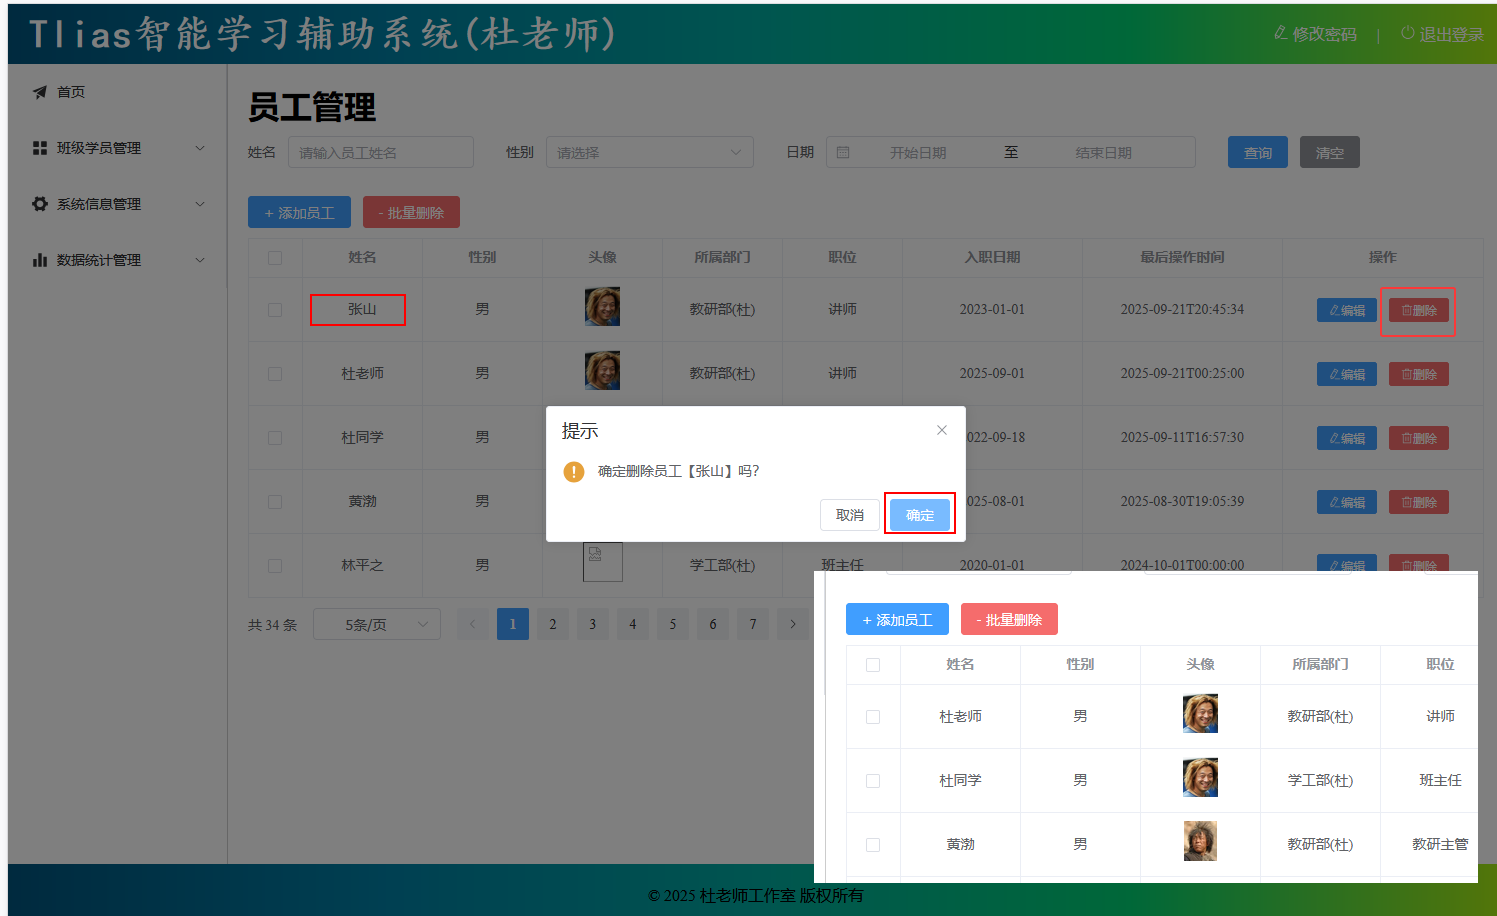 图6 删除员工-删除单个验证
#### 删除员工-批量删除
* 为表格的复选框绑定事件,点击复选框之后,获取到目前选中的条件的id(多个id可以封装到数组中)。
* 为 "批量删除" 按钮绑定事件, 发送异步请求到服务端,根据id批量删除员工信息。
图6 删除员工-删除单个验证
#### 删除员工-批量删除
* 为表格的复选框绑定事件,点击复选框之后,获取到目前选中的条件的id(多个id可以封装到数组中)。
* 为 "批量删除" 按钮绑定事件, 发送异步请求到服务端,根据id批量删除员工信息。
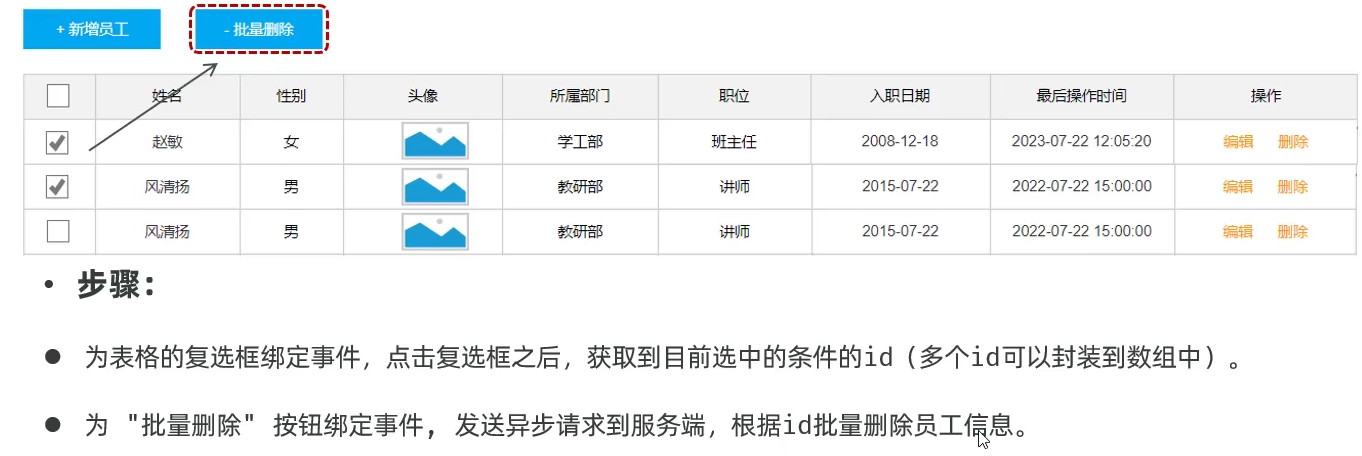 图7 删除员工-批量删除
##### src\views\emp\index.vue 添加或修改如下代码
```vue
...
-批量删除
...
```
图7 删除员工-批量删除
##### src\views\emp\index.vue 添加或修改如下代码
```vue
...
-批量删除
...
```
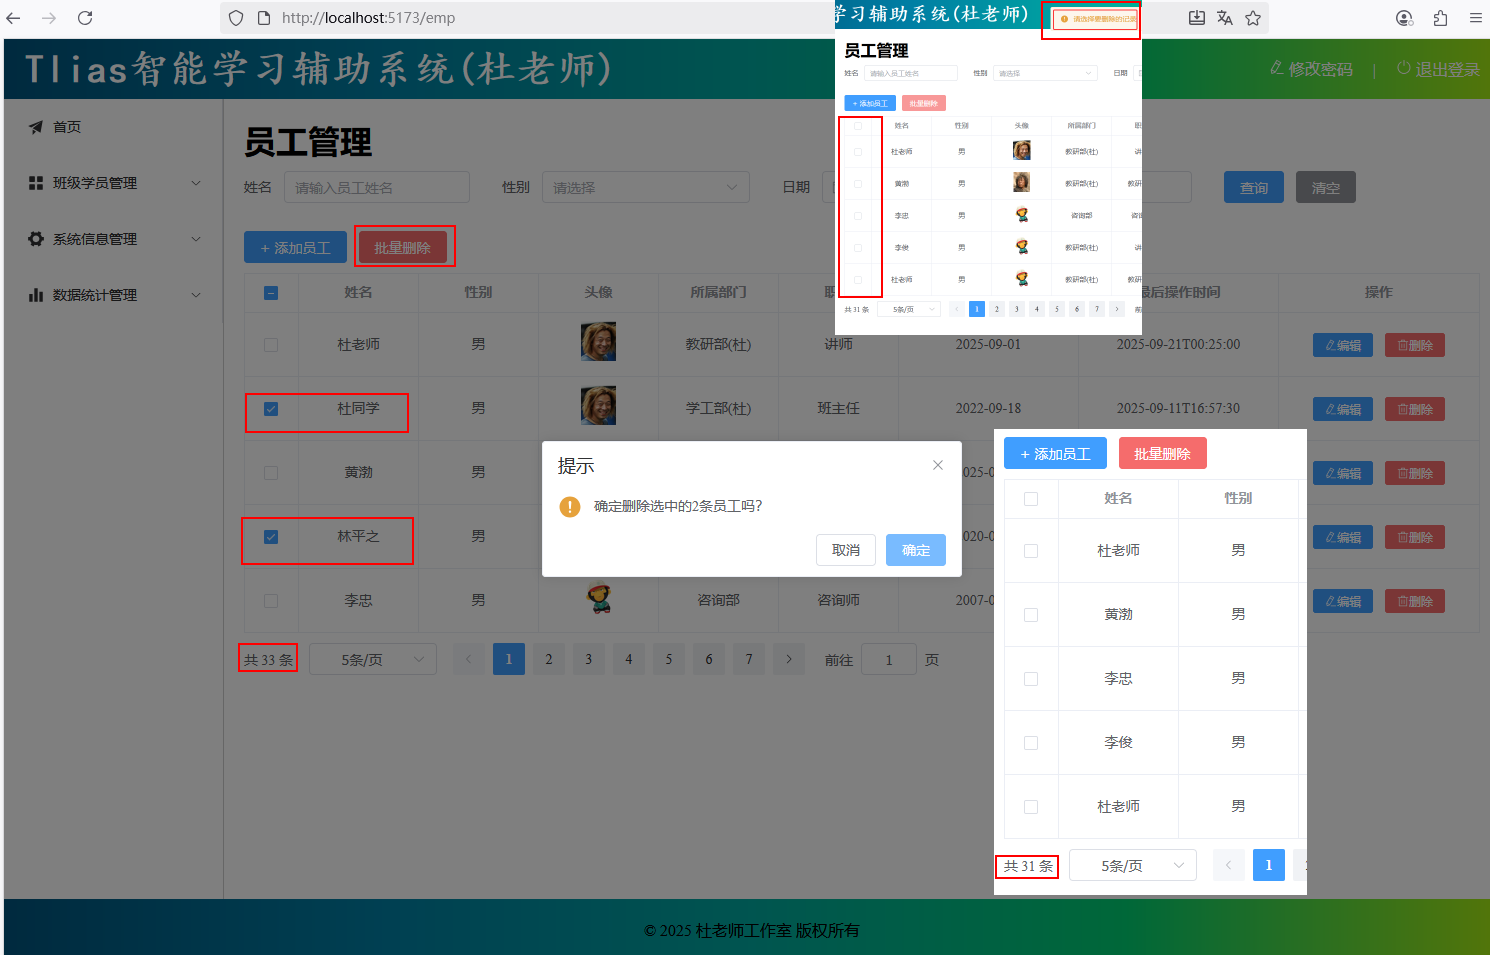 图8 删除员工-批量删除验证
### 3. 登录退出
#### 3.1 登录
图8 删除员工-批量删除验证
### 3. 登录退出
#### 3.1 登录
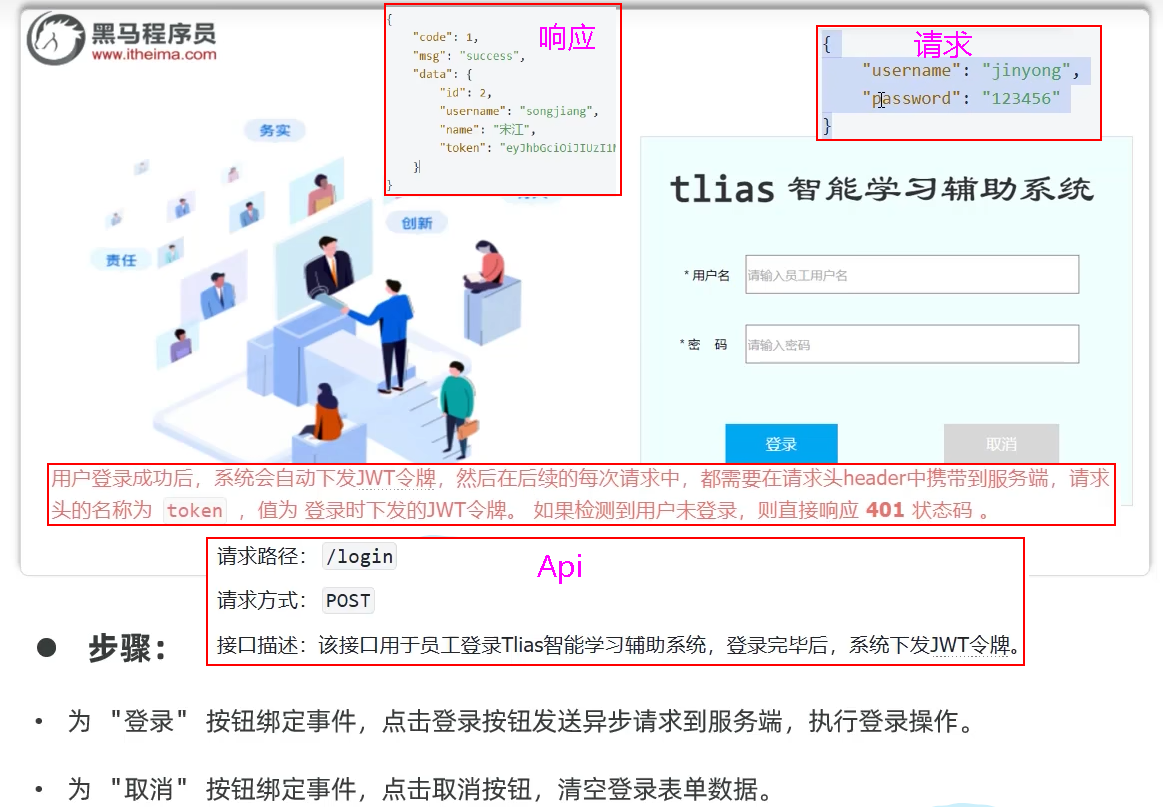 图9 登录需求
##### src\api\login.js
```js
import request from '@/utils/request'
// 登录
export const loginApi = (data) => request.post('/login',data)
```
##### src\views\login\index.vue 添加或修改代码如下
```vue
登 录
重 置
```
图9 登录需求
##### src\api\login.js
```js
import request from '@/utils/request'
// 登录
export const loginApi = (data) => request.post('/login',data)
```
##### src\views\login\index.vue 添加或修改代码如下
```vue
登 录
重 置
```
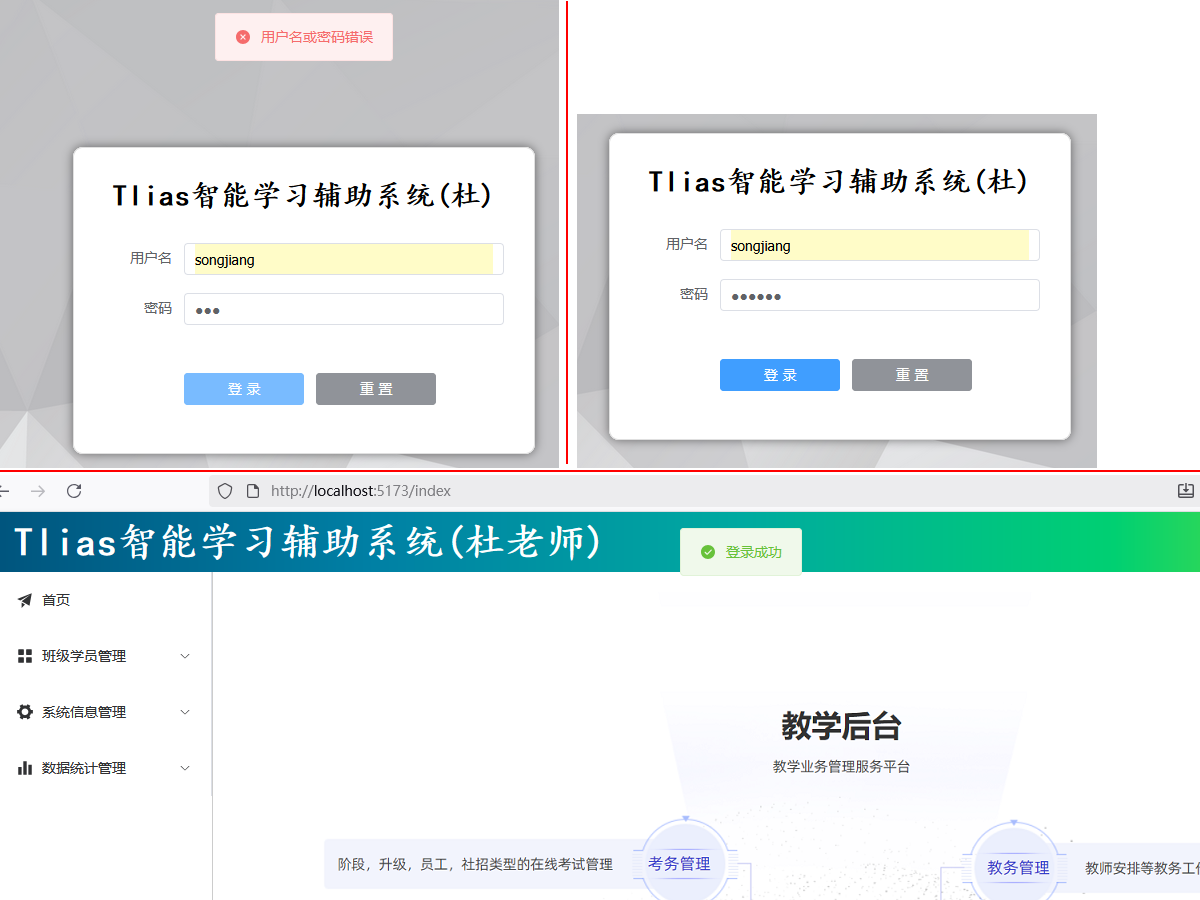 图10 登录验证
#### 登录
* 问题:目前执行登录操作,登录成功之后,并没有将令牌信息起来,在后续的每次操作中,也就拿不到登录时的令牌信息了。
* 方案:需要在登录成功后,将令牌等信息存储起来。 在后续的请求中,再将令牌取出来,携带到服务端。
图10 登录验证
#### 登录
* 问题:目前执行登录操作,登录成功之后,并没有将令牌信息起来,在后续的每次操作中,也就拿不到登录时的令牌信息了。
* 方案:需要在登录成功后,将令牌等信息存储起来。 在后续的请求中,再将令牌取出来,携带到服务端。
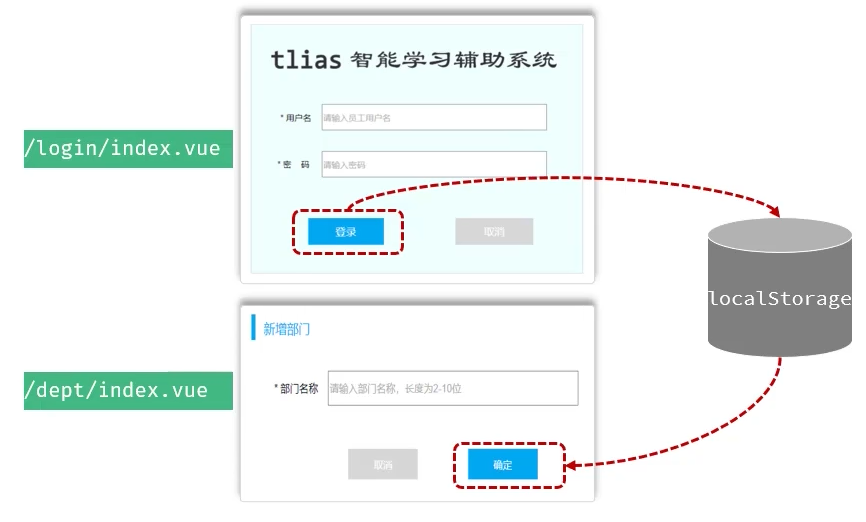 图11 登录后令牌处理
#### localStorage
* localStorage是浏览器提供的本地存储机制(5MB)。
* 存储形式为key-value形式,键和值都是字符串类型。
* API方法:
* localStorage.setItem(key,value)
* localStorage.getItem(key)
* localStorage.removeItem(key)
* localStorage.clear()
##### src\views\login\index.vue 添加或修改代码如下
```js
//保存登录信息
localStorage.setItem('loginUser',JSON.stringify(result.data))
```
图11 登录后令牌处理
#### localStorage
* localStorage是浏览器提供的本地存储机制(5MB)。
* 存储形式为key-value形式,键和值都是字符串类型。
* API方法:
* localStorage.setItem(key,value)
* localStorage.getItem(key)
* localStorage.removeItem(key)
* localStorage.clear()
##### src\views\login\index.vue 添加或修改代码如下
```js
//保存登录信息
localStorage.setItem('loginUser',JSON.stringify(result.data))
```
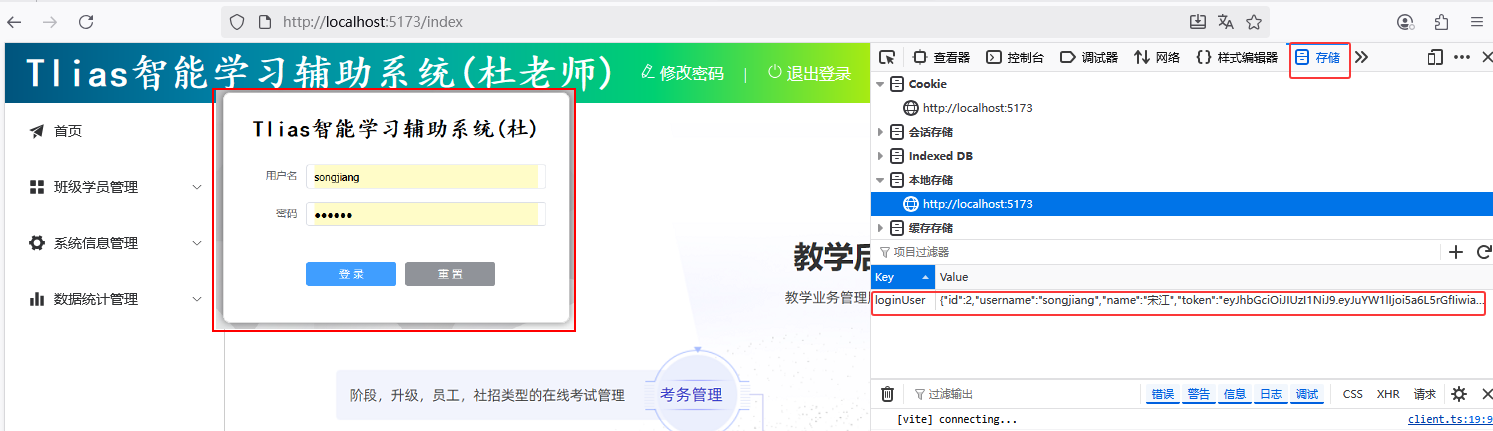 图12 登录成功后保存用户信息验证
#### 携带令牌访问服务端
* 在后续的每一次Ajax请求中都获取localStorage中的令牌,在请求头中将令牌携带到服务端。
图12 登录成功后保存用户信息验证
#### 携带令牌访问服务端
* 在后续的每一次Ajax请求中都获取localStorage中的令牌,在请求头中将令牌携带到服务端。
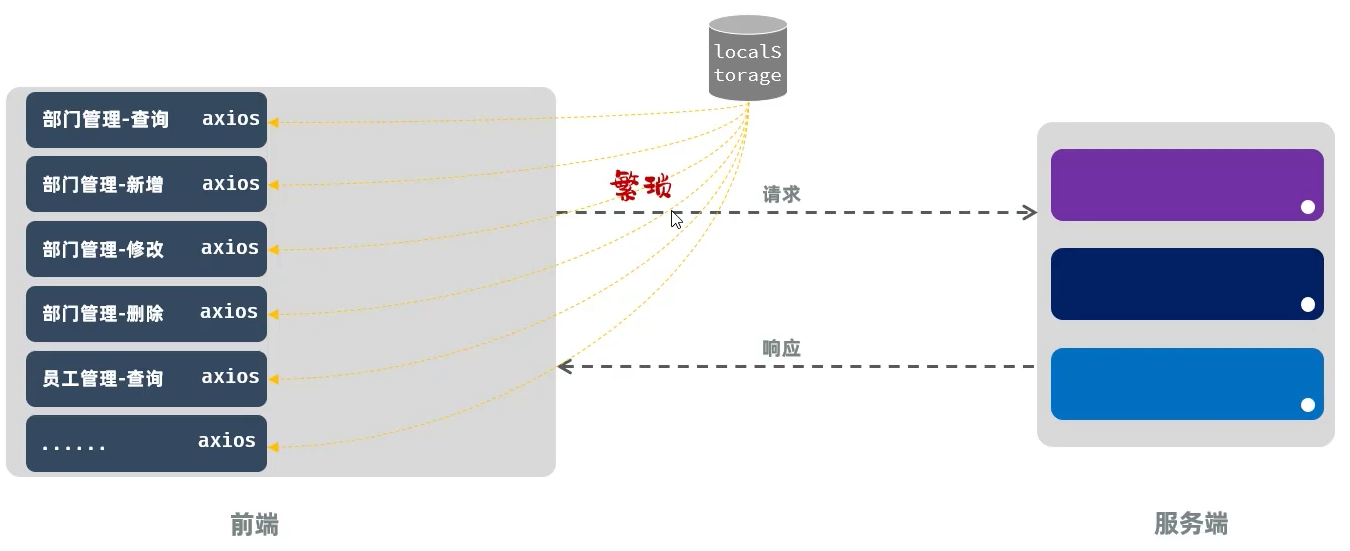 图13 请求头中将令牌携带到服务端
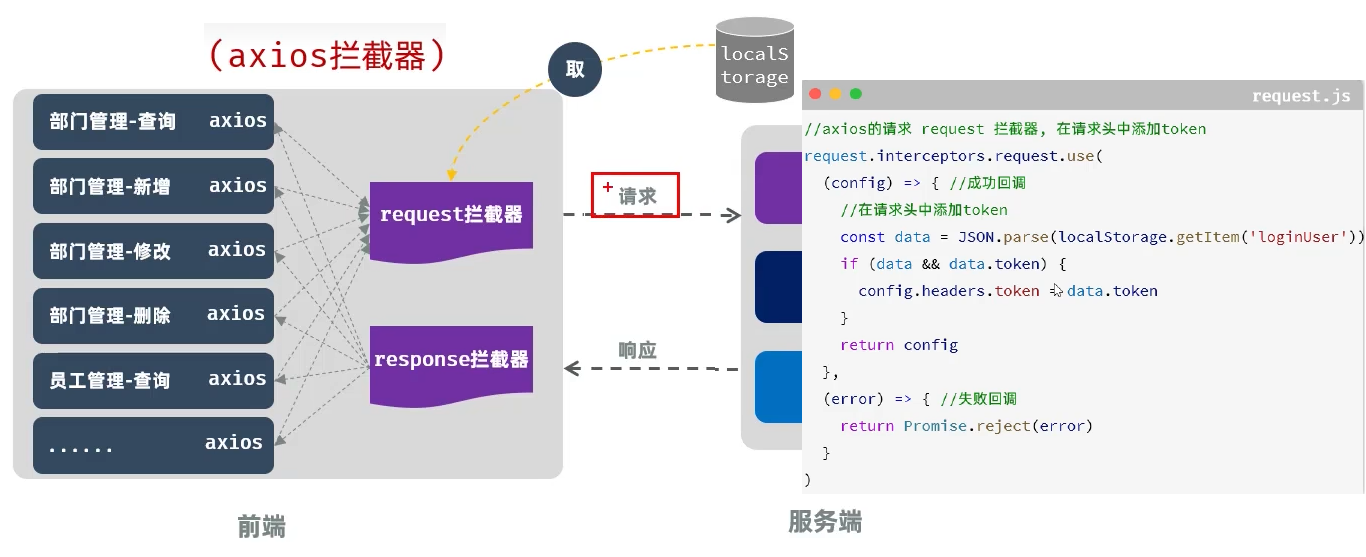 图14 请求头中将令牌携带到服务端
##### 服务器端设置权限过滤,如
* cn/dzj/filter/TokenFilter.java 开启 @WebFilter("/*")
* cn/dzj/TliasWebManagementApplication.java 开启 @ServletComponentScan ///开启了SpringBoot对Servlet组件的支持
##### src\utils\request.js 添加如下代码
```js
//axios的请求request拦截器-获取localstorage中的token,在请求头中增加token请求头
request.interceptors.request.use(
(config) => { //成功回调
const loginUser = JSON.parse(localStorage.getItem('loginUser'));
if(loginUser && loginUser.token)
config.headers.token = loginUser.token;
return config
},
(error) => { //失败回调
return Promise.reject (error)
}
)
```
图14 请求头中将令牌携带到服务端
##### 服务器端设置权限过滤,如
* cn/dzj/filter/TokenFilter.java 开启 @WebFilter("/*")
* cn/dzj/TliasWebManagementApplication.java 开启 @ServletComponentScan ///开启了SpringBoot对Servlet组件的支持
##### src\utils\request.js 添加如下代码
```js
//axios的请求request拦截器-获取localstorage中的token,在请求头中增加token请求头
request.interceptors.request.use(
(config) => { //成功回调
const loginUser = JSON.parse(localStorage.getItem('loginUser'));
if(loginUser && loginUser.token)
config.headers.token = loginUser.token;
return config
},
(error) => { //失败回调
return Promise.reject (error)
}
)
```
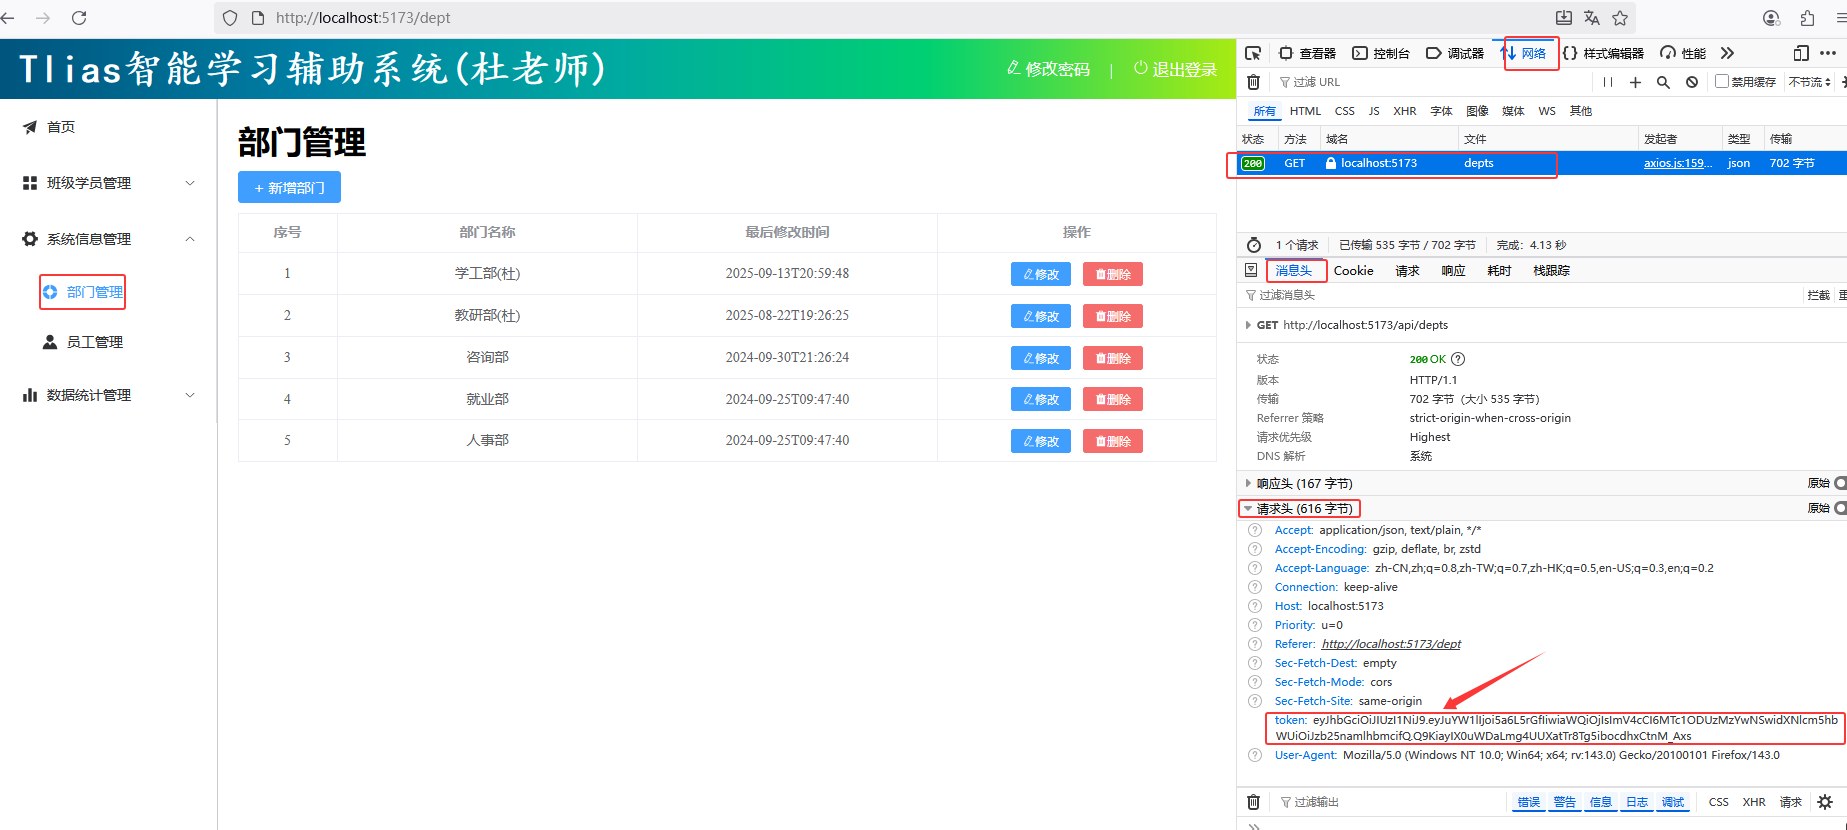 图15 携带令牌访问服务端验证
#### 文件上传携带令牌
##### src\views\emp\index.vue 添加或修改下列代码
```vue
图15 携带令牌访问服务端验证
#### 文件上传携带令牌
##### src\views\emp\index.vue 添加或修改下列代码
```vue
![]() ```
```
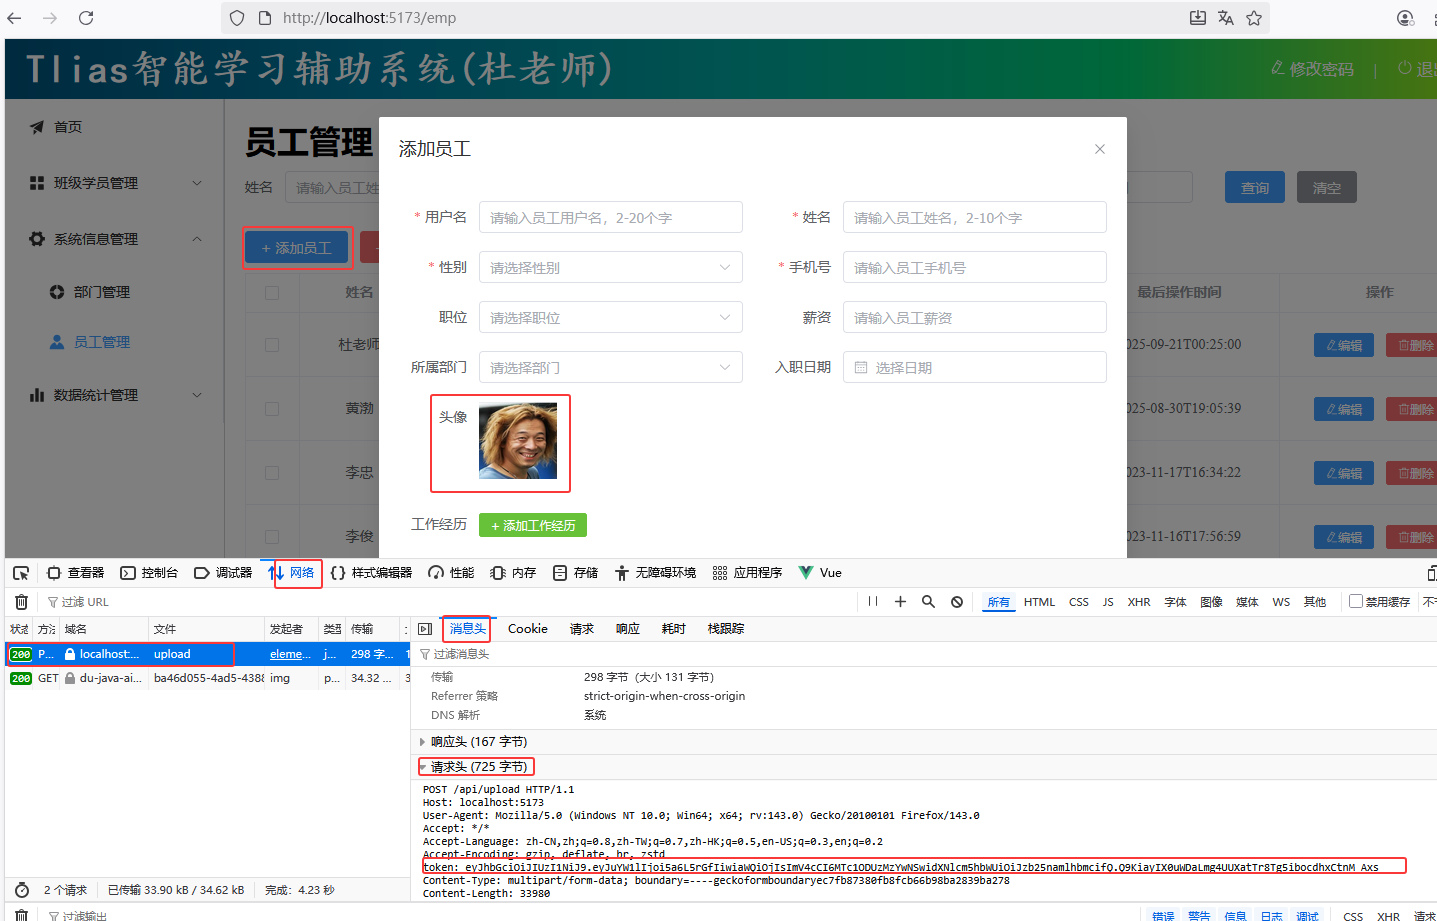 图16 文件上传携带令牌验证
#### 功能完善
* 目前,即使用户未登录的情况下访问服务器,服务器会响应401状态码,但是前端并不会跳转到登录页面。
图16 文件上传携带令牌验证
#### 功能完善
* 目前,即使用户未登录的情况下访问服务器,服务器会响应401状态码,但是前端并不会跳转到登录页面。
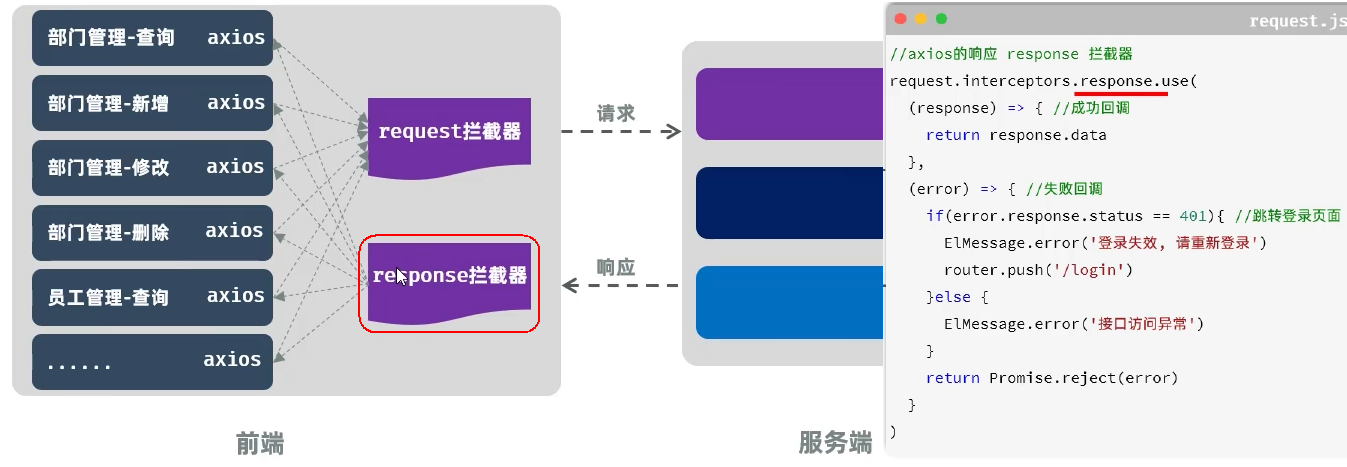 图17 响应401状态码跳转到登录页面
##### src\utils\request.js 添加或修改如下代码
```js
...
import { ElMessage } from 'element-plus'
import router from '../router'
...
//axios的响应 response 拦截器
request.interceptors.response.use(
(response) => { //成功回调
return response.data
},
(error) => { //失败回调
if(error.response.status === 401) { //全等
ElMessage.error('登录已过期,请重新登录!')
localStorage.removeItem('loginUser')
//跳转到登录页面
router.push('/login')
} else
ElMessage.error("接口访问异常")
return Promise.reject(error)
}
)
export default request
```
图17 响应401状态码跳转到登录页面
##### src\utils\request.js 添加或修改如下代码
```js
...
import { ElMessage } from 'element-plus'
import router from '../router'
...
//axios的响应 response 拦截器
request.interceptors.response.use(
(response) => { //成功回调
return response.data
},
(error) => { //失败回调
if(error.response.status === 401) { //全等
ElMessage.error('登录已过期,请重新登录!')
localStorage.removeItem('loginUser')
//跳转到登录页面
router.push('/login')
} else
ElMessage.error("接口访问异常")
return Promise.reject(error)
}
)
export default request
```
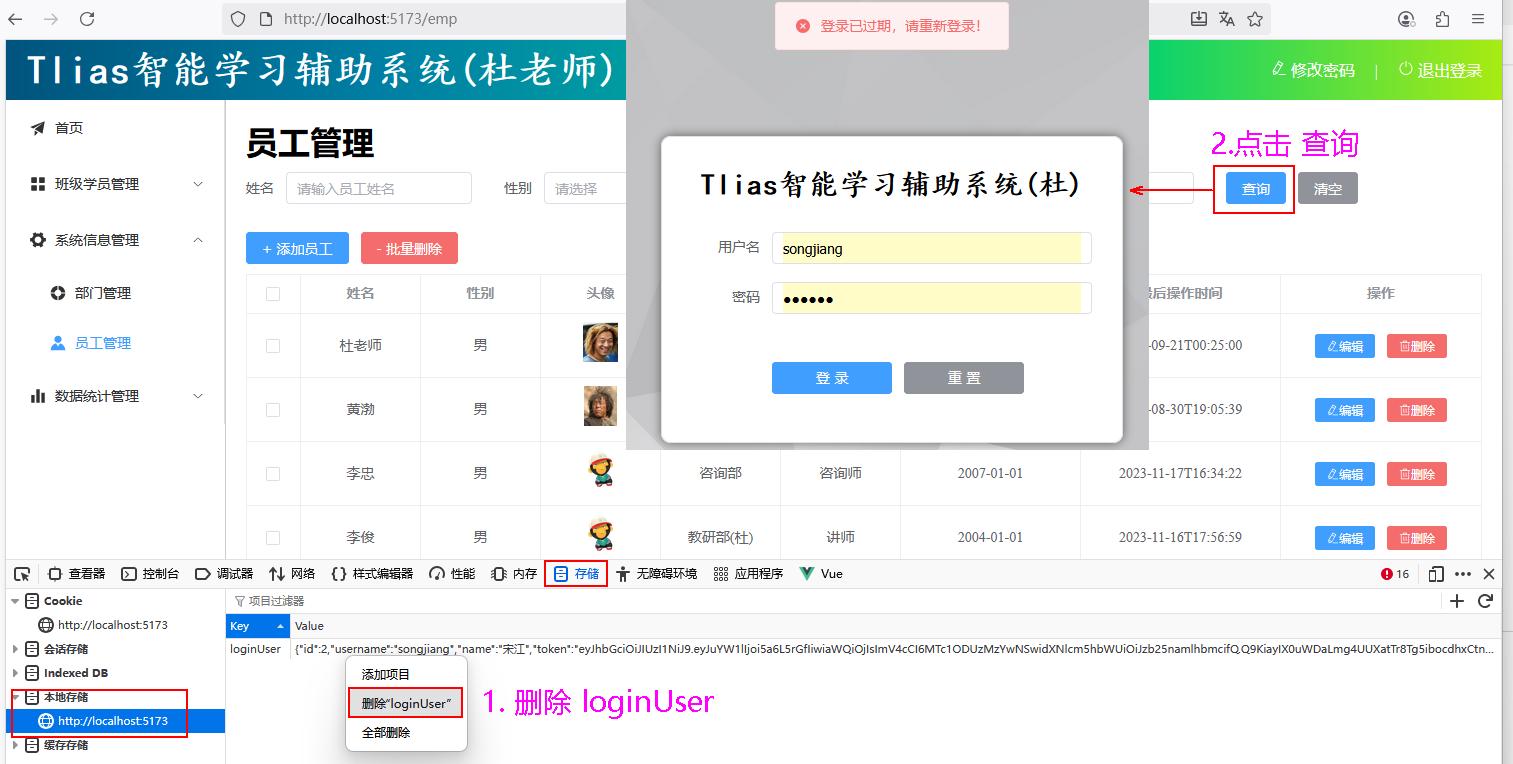 图18 响应401状态码
#### 3.2 退出
图18 响应401状态码
#### 3.2 退出
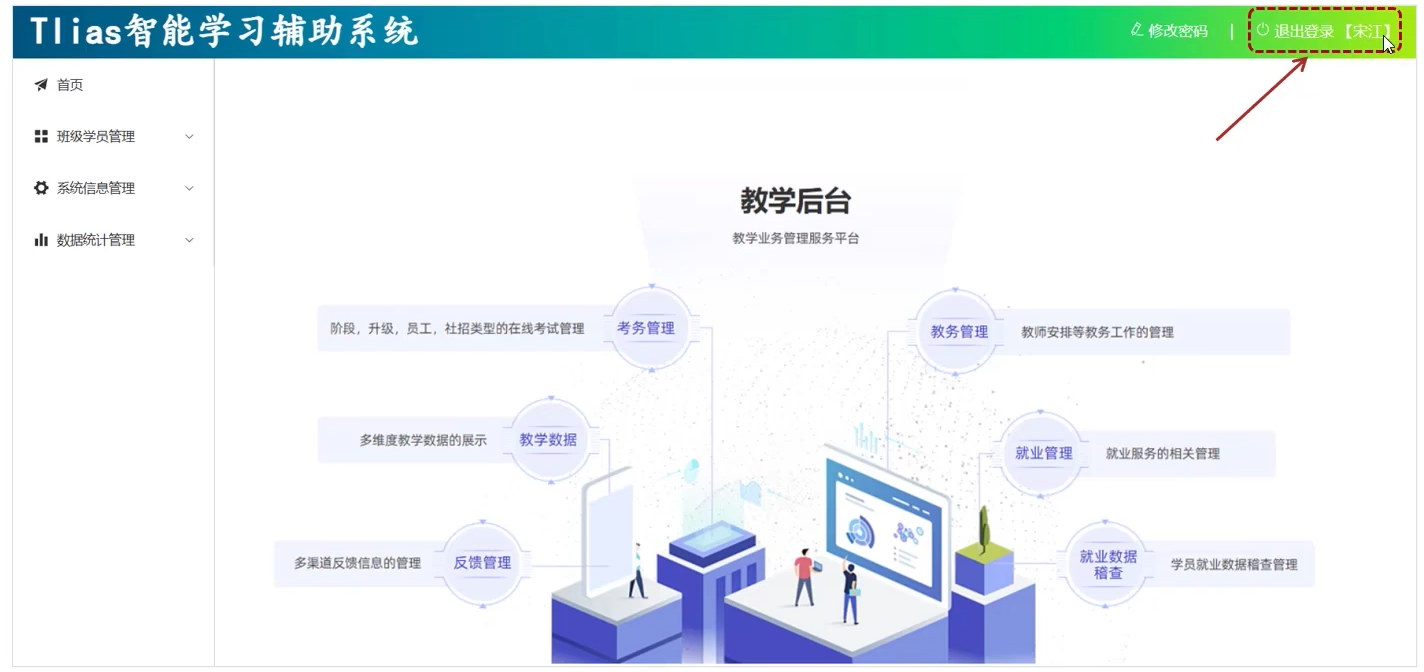 图19 退出需求
* 展示当前登录用户。
* 退出登录。
#### 展示当前登录用户
##### src\views\layout\index.vue 添加、修改代码如下
```vue
。。。
退出登录 【{{loginName}}】
```
图19 退出需求
* 展示当前登录用户。
* 退出登录。
#### 展示当前登录用户
##### src\views\layout\index.vue 添加、修改代码如下
```vue
。。。
退出登录 【{{loginName}}】
```
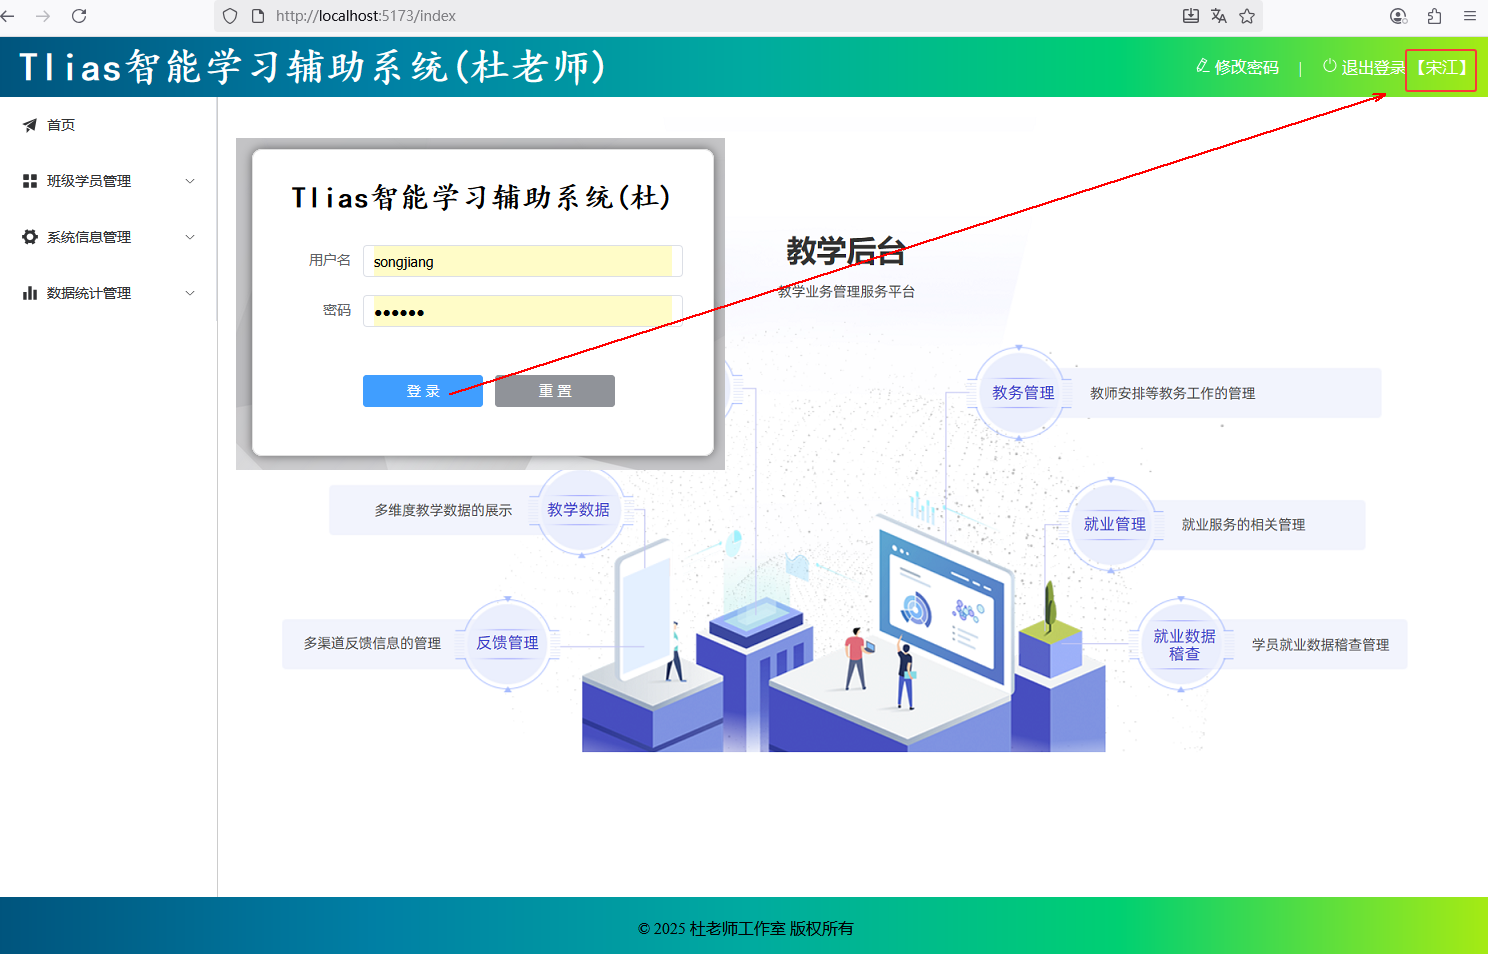 图20 登录展示当前登录用户验证
#### 退出登录
##### src\views\layout\index.vue 添加、修改代码如下
```vue
...
退出登录 【{{loginName}}】
```
图20 登录展示当前登录用户验证
#### 退出登录
##### src\views\layout\index.vue 添加、修改代码如下
```vue
...
退出登录 【{{loginName}}】
```
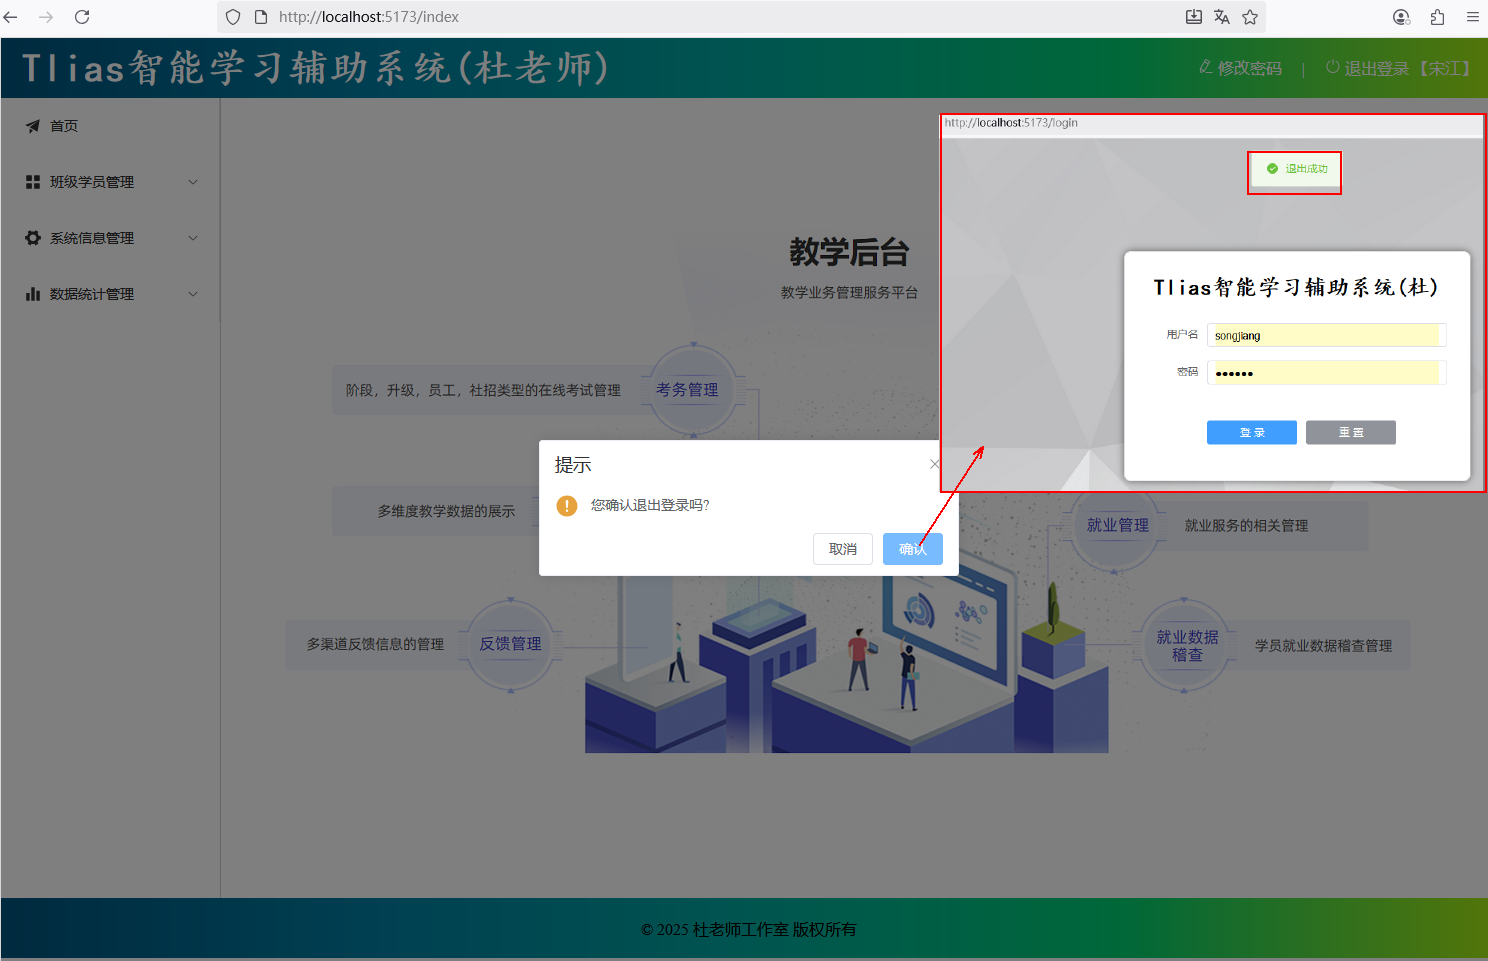 图21 登录退出验证
#### 修改密码
### 4. 项目打包部署
#### 4.1 打包
图21 登录退出验证
#### 修改密码
### 4. 项目打包部署
#### 4.1 打包
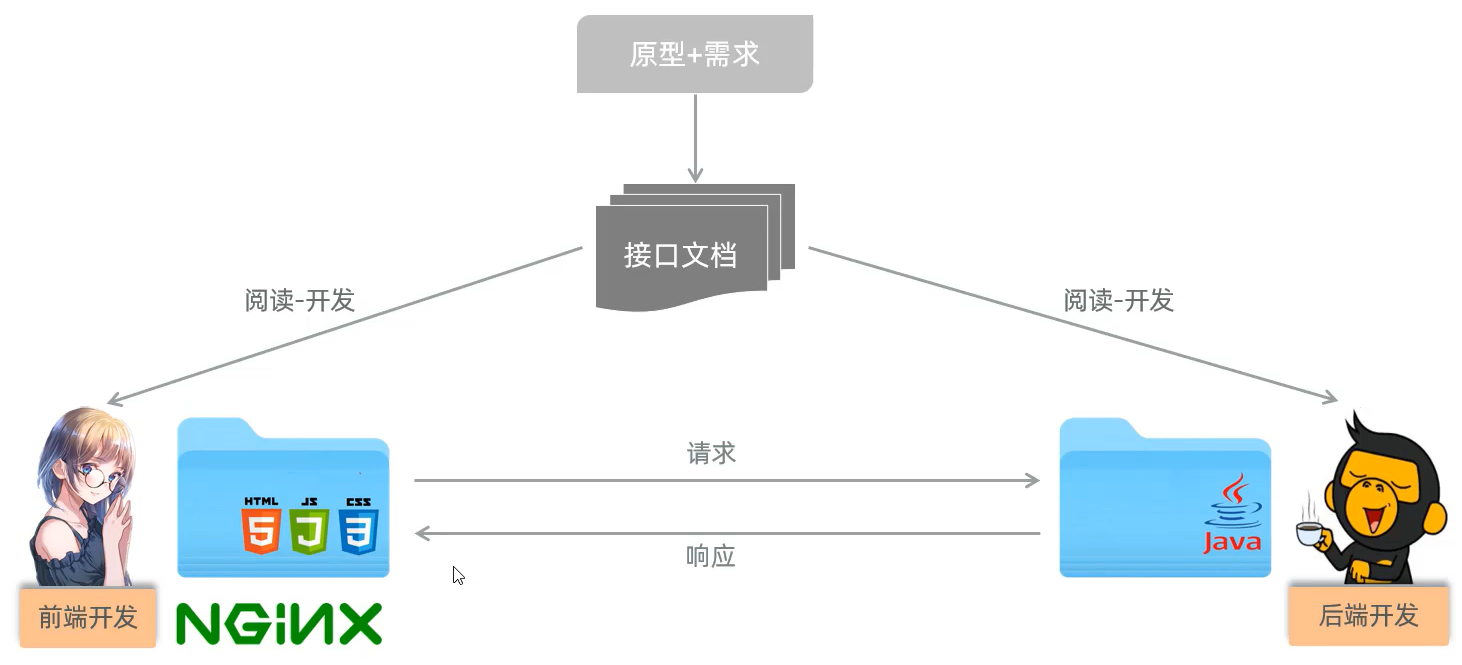 图22 前端部署
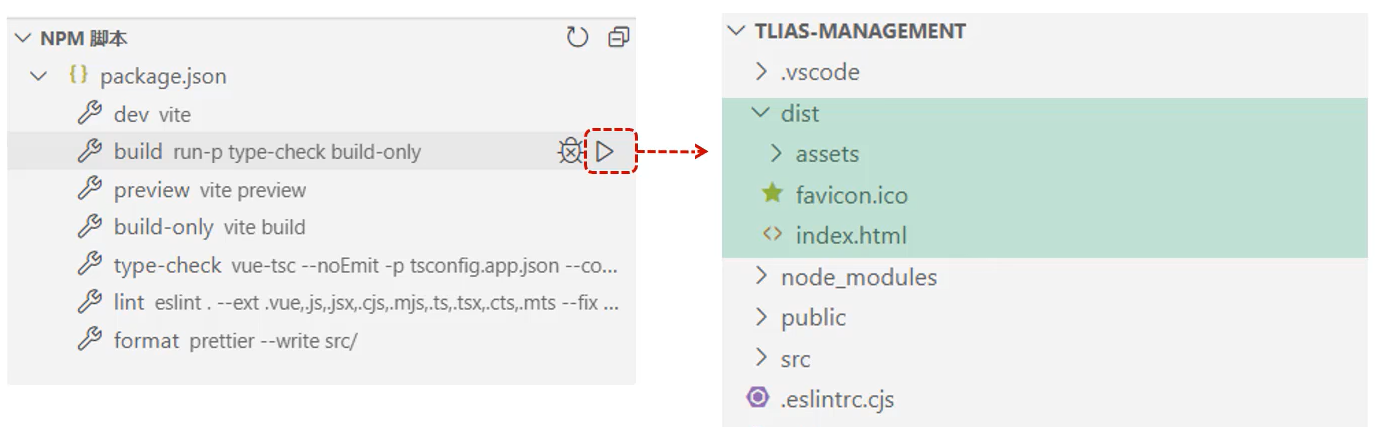 图23 前端打包
#### 4.2 部署(nginx)
* 介绍:Nginx是一款轻量级的Web服务器/反向代理服务器及电子邮件(IMAP/POP3)代理服务器。其特点是占有内存少,并发能力强,在各大型互联网公司都有非常广泛的使用。
* 官网:https://nginx.org/
图23 前端打包
#### 4.2 部署(nginx)
* 介绍:Nginx是一款轻量级的Web服务器/反向代理服务器及电子邮件(IMAP/POP3)代理服务器。其特点是占有内存少,并发能力强,在各大型互联网公司都有非常广泛的使用。
* 官网:https://nginx.org/
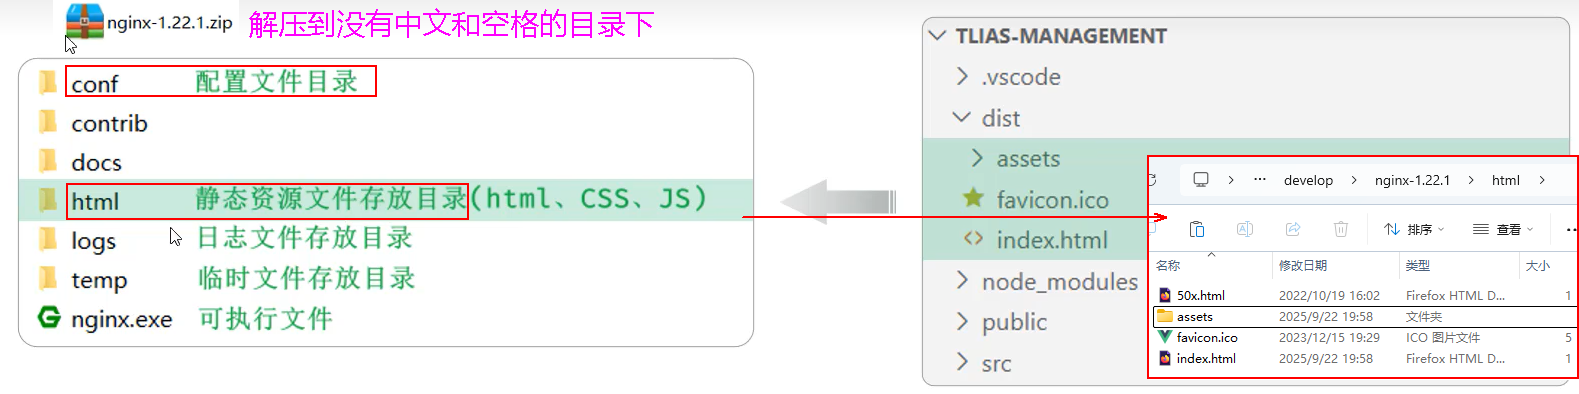 图24 Nginx安装、前端部署
* 部署:将打包好的 dist 目录下的文件,复制到nginx安装目录的html目录下。
* 启动:双击 nginx.exe 文件即可,Nginx服务器默认占用 80 端口号。
* Nginx默认占用80端口号,如果80端口号被占用,可以在nginx.conf中修改端口号。(netstat -ano | findStr 80)
* vite.config.js是项目开发时的配置文件、项目打包是将src下的源代码混淆打包、所以项目部署后运行时该配置文件不起作用
##### G:\develop\nginx-1.22.1\conf\nginx.conf
```
#user nobody;
worker_processes 1;
events {
worker_connections 1024;
}
http {
include mime.types;
default_type application/octet-stream;
sendfile on;
keepalive_timeout 65;
server {
listen 80;
server_name localhost;
client_max_body_size 10m;
location / {
root html;
index index.html index.htm;
try_files $uri $uri/ /index.html;
}
location ^~ /api/ {
rewrite ^/api/(.*)$ /$1 break;
proxy_pass http://localhost:8080;
}
error_page 500 502 503 504 /50x.html;
location = /50x.html {
root html;
}
}
}
```
图24 Nginx安装、前端部署
* 部署:将打包好的 dist 目录下的文件,复制到nginx安装目录的html目录下。
* 启动:双击 nginx.exe 文件即可,Nginx服务器默认占用 80 端口号。
* Nginx默认占用80端口号,如果80端口号被占用,可以在nginx.conf中修改端口号。(netstat -ano | findStr 80)
* vite.config.js是项目开发时的配置文件、项目打包是将src下的源代码混淆打包、所以项目部署后运行时该配置文件不起作用
##### G:\develop\nginx-1.22.1\conf\nginx.conf
```
#user nobody;
worker_processes 1;
events {
worker_connections 1024;
}
http {
include mime.types;
default_type application/octet-stream;
sendfile on;
keepalive_timeout 65;
server {
listen 80;
server_name localhost;
client_max_body_size 10m;
location / {
root html;
index index.html index.htm;
try_files $uri $uri/ /index.html;
}
location ^~ /api/ {
rewrite ^/api/(.*)$ /$1 break;
proxy_pass http://localhost:8080;
}
error_page 500 502 503 504 /50x.html;
location = /50x.html {
root html;
}
}
}
```
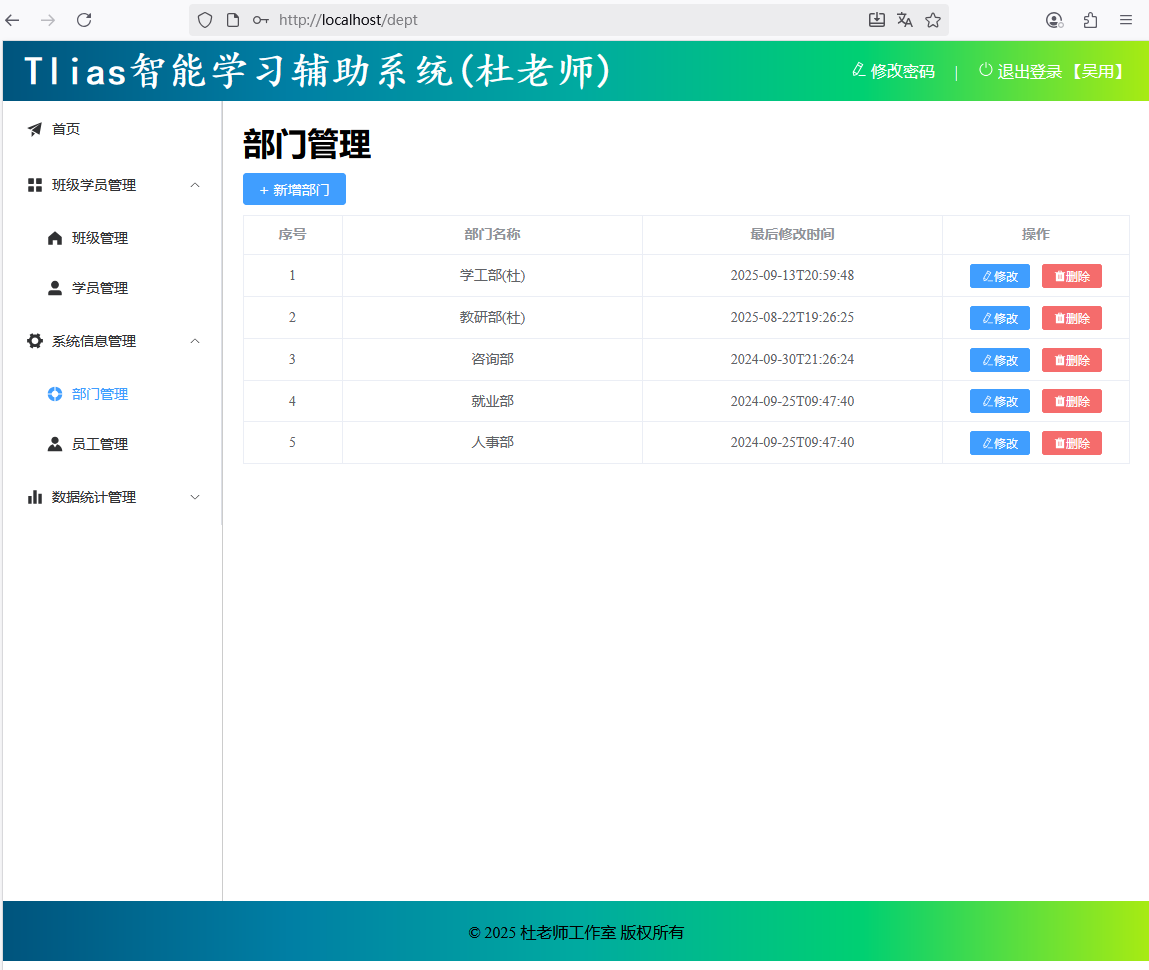 图25 前端部署验证
#### 小结
前端项目的打包部署
* 打包:运行 build ---> dist
* 部署:将dist目录下的打包好的文件 ---> nginx/html 目录中
* nginx命令:
* 启动:nginx.exe
* 重载:nginx.exe -s reload
* 停止:nginx.exe -s stop
图25 前端部署验证
#### 小结
前端项目的打包部署
* 打包:运行 build ---> dist
* 部署:将dist目录下的打包好的文件 ---> nginx/html 目录中
* nginx命令:
* 启动:nginx.exe
* 重载:nginx.exe -s reload
* 停止:nginx.exe -s stop
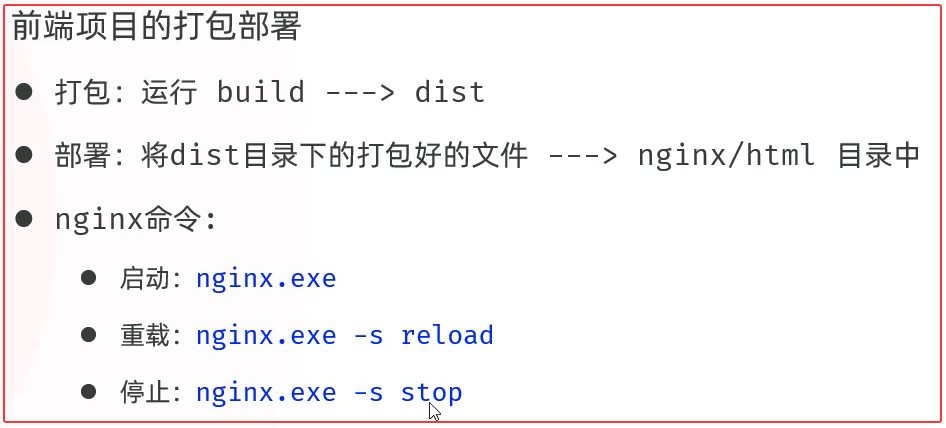 图26 小结
#### 班级、学员管理自行完成
图26 小结
#### 班级、学员管理自行完成
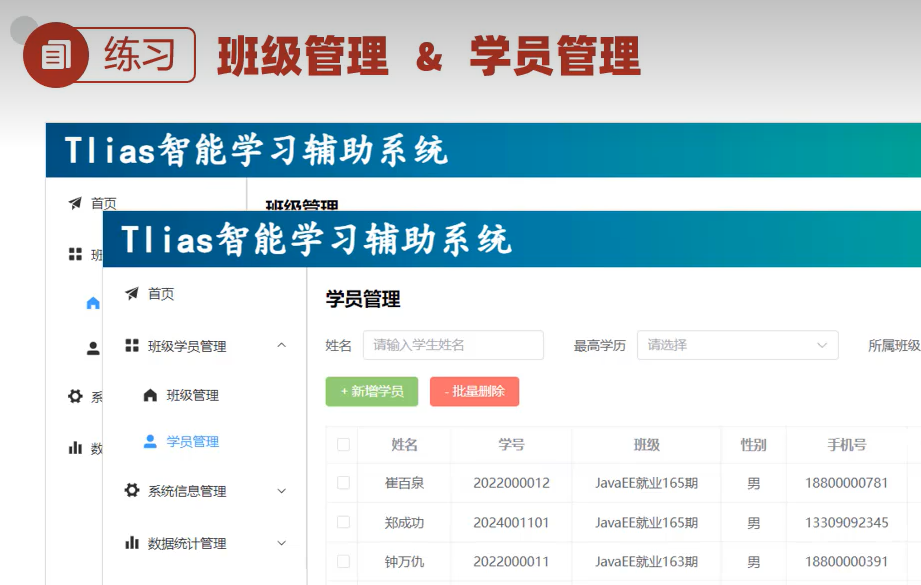 图27 班级管理、学员管理自行完成