## Day16 Web前端实战(案例):整体布局、 部门管理
---
##### 目录
* 开发模式
* 整体布局
* 部门管理
#### Tlias智能学习辅助系统
* 开发模式
* 整体布局
* 部门管理
* 员工管理
* 登录/退出
* 班级管理(自己实现)
* 学员管理(自己实现)
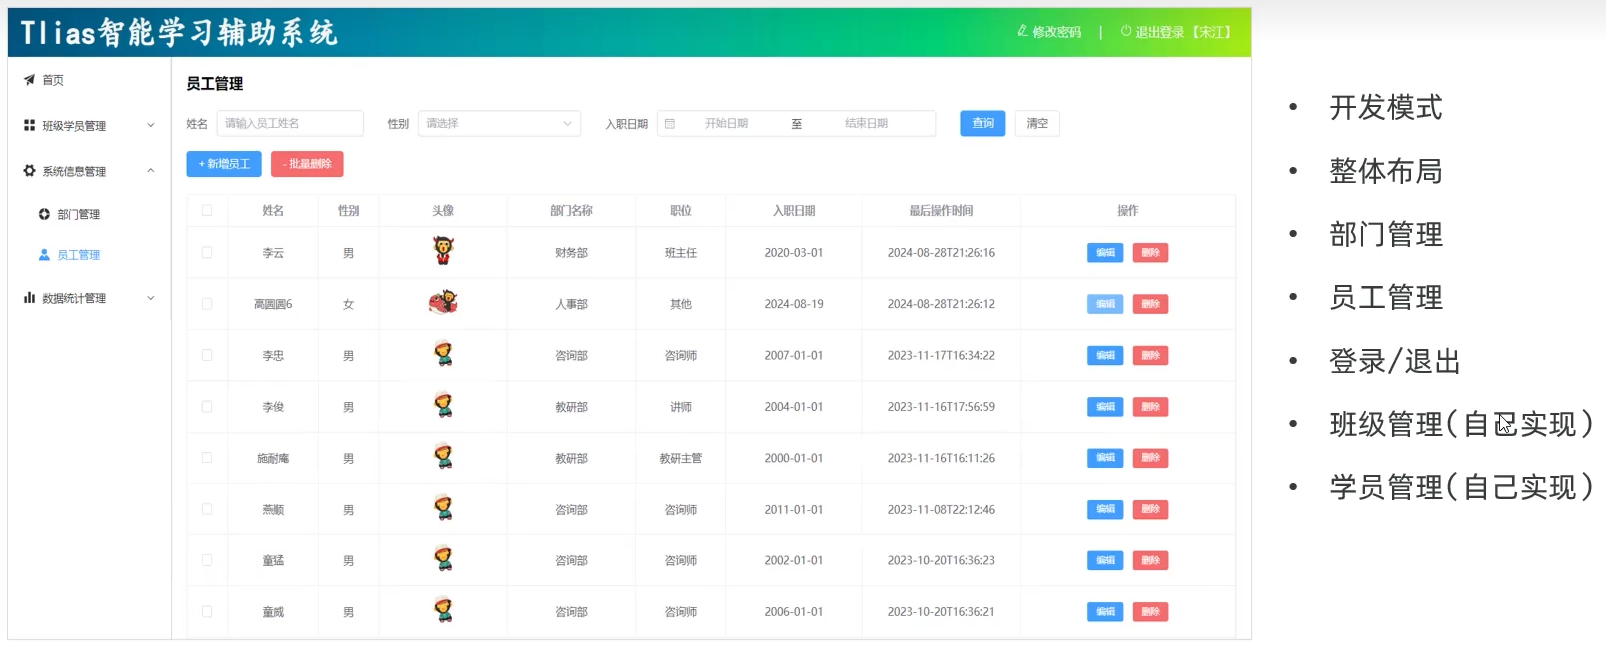 图1 Tlias智能学习辅助系统开发步骤
### 1. 开发模式
#### 前后端分离开发
* 当前最为主流的开发模式:前后端分离
图1 Tlias智能学习辅助系统开发步骤
### 1. 开发模式
#### 前后端分离开发
* 当前最为主流的开发模式:前后端分离
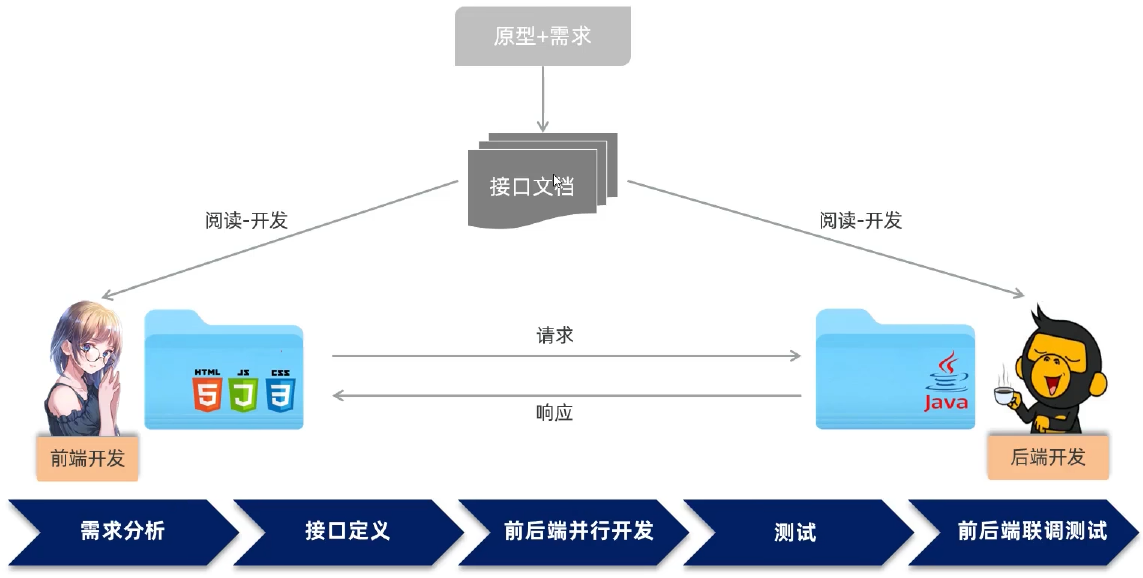 图2 前后端分离开发流程
#### 小结
什么是前后端分离开发模式?
* 前后端开发人员独立开发,独立部署
需求的开发流程?
* 需求分析 -> 接口定义 -> 前后端并行开发 -> 测试 -> 前后端联调测试
图2 前后端分离开发流程
#### 小结
什么是前后端分离开发模式?
* 前后端开发人员独立开发,独立部署
需求的开发流程?
* 需求分析 -> 接口定义 -> 前后端并行开发 -> 测试 -> 前后端联调测试
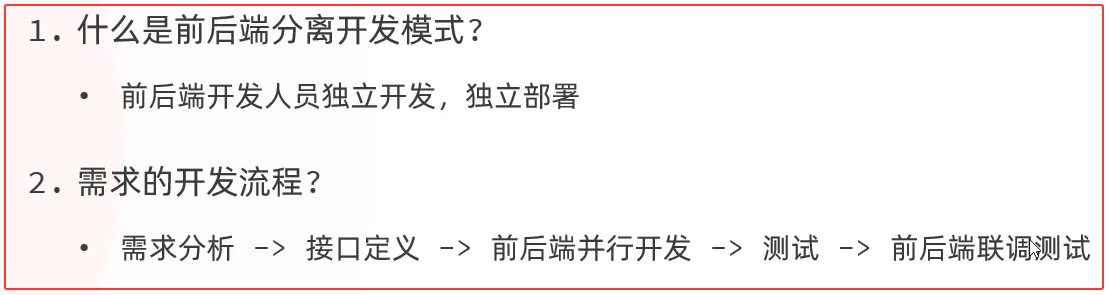 图3 小结
### 2. 整体布局
* 准备工作
* 动态菜单
图3 小结
### 2. 整体布局
* 准备工作
* 动态菜单
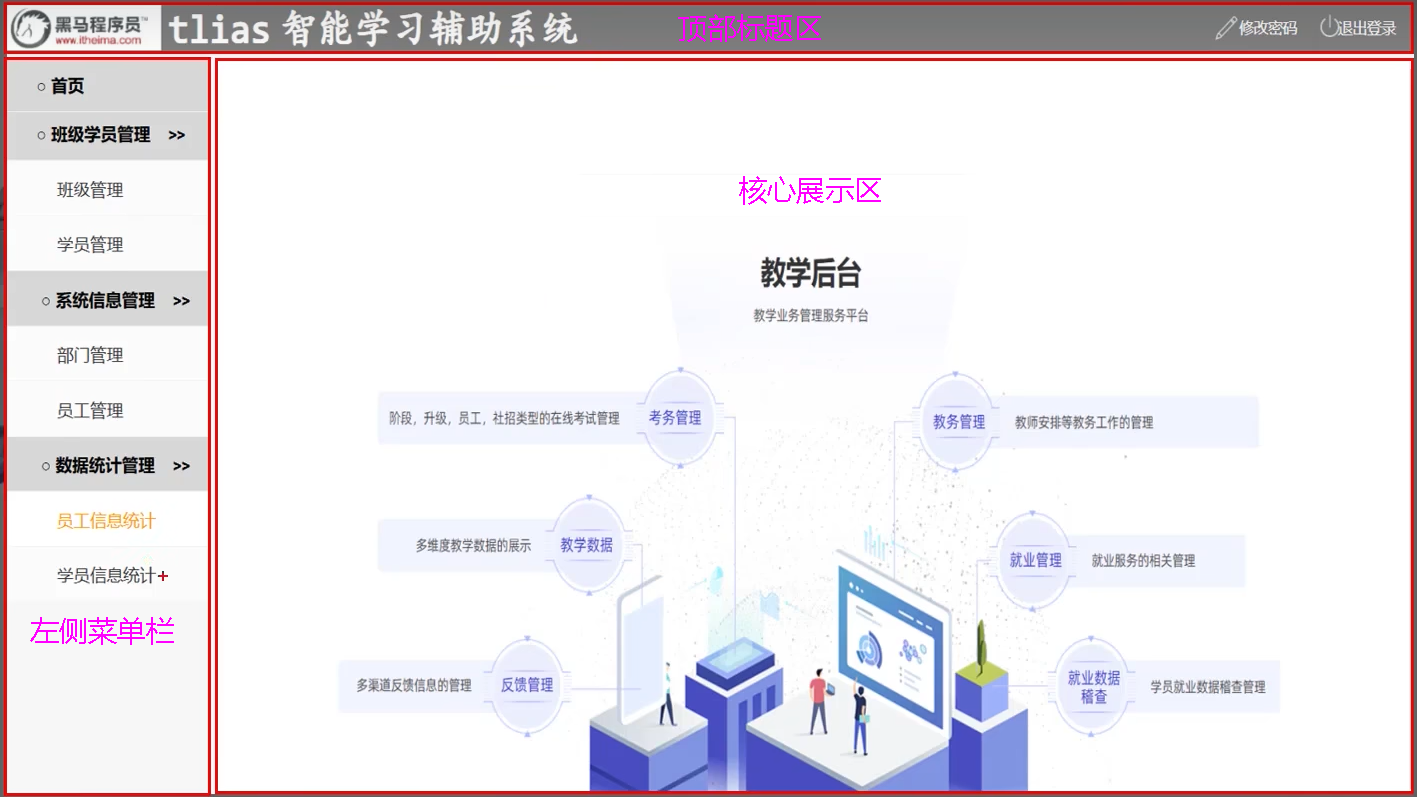 图4 整体布局
#### 2.1 准备工作
* 导入资料中准备的基础工程到VsCode 如将vue-tlias-management.zip复制到G:\workspace\duSSM\vue(个人vue工作目录)下解压
* 启动前端项目,访问该项目
##### ① index.html 单页面入口文件
绝对路径G:\workspace\duSSM\vue\vue-tlias-management\index.html,修改其中的title内容
```html
Tlias智能学习辅助系统(杜老师)
```
##### ② src\main.js js入口文件
```javascript
// 引入Vue、根组件、vue路由
import { createApp } from 'vue'
import App from './App.vue'
import router from './router'
// 引入ElementPlus
import ElementPlus from 'element-plus'
import 'element-plus/dist/index.css'
import zhCn from 'element-plus/es/locale/lang/zh-cn'
import * as ElementPlusIconsVue from '@element-plus/icons-vue'
// 引入样式
import './assets/main.css'
// 创建Vue实例并使用路由、ElementPlus、图标、并挂载到#app
const app = createApp(App)
app.use(router)
app.use(ElementPlus, {locale: zhCn})
for (const [key, component] of Object.entries(ElementPlusIconsVue)) {
app.component(key, component)
}
app.mount('#app')
```
##### ③ src\App.vue 根组件
```vue
```
##### ④ src\views\layout\index.vue 布局组件
修改el-header内容
```vue
图4 整体布局
#### 2.1 准备工作
* 导入资料中准备的基础工程到VsCode 如将vue-tlias-management.zip复制到G:\workspace\duSSM\vue(个人vue工作目录)下解压
* 启动前端项目,访问该项目
##### ① index.html 单页面入口文件
绝对路径G:\workspace\duSSM\vue\vue-tlias-management\index.html,修改其中的title内容
```html
Tlias智能学习辅助系统(杜老师)
```
##### ② src\main.js js入口文件
```javascript
// 引入Vue、根组件、vue路由
import { createApp } from 'vue'
import App from './App.vue'
import router from './router'
// 引入ElementPlus
import ElementPlus from 'element-plus'
import 'element-plus/dist/index.css'
import zhCn from 'element-plus/es/locale/lang/zh-cn'
import * as ElementPlusIconsVue from '@element-plus/icons-vue'
// 引入样式
import './assets/main.css'
// 创建Vue实例并使用路由、ElementPlus、图标、并挂载到#app
const app = createApp(App)
app.use(router)
app.use(ElementPlus, {locale: zhCn})
for (const [key, component] of Object.entries(ElementPlusIconsVue)) {
app.component(key, component)
}
app.mount('#app')
```
##### ③ src\App.vue 根组件
```vue
```
##### ④ src\views\layout\index.vue 布局组件
修改el-header内容
```vue
左侧菜单栏
右侧核心展示区域
```
##### ⑤ src\views\login\index.vue 登录组件
修改``` ```内容
```vue
```
##### ⑥ src\router\index.js
```javascript
import { createRouter, createWebHistory } from 'vue-router'
const router = createRouter({
history: createWebHistory(import.meta.env.BASE_URL),
routes: [
// {
// path: '/',
// name: 'home',
// component: HomeView
// },
// {
// path: '/about',
// name: 'about',
// component: () => import('../views/AboutView.vue')
// }
]
})
export default router
```
##### ⑦ 其他组件
src\views\clazz\index.vue,其他组件初始代码类同
```vue
班级管理
```
| 组件 | 组件相对路径 | template内容 |
| --------------------- | ------------------------------ | ---------------------------------------- |
| 首页组件 | src\views\index\index.vue | ``` ``` |
| 班级管理组件 | src\views\clazz\index.vue | 班级管理 |
| 学员管理组件 | src\views\stu\index.vue | 学员管理 |
| 部门管理组件 | src\views\dept\index.vue | 部门管理 |
| 员工管理组件 | src\views\emp\index.vue | 员工管理 |
| 学员信息统计组件 | src\views\report\stu\index.vue | 学员信息统计 |
| 员工信息统计组件 | src\views\report\emp\index.vue | 员工信息统计 |
| 日志管理组件 | src\views\log\index.vue | 日志管理 |
| | | |
| 布局组件 | src\views\layout\index.vue | |
| 登录组件 | src\views\login\index.vue | |
``` |
| 班级管理组件 | src\views\clazz\index.vue | 班级管理 |
| 学员管理组件 | src\views\stu\index.vue | 学员管理 |
| 部门管理组件 | src\views\dept\index.vue | 部门管理 |
| 员工管理组件 | src\views\emp\index.vue | 员工管理 |
| 学员信息统计组件 | src\views\report\stu\index.vue | 学员信息统计 |
| 员工信息统计组件 | src\views\report\emp\index.vue | 员工信息统计 |
| 日志管理组件 | src\views\log\index.vue | 日志管理 |
| | | |
| 布局组件 | src\views\layout\index.vue | |
| 登录组件 | src\views\login\index.vue | |
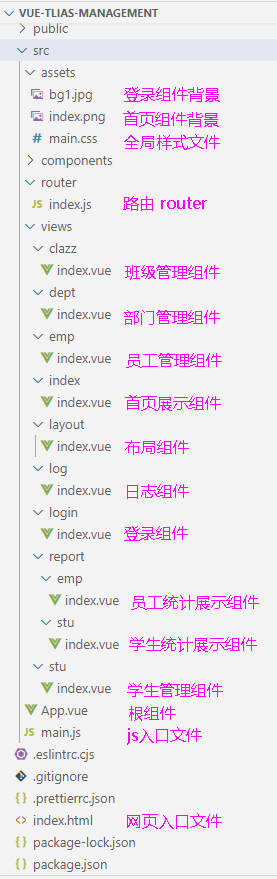 图5 源代码目录
#### Container 布局容器
``:外层容器。
当子元素中包含 `` 或 `` 时,全部子元素会垂直上下排列, 否则会水平左右排列。
``:顶栏容器。
``:侧边栏容器。
``:主要区域容器。
``:底栏容器。
##### src\views\layout\index.vue 布局组件 主要布局如下
```vue
顶部标题
左侧菜单栏
右侧核心展示区域
图5 源代码目录
#### Container 布局容器
``:外层容器。
当子元素中包含 `` 或 `` 时,全部子元素会垂直上下排列, 否则会水平左右排列。
``:顶栏容器。
``:侧边栏容器。
``:主要区域容器。
``:底栏容器。
##### src\views\layout\index.vue 布局组件 主要布局如下
```vue
顶部标题
左侧菜单栏
右侧核心展示区域
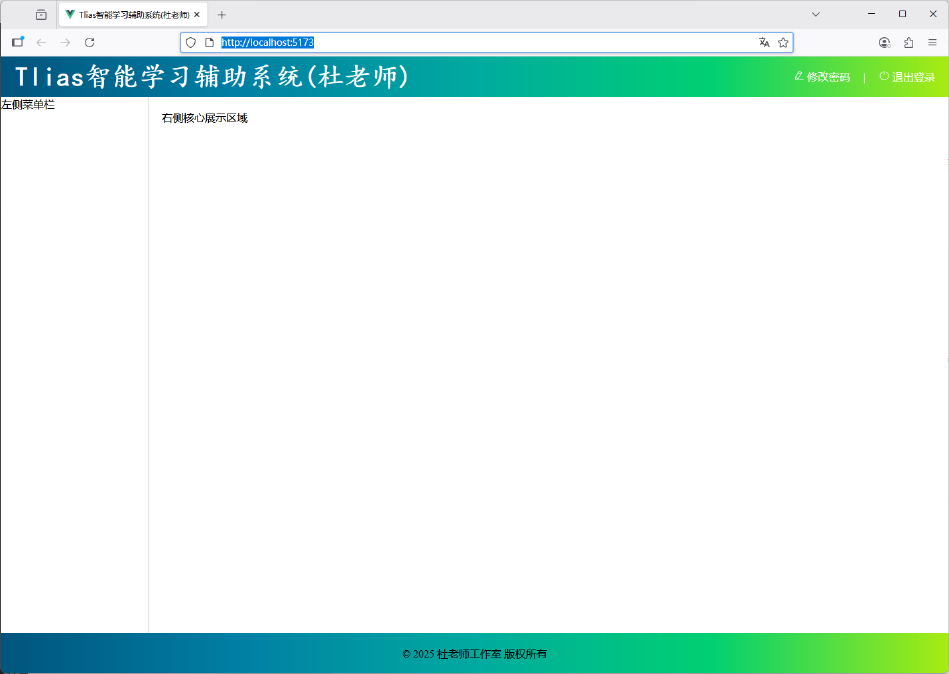 图6 页面布局验证
#### 小结
图6 页面布局验证
#### 小结
 图7 页面布局小结
#### ② 动态菜单
#### 页面布局-左侧菜单
##### src\views\layout\index.vue 左侧菜单栏 替换 下列菜单定义
```vue
首页
班级学员管理
班级管理
学员管理
系统信息管理
部门管理
员工管理
数据统计管理
员工信息统计
学员信息统计
日志信息统计
```
图7 页面布局小结
#### ② 动态菜单
#### 页面布局-左侧菜单
##### src\views\layout\index.vue 左侧菜单栏 替换 下列菜单定义
```vue
首页
班级学员管理
班级管理
学员管理
系统信息管理
部门管理
员工管理
数据统计管理
员工信息统计
学员信息统计
日志信息统计
```
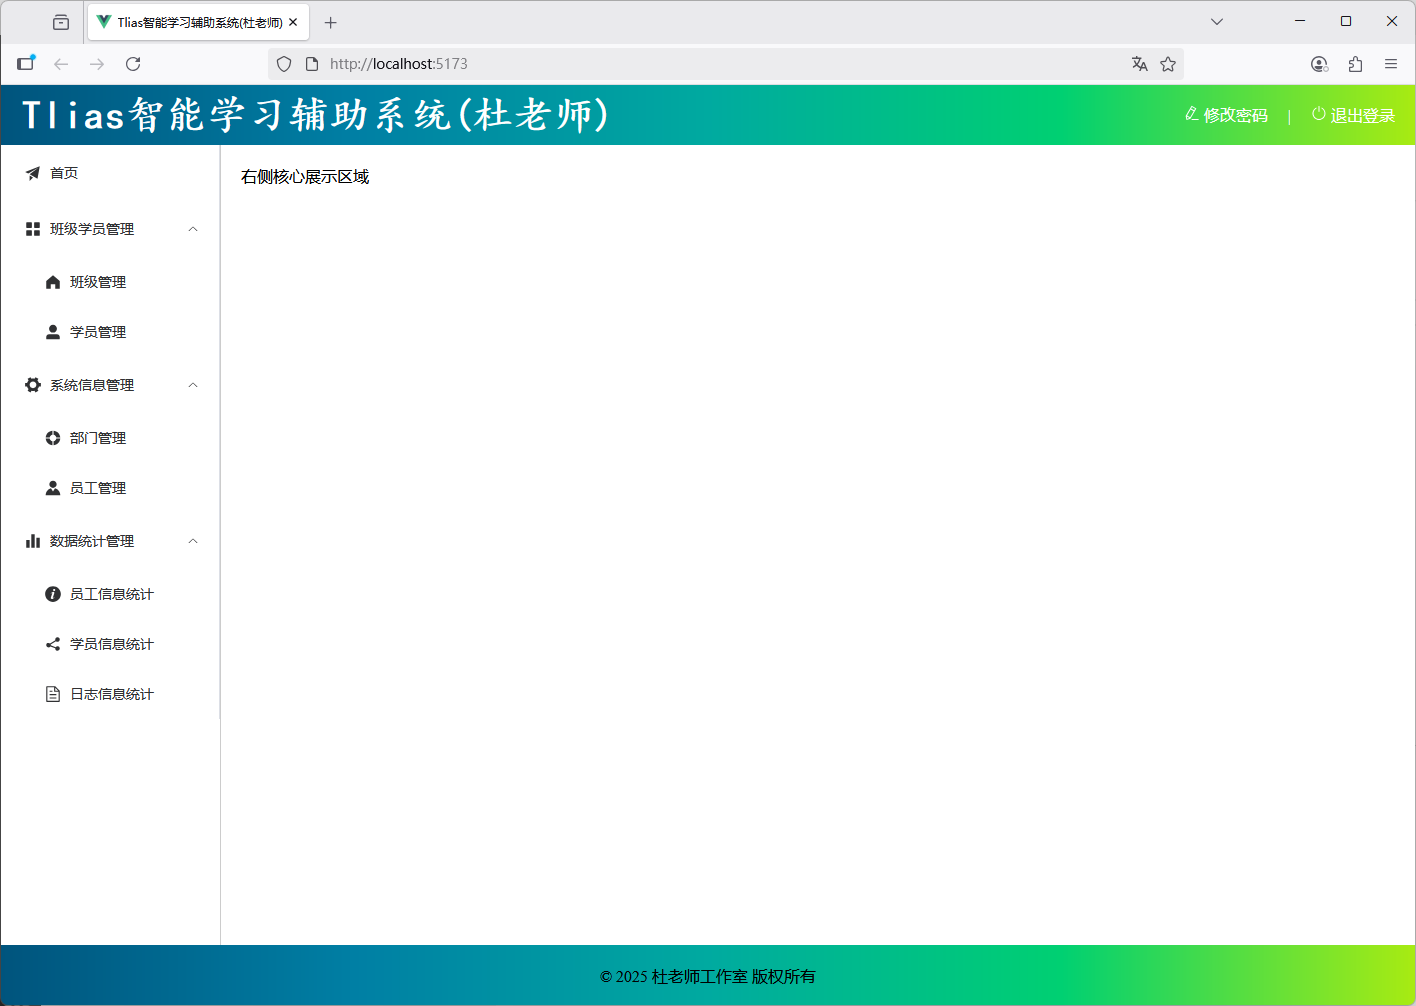 图8 左侧菜单栏验证
##### Vue Router
* Vue Router:Vue的官方路由。为Vue提供富有表现力、可配置的、方便的路由。(https://router.vuejs.org/zh)
* 客户端路由的作用是在单页应用 (SPA) 中将浏览器的 URL 和用户看到的内容绑定起来。当用户在应用中浏览不同页面时,URL 会随之更新,但页面不需要从服务器重新加载。
* Vue中的路由:路径 与 组件 的对应关系。
* 组成:
* Router实例:路由实例,基于createRouter函数创建,维护了应用的路由信息。
* ``````:路由链接组件,浏览器会解析成超链接``。
* ``````:动态视图组件,用来渲染展示与路由路径对应的组件。
图8 左侧菜单栏验证
##### Vue Router
* Vue Router:Vue的官方路由。为Vue提供富有表现力、可配置的、方便的路由。(https://router.vuejs.org/zh)
* 客户端路由的作用是在单页应用 (SPA) 中将浏览器的 URL 和用户看到的内容绑定起来。当用户在应用中浏览不同页面时,URL 会随之更新,但页面不需要从服务器重新加载。
* Vue中的路由:路径 与 组件 的对应关系。
* 组成:
* Router实例:路由实例,基于createRouter函数创建,维护了应用的路由信息。
* ``````:路由链接组件,浏览器会解析成超链接``。
* ``````:动态视图组件,用来渲染展示与路由路径对应的组件。
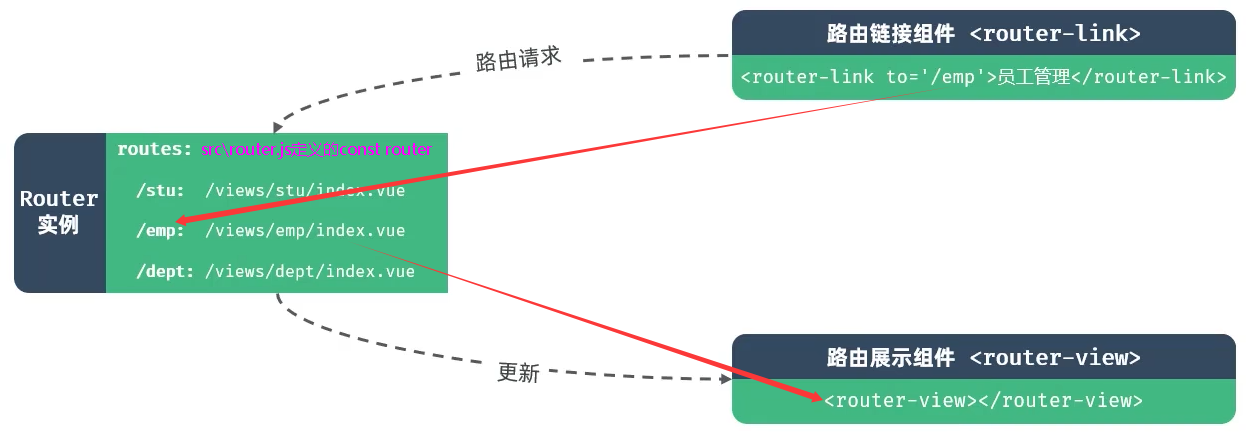 图9 Vue Router三个组成
##### src\views\layout\index.vue 左侧菜单栏 替换 下列菜单定义
```vue
```
* ``````:是否启用vue-router模式。启用该模式会在激活导航时以index作为path进行路由跳转
##### src\views\layout\index.vue 修改以下2处
```vue
```
```javascript
import { createRouter, createWebHistory } from 'vue-router'
import IndexView from '@/views/index/index.vue'
import ClazzView from '@/views/clazz/index.vue'
import DeptView from '@/views/dept/index.vue'
import EmpView from '@/views/emp/index.vue'
import LogView from '@/views/log/index.vue'
import StuView from '@/views/stu/index.vue'
import EmpReportView from '@/views/report/emp/index.vue'
import StuReportView from '@/views/report/stu/index.vue'
import LayoutView from '@/views/layout/index.vue'
import LoginView from '@/views/login/index.vue'
const router = createRouter({
history: createWebHistory(import.meta.env.BASE_URL),
routes: [
{path: '/index', name: 'index', component: IndexView},
{path: '/clazz', name: 'clazz', component: ClazzView},
{path: '/stu', name: 'stu', component: StuView},
{path: '/dept', name: 'dept', component: DeptView},
{path: '/emp', name: 'emp', component: EmpView},
{path: '/log', name: 'log', component: LogView},
{path: '/empReport', name: 'empReport', component: EmpReportView},
{path: '/stuReport', name: 'stuReport', component: StuReportView},
{path: '/login', name: 'login', component: LoginView}
]
})
export default router
```
图9 Vue Router三个组成
##### src\views\layout\index.vue 左侧菜单栏 替换 下列菜单定义
```vue
```
* ``````:是否启用vue-router模式。启用该模式会在激活导航时以index作为path进行路由跳转
##### src\views\layout\index.vue 修改以下2处
```vue
```
```javascript
import { createRouter, createWebHistory } from 'vue-router'
import IndexView from '@/views/index/index.vue'
import ClazzView from '@/views/clazz/index.vue'
import DeptView from '@/views/dept/index.vue'
import EmpView from '@/views/emp/index.vue'
import LogView from '@/views/log/index.vue'
import StuView from '@/views/stu/index.vue'
import EmpReportView from '@/views/report/emp/index.vue'
import StuReportView from '@/views/report/stu/index.vue'
import LayoutView from '@/views/layout/index.vue'
import LoginView from '@/views/login/index.vue'
const router = createRouter({
history: createWebHistory(import.meta.env.BASE_URL),
routes: [
{path: '/index', name: 'index', component: IndexView},
{path: '/clazz', name: 'clazz', component: ClazzView},
{path: '/stu', name: 'stu', component: StuView},
{path: '/dept', name: 'dept', component: DeptView},
{path: '/emp', name: 'emp', component: EmpView},
{path: '/log', name: 'log', component: LogView},
{path: '/empReport', name: 'empReport', component: EmpReportView},
{path: '/stuReport', name: 'stuReport', component: StuReportView},
{path: '/login', name: 'login', component: LoginView}
]
})
export default router
```
 图10 Vue Router验证1
#### 小结
Vue的路由指的是什么 ?
* Vue Router是Vue官方的路由,描述的是路径与组件的对应关系
Vue Router中的三个核心组成部分 ?
* router实例,维护了应用的路由信息(routes)
* ``````:路由链接组件
* ``````:动态视图组件
图10 Vue Router验证1
#### 小结
Vue的路由指的是什么 ?
* Vue Router是Vue官方的路由,描述的是路径与组件的对应关系
Vue Router中的三个核心组成部分 ?
* router实例,维护了应用的路由信息(routes)
* ``````:路由链接组件
* ``````:动态视图组件
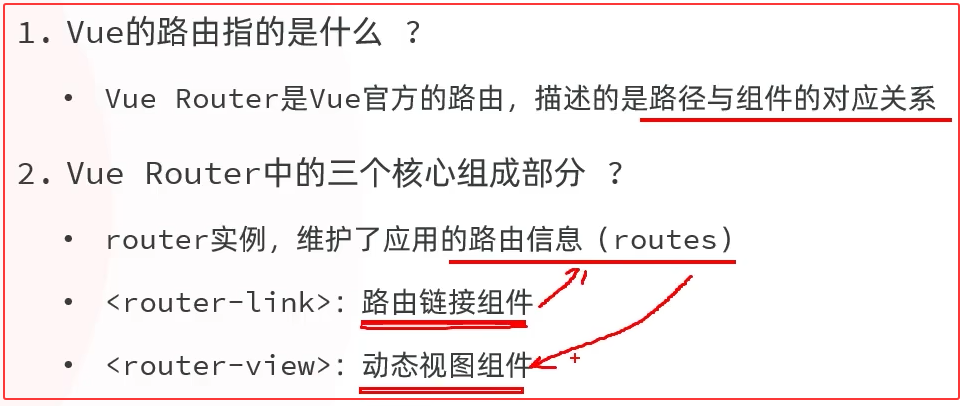 图11 Vue的路由小结
#### 案例路由实现
图11 Vue的路由小结
#### 案例路由实现
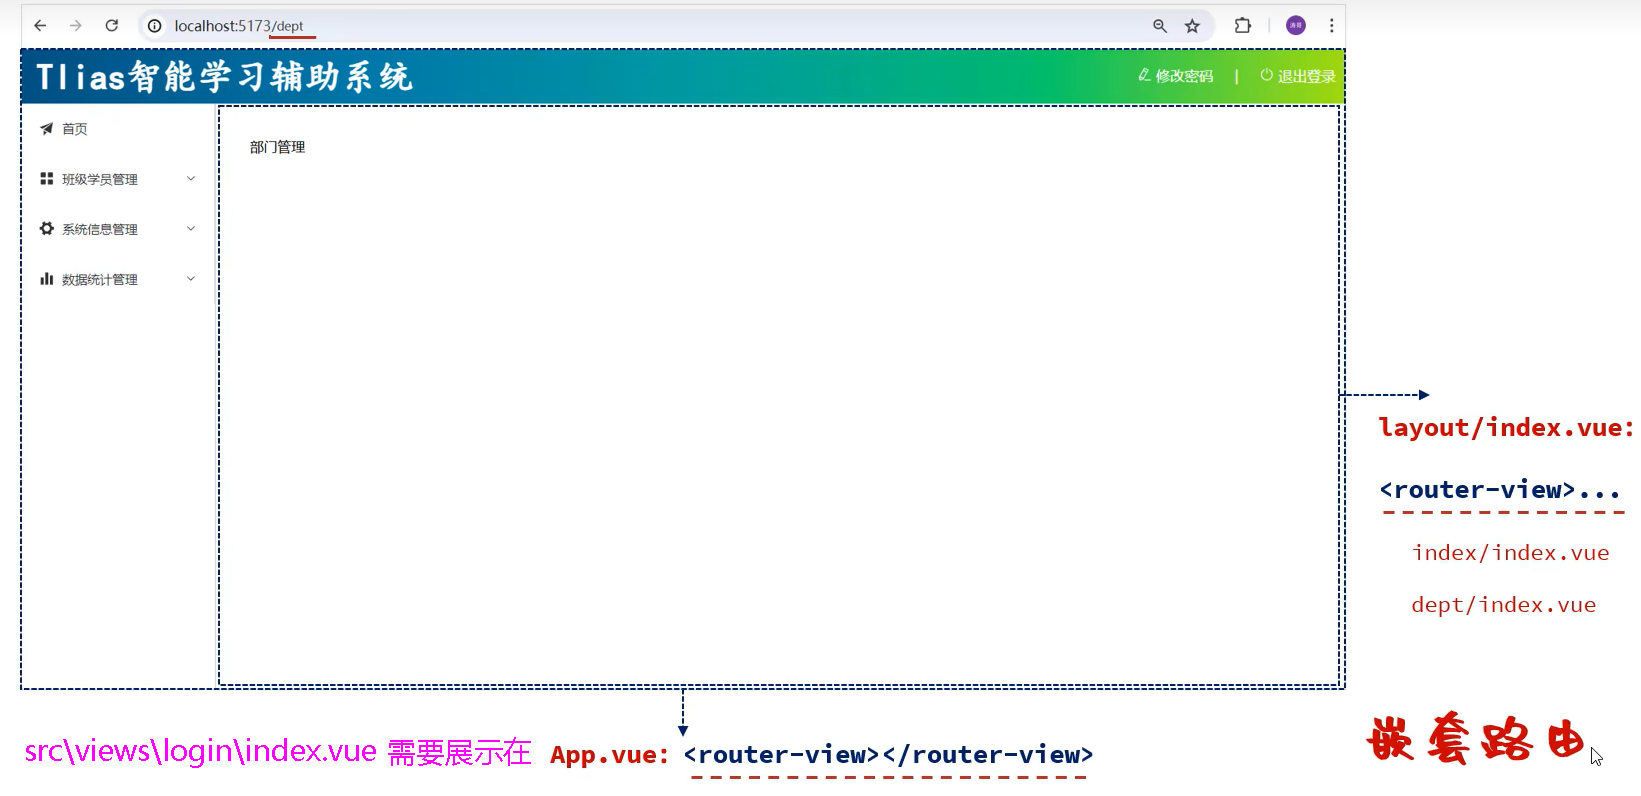 图12 嵌套路由
##### src\App.vue
```vue
```
##### src\router\index.js
```javascript
import { createRouter, createWebHistory } from 'vue-router'
import IndexView from '@/views/index/index.vue'
import ClazzView from '@/views/clazz/index.vue'
import DeptView from '@/views/dept/index.vue'
import EmpView from '@/views/emp/index.vue'
import LogView from '@/views/log/index.vue'
import StuView from '@/views/stu/index.vue'
import EmpReportView from '@/views/report/emp/index.vue'
import StuReportView from '@/views/report/stu/index.vue'
import LayoutView from '@/views/layout/index.vue'
import LoginView from '@/views/login/index.vue'
const router = createRouter({
history: createWebHistory(import.meta.env.BASE_URL),
routes: [
{
path: '/', name: '', component: LayoutView, redirect: '/index', //重定向
children: [
{path: 'index', name: 'index', component: IndexView},
{path: 'clazz', name: 'clazz', component: ClazzView},
{path: 'stu', name: 'stu', component: StuView},
{path: 'dept', name: 'dept', component: DeptView},
{path: 'emp', name: 'emp', component: EmpView},
{path: 'log', name: 'log', component: LogView},
{path: 'empReport', name: 'empReport', component: EmpReportView},
{path: 'stuReport', name: 'stuReport', component: StuReportView}
]
},
{path: '/login', name: 'login', component: LoginView}
]
})
export default router
```
图12 嵌套路由
##### src\App.vue
```vue
```
##### src\router\index.js
```javascript
import { createRouter, createWebHistory } from 'vue-router'
import IndexView from '@/views/index/index.vue'
import ClazzView from '@/views/clazz/index.vue'
import DeptView from '@/views/dept/index.vue'
import EmpView from '@/views/emp/index.vue'
import LogView from '@/views/log/index.vue'
import StuView from '@/views/stu/index.vue'
import EmpReportView from '@/views/report/emp/index.vue'
import StuReportView from '@/views/report/stu/index.vue'
import LayoutView from '@/views/layout/index.vue'
import LoginView from '@/views/login/index.vue'
const router = createRouter({
history: createWebHistory(import.meta.env.BASE_URL),
routes: [
{
path: '/', name: '', component: LayoutView, redirect: '/index', //重定向
children: [
{path: 'index', name: 'index', component: IndexView},
{path: 'clazz', name: 'clazz', component: ClazzView},
{path: 'stu', name: 'stu', component: StuView},
{path: 'dept', name: 'dept', component: DeptView},
{path: 'emp', name: 'emp', component: EmpView},
{path: 'log', name: 'log', component: LogView},
{path: 'empReport', name: 'empReport', component: EmpReportView},
{path: 'stuReport', name: 'stuReport', component: StuReportView}
]
},
{path: '/login', name: 'login', component: LoginView}
]
})
export default router
```
 图13 Vue Router验证2
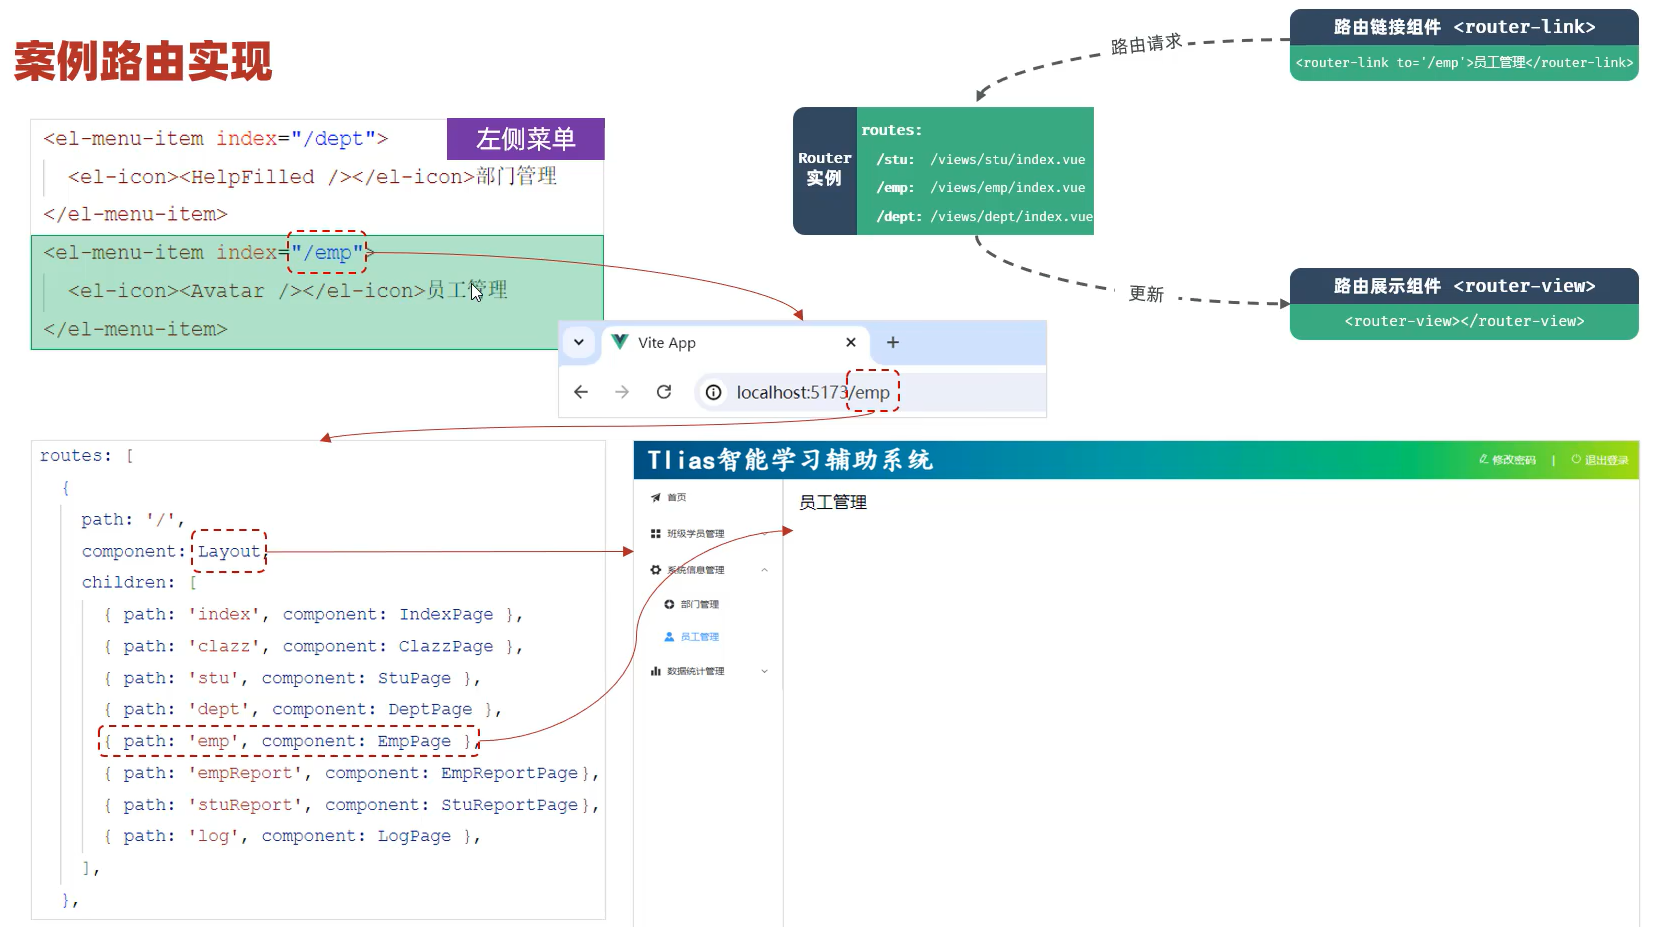 图14 嵌套路由
### 3. 部门管理
* 列表查询
* 新增部门
* 修改部门
* 删除部门
#### ① 列表查询
#### 列表查询-页面布局
* 根据页面原型、需求说明、接口文档,先完成页面的基本布局。
* Button按钮组件
* Table表格组件
图14 嵌套路由
### 3. 部门管理
* 列表查询
* 新增部门
* 修改部门
* 删除部门
#### ① 列表查询
#### 列表查询-页面布局
* 根据页面原型、需求说明、接口文档,先完成页面的基本布局。
* Button按钮组件
* Table表格组件
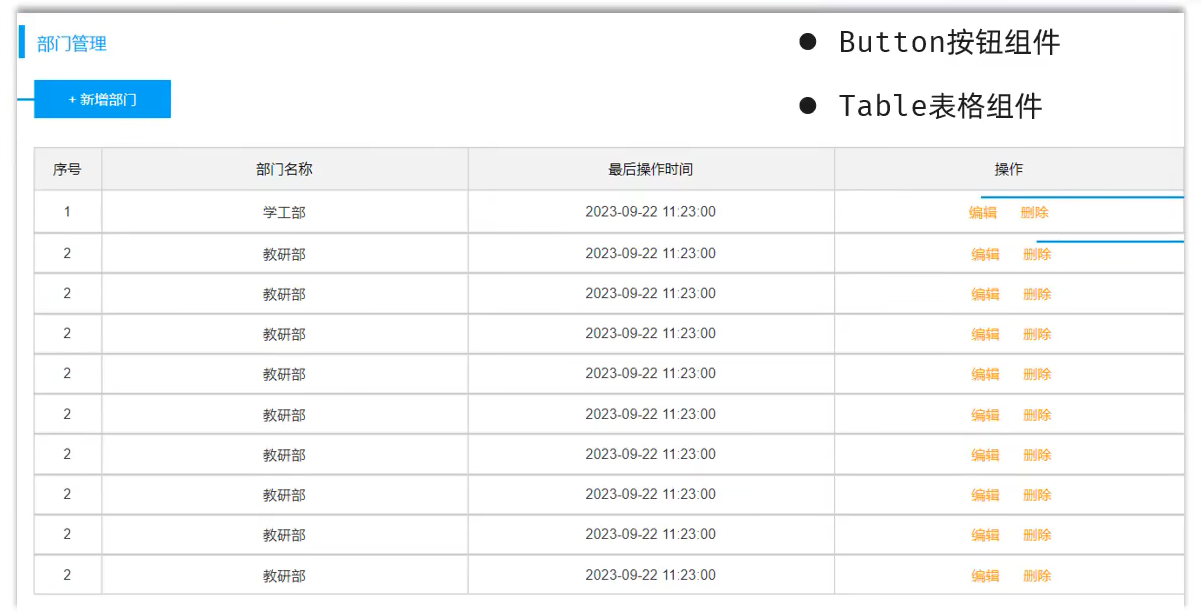 图15 部门管理基本布局
##### src\views\dept\index.vue
```vue
图15 部门管理基本布局
##### src\views\dept\index.vue
```vue
部门管理
+ 新增部门
修改
删除
```
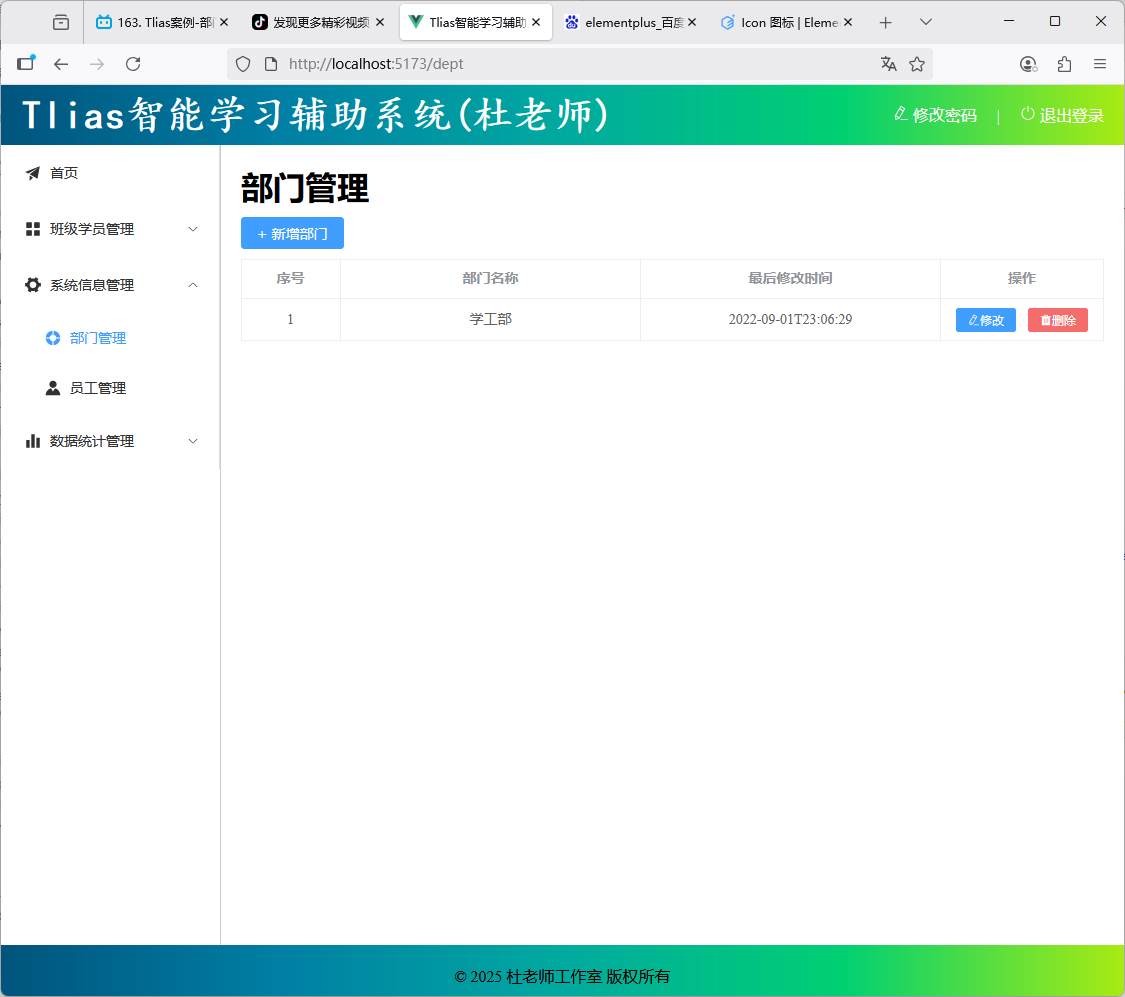 图16 部门管理基本布局验证
* 根据需求,需要在打开页面之后,需要自动加载全部部门数据,展示在表格中。
* 前后端分离开发模式中,前后端是并行开发的,前端如何进行接口请求测试?
* Mock.js来生成测试的假数据
* 基于Apifox提供的Mock服务进行测试
##### src\views\dept\index.vue
```vue
图16 部门管理基本布局验证
* 根据需求,需要在打开页面之后,需要自动加载全部部门数据,展示在表格中。
* 前后端分离开发模式中,前后端是并行开发的,前端如何进行接口请求测试?
* Mock.js来生成测试的假数据
* 基于Apifox提供的Mock服务进行测试
##### src\views\dept\index.vue
```vue
部门管理
+ 新增部门
修改
删除
```
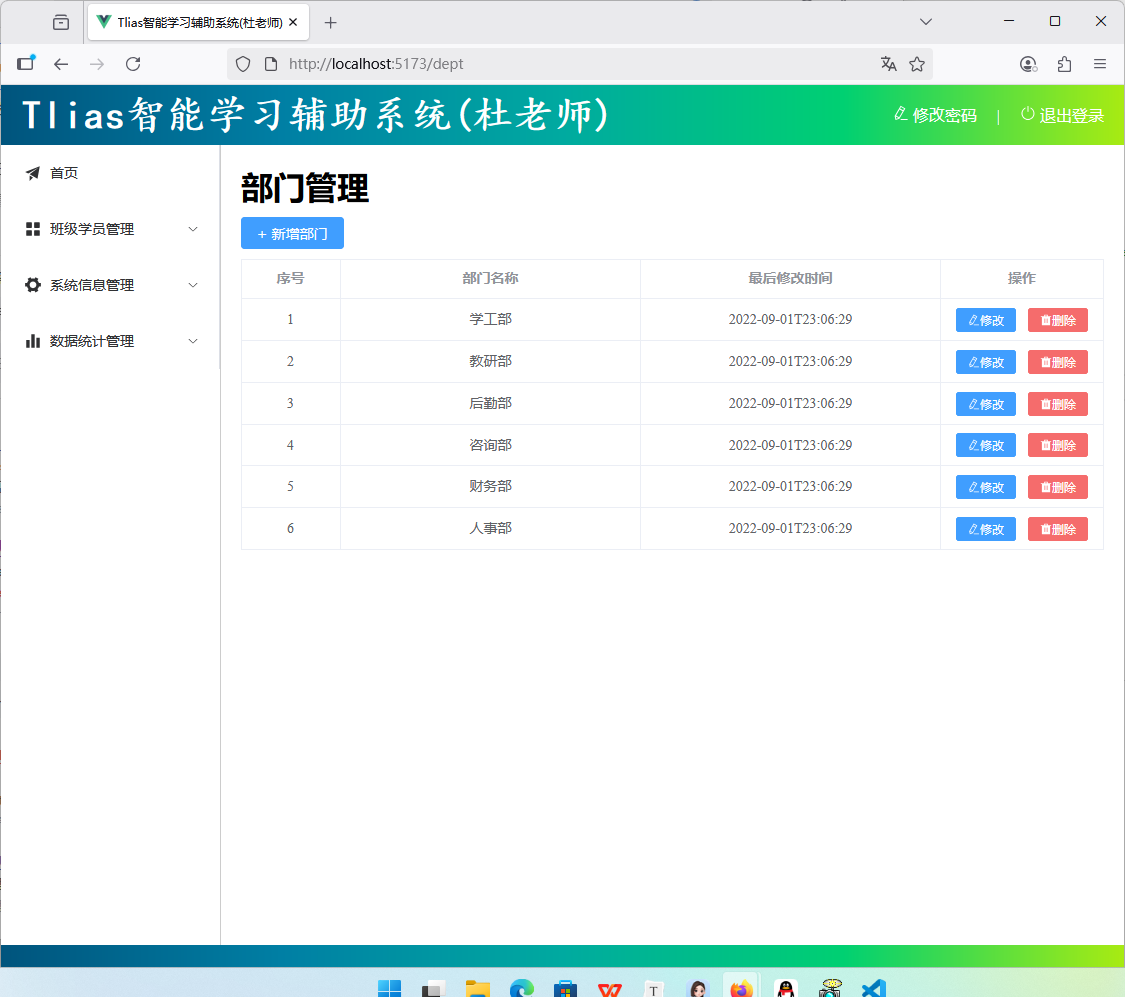 图17 自动加载全部部门数据验证
#### 小结
动态加载部门列表数据
* 钩子函数 onMounted
* Axios发送异步请求
#### 列表查询-程序优化
图17 自动加载全部部门数据验证
#### 小结
动态加载部门列表数据
* 钩子函数 onMounted
* Axios发送异步请求
#### 列表查询-程序优化
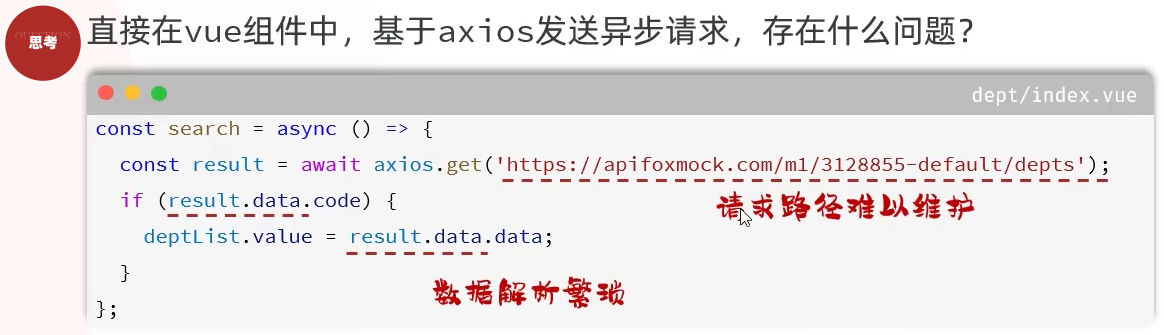 图18 查询优化问题
* 为解决上述问题,我们在前端项目开发时,通常会定义一个请求处理的工具类 – request.js 。
* 与服务端进行异步交互的逻辑,通常会封装到一个单独的api中,如:dept.js 。
图18 查询优化问题
* 为解决上述问题,我们在前端项目开发时,通常会定义一个请求处理的工具类 – request.js 。
* 与服务端进行异步交互的逻辑,通常会封装到一个单独的api中,如:dept.js 。
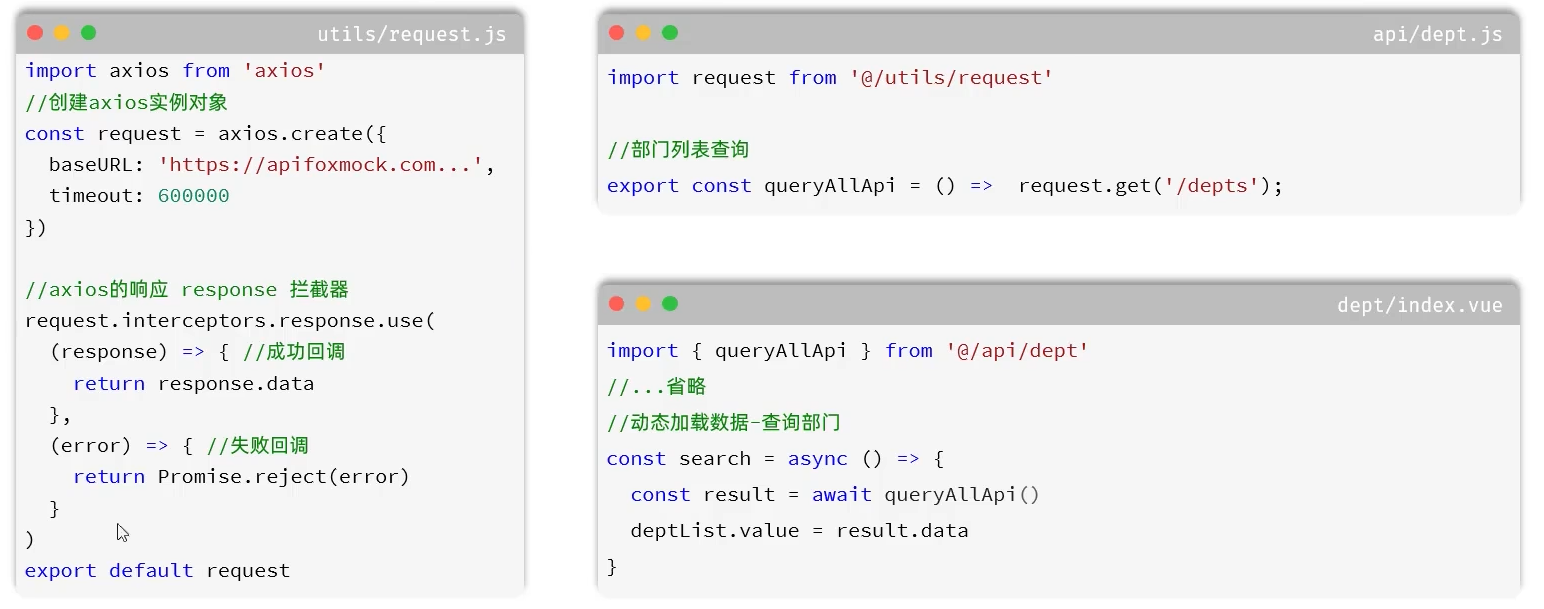 图19 列表查询-程序优化
##### src\utils\request.js
```javascript
import axios from 'axios'
import { ElMessage } from 'element-plus'
import router from '../router'
//创建axios实例对象
const request = axios.create({
baseURL: 'https://apifoxmock.com/m1/3128855-1224313-default/', //'/api',
timeout: 600000
})
//axios的响应 response 拦截器
request.interceptors.response.use(
(response) => { //成功回调
return response.data
},
(error) => { //失败回调
return Promise.reject(error)
}
)
export default request
```
##### src\api\dept.js
```js
import request from '@/utils/request'
//部门列表查询
export const queryAllApi = () => request.get('/depts');
//部门添加
//部门删除
//部门详情查询
//部门修改
```
##### src\views\dept\index.vue
```vue
图19 列表查询-程序优化
##### src\utils\request.js
```javascript
import axios from 'axios'
import { ElMessage } from 'element-plus'
import router from '../router'
//创建axios实例对象
const request = axios.create({
baseURL: 'https://apifoxmock.com/m1/3128855-1224313-default/', //'/api',
timeout: 600000
})
//axios的响应 response 拦截器
request.interceptors.response.use(
(response) => { //成功回调
return response.data
},
(error) => { //失败回调
return Promise.reject(error)
}
)
export default request
```
##### src\api\dept.js
```js
import request from '@/utils/request'
//部门列表查询
export const queryAllApi = () => request.get('/depts');
//部门添加
//部门删除
//部门详情查询
//部门修改
```
##### src\views\dept\index.vue
```vue
部门管理
+ 新增部门
修改
删除
```
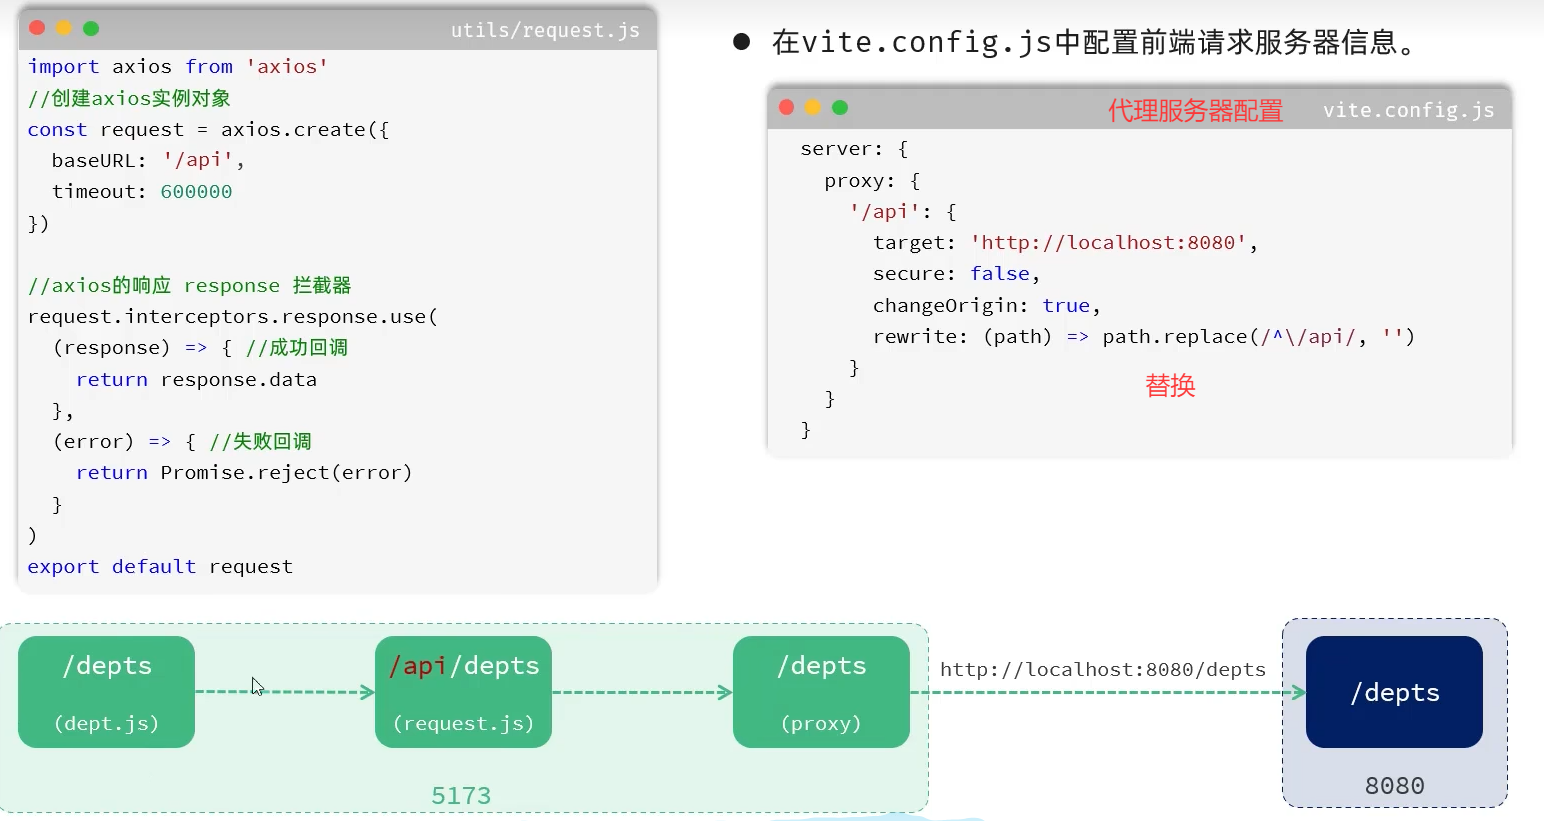 图20 配置前端代理服务器
##### vite.config.js 添加代理服务器配置
```js
server: {
proxy: {
'/api': {
target: 'http://localhost:8080',
secure: false,
changeOrigin: true,
rewrite: (path) => path.replace(/^\/api/, '')
}
}
}
```
##### src\utils\request.js 修改baseURL
```js
baseURL: '/api',
```
启动后台服务器(停止令牌检验过滤器、拦截器)后,前端测试
图20 配置前端代理服务器
##### vite.config.js 添加代理服务器配置
```js
server: {
proxy: {
'/api': {
target: 'http://localhost:8080',
secure: false,
changeOrigin: true,
rewrite: (path) => path.replace(/^\/api/, '')
}
}
}
```
##### src\utils\request.js 修改baseURL
```js
baseURL: '/api',
```
启动后台服务器(停止令牌检验过滤器、拦截器)后,前端测试
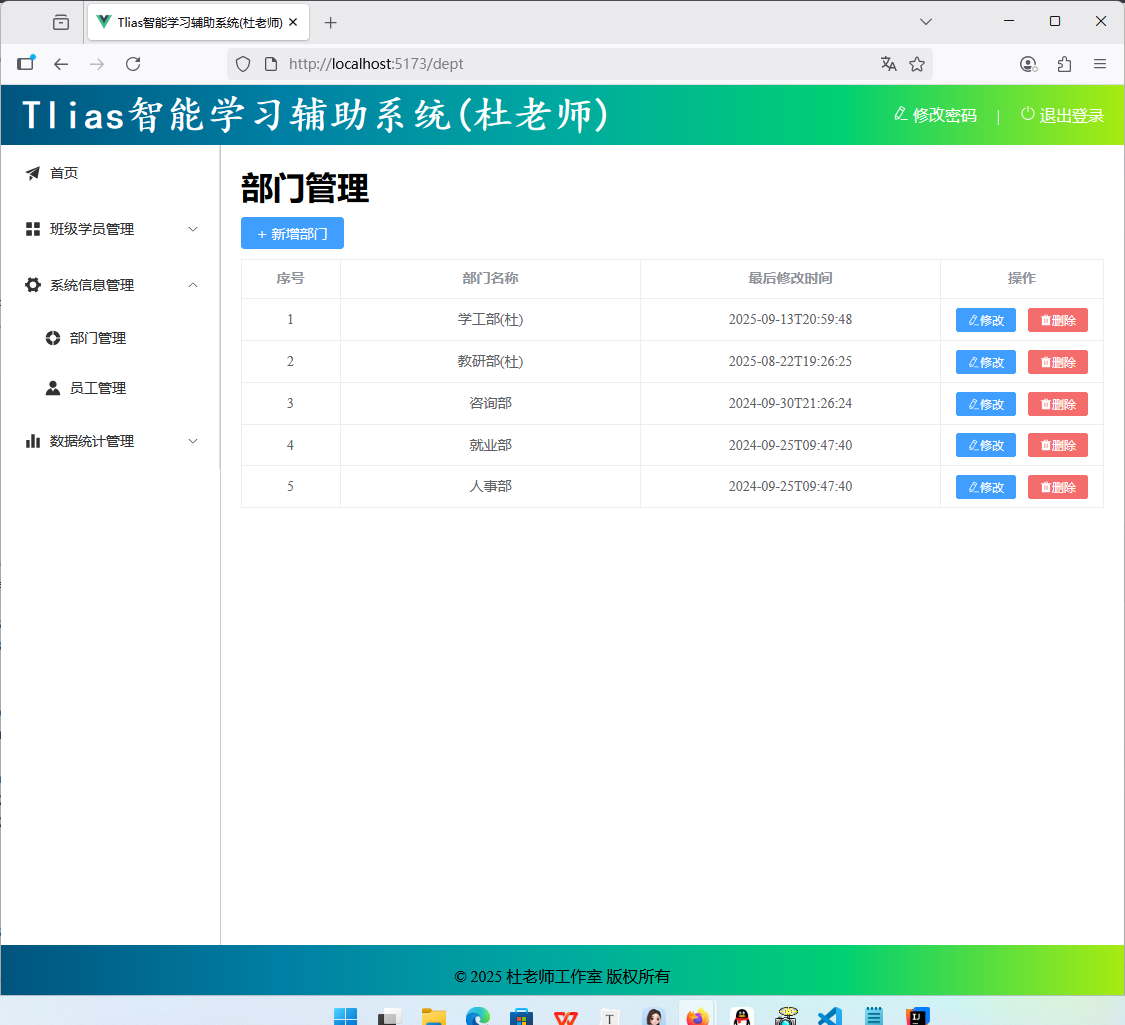 图21 启动后台服务器、前端代理服务器验证
#### 小结
请求处理工具类
* request.js:封装axios异步请求的基本信息(拦截器)
* api/xxx.js: 封装模块异步交互的代码
* vite.config.js: 配置代理规则
#### ② 新增部门
#### 新增部门
* 根据页面原型、需求说明、接口文档,先完成页面的基本布局。
* 新增部门 和 编辑部门可以共用一个Dialog对话框。
图21 启动后台服务器、前端代理服务器验证
#### 小结
请求处理工具类
* request.js:封装axios异步请求的基本信息(拦截器)
* api/xxx.js: 封装模块异步交互的代码
* vite.config.js: 配置代理规则
#### ② 新增部门
#### 新增部门
* 根据页面原型、需求说明、接口文档,先完成页面的基本布局。
* 新增部门 和 编辑部门可以共用一个Dialog对话框。
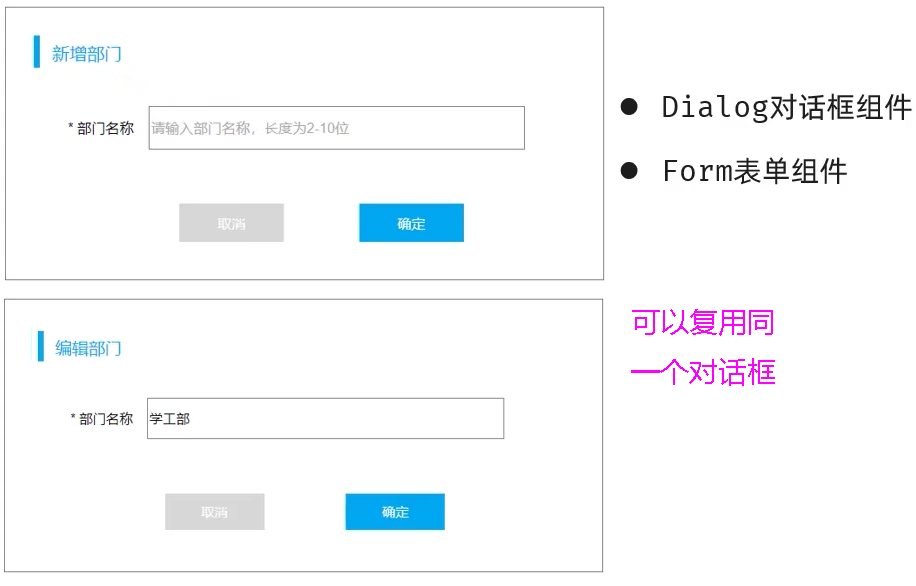 图22 新增和修改部门对话框
##### src\views\dept\index.vue 添加或修改如下代码
```vue
+ 新增部门
```
##### src\api\dept.js 添加下列代码
```js
//部门添加
export const addApi = (dept) => request.post('/depts',dept);
```
#### 新增部门-表单校验
* 在ElementPlus提供的form表单组件中,就提供了对应的表单校验的功能。 具体步骤如下:
* 定义表单校验规则,通过rules属性与表单绑定
* 通过prop属性绑定对应的表单项。
* 通过ref属性注册表单的引用,表单提交时,校验表单,校验通过,则允许提交表单。
图22 新增和修改部门对话框
##### src\views\dept\index.vue 添加或修改如下代码
```vue
+ 新增部门
```
##### src\api\dept.js 添加下列代码
```js
//部门添加
export const addApi = (dept) => request.post('/depts',dept);
```
#### 新增部门-表单校验
* 在ElementPlus提供的form表单组件中,就提供了对应的表单校验的功能。 具体步骤如下:
* 定义表单校验规则,通过rules属性与表单绑定
* 通过prop属性绑定对应的表单项。
* 通过ref属性注册表单的引用,表单提交时,校验表单,校验通过,则允许提交表单。
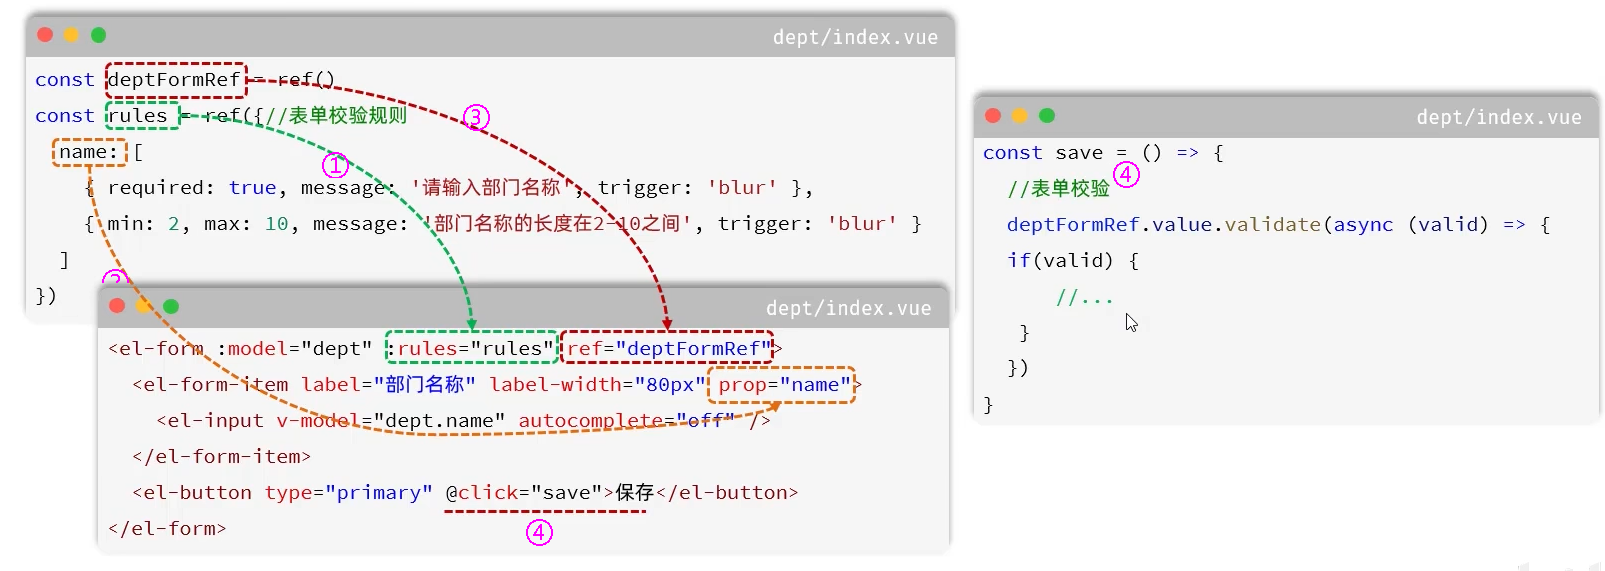 图23 新增部门-表单校验
##### src\views\dept\index.vue 添加或修改如下代码
```vue
```
图23 新增部门-表单校验
##### src\views\dept\index.vue 添加或修改如下代码
```vue
```
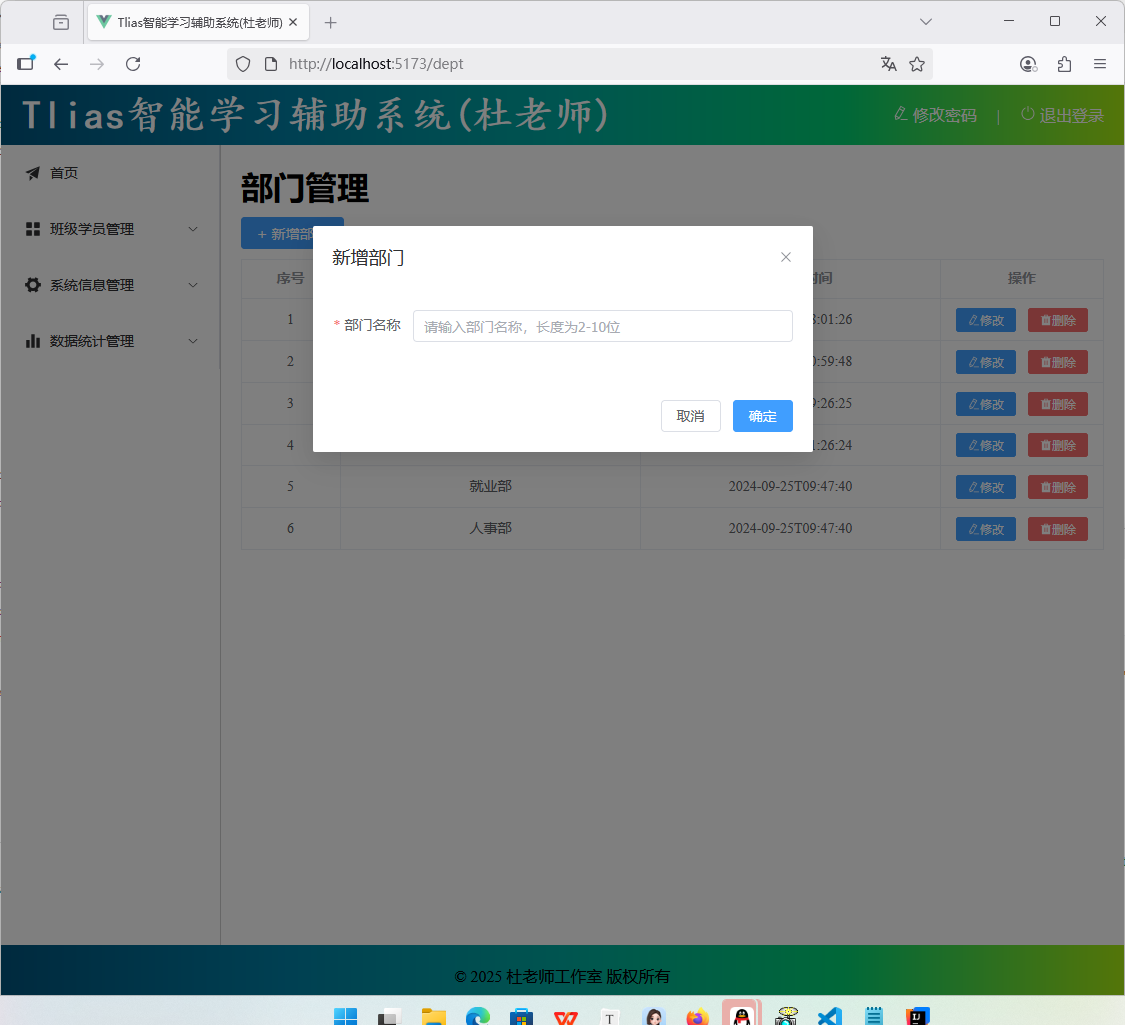 图24 新增部门验证
#### ③ 修改部门
* 对于修改操作,通常会分为两步进行:① 查询回显、② 保存修改 。
图24 新增部门验证
#### ③ 修改部门
* 对于修改操作,通常会分为两步进行:① 查询回显、② 保存修改 。
 图25
* 交互逻辑:
* 点击 编辑 按钮,根据ID进行查询,弹出对话框,完成页面回显展示。(查询回显)
* 点击 确定 按钮,保存修改后的数据,完成数据更新操作。(保存修改)
#### 查询回显
##### src\api\dept.js 添加下列代码
```js
//根部门id查询部门详情
export const queryByIdApi = (id) => request.get('/depts/'+id);
```
##### src\views\dept\index.vue 添加或修改如下代码
```vue
修改
删除
```
图25
* 交互逻辑:
* 点击 编辑 按钮,根据ID进行查询,弹出对话框,完成页面回显展示。(查询回显)
* 点击 确定 按钮,保存修改后的数据,完成数据更新操作。(保存修改)
#### 查询回显
##### src\api\dept.js 添加下列代码
```js
//根部门id查询部门详情
export const queryByIdApi = (id) => request.get('/depts/'+id);
```
##### src\views\dept\index.vue 添加或修改如下代码
```vue
修改
删除
```
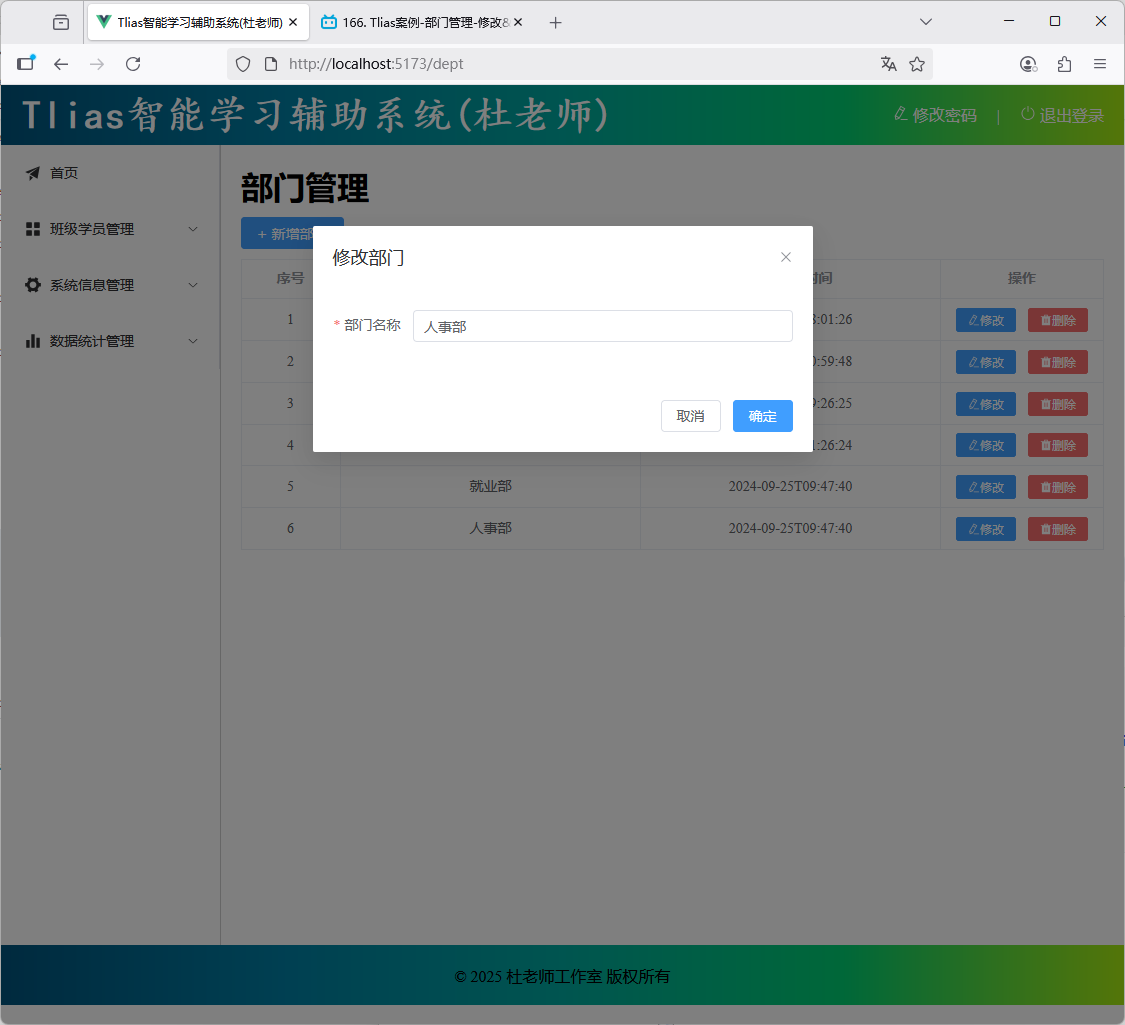 图26 修改部门数据回显验证
##### src\api\dept.js 添加下列代码
```js
//部门修改
export const updateApi = (dept) => request.put('/depts',dept);
```
##### src\views\dept\index.vue 修改如下js代码
```js
import { queryAllApi, addApi, queryByIdApi, updateApi } from '@/api/dept'
// 保存新增、修改部门
const save = async () => {
//表单校验
if(!deptFormRef.value) return;
deptFormRef.value.validate(async(valid)=>{//valid表示是否校验通过:true通过/false不通过
if(valid){//通过
//保存新增、修改部门
let result;
if(dept.value.id){//修改
result = await updateApi(dept.value);
} else { //新增
result = await addApi(dept.value);
}
if(result.code){
//提示信息
ElMessage.success(`${formTitle.value}成功`);
//关闭对话框
dialogFormVisible.value = false;
//查询
search();
} else { //失败
ElMessage.error(result.msg);
}
}else {//不通过
//提示信息
ElMessage.error('表单校验未通过');
}
})
}
```
图26 修改部门数据回显验证
##### src\api\dept.js 添加下列代码
```js
//部门修改
export const updateApi = (dept) => request.put('/depts',dept);
```
##### src\views\dept\index.vue 修改如下js代码
```js
import { queryAllApi, addApi, queryByIdApi, updateApi } from '@/api/dept'
// 保存新增、修改部门
const save = async () => {
//表单校验
if(!deptFormRef.value) return;
deptFormRef.value.validate(async(valid)=>{//valid表示是否校验通过:true通过/false不通过
if(valid){//通过
//保存新增、修改部门
let result;
if(dept.value.id){//修改
result = await updateApi(dept.value);
} else { //新增
result = await addApi(dept.value);
}
if(result.code){
//提示信息
ElMessage.success(`${formTitle.value}成功`);
//关闭对话框
dialogFormVisible.value = false;
//查询
search();
} else { //失败
ElMessage.error(result.msg);
}
}else {//不通过
//提示信息
ElMessage.error('表单校验未通过');
}
})
}
```
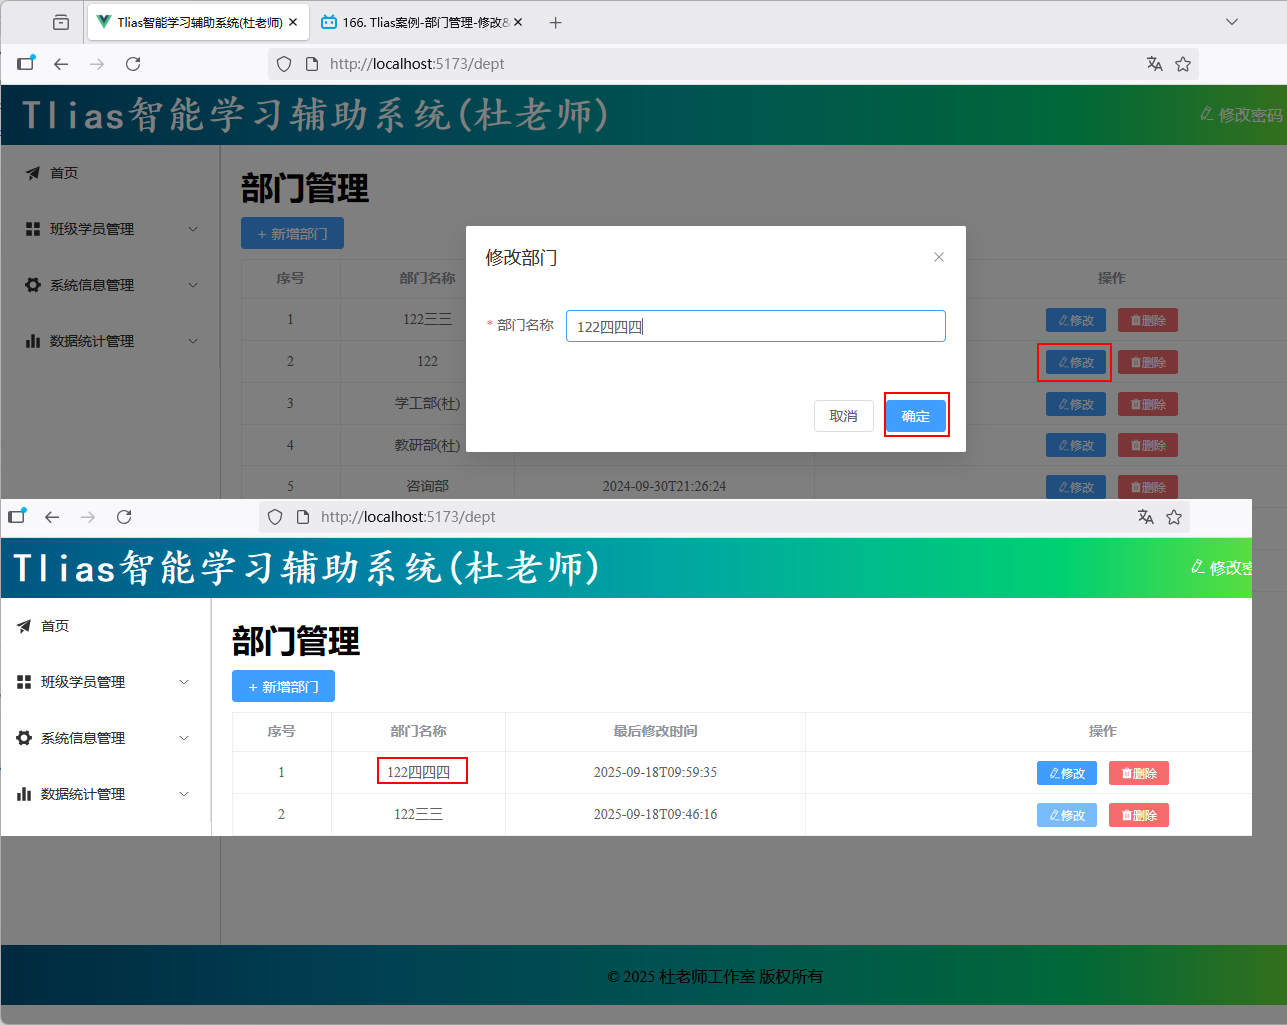 图27 修改部门保存数据验证
#### ④ 删除部门
图27 修改部门保存数据验证
#### ④ 删除部门
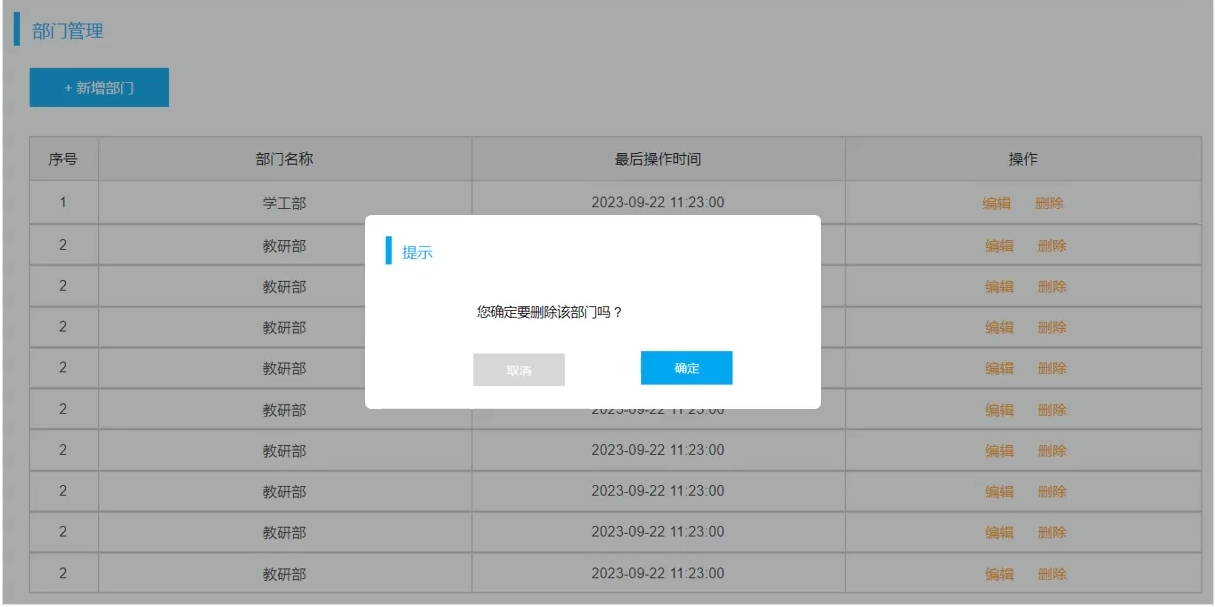 图28 删除部门需求
* 点击删除按钮,需要删除当前这条数据,删除完成之后,刷新页面,展示出最新的数据。
* 由于删除是一个比较危险的操作,为避免误操作,通常会在点击删除之后,弹出确认框进行确认。
* Element 组件:ElMessageBox消息弹出框组件
##### src\api\dept.js 添加下列代码
```js
//根部门id删除部门
export const deleteByIdApi = (id) => request.delete(`/depts?id=${id}`);
```
##### src\views\dept\index.vue 修改如下代码
```vue
修改
删除
```
图28 删除部门需求
* 点击删除按钮,需要删除当前这条数据,删除完成之后,刷新页面,展示出最新的数据。
* 由于删除是一个比较危险的操作,为避免误操作,通常会在点击删除之后,弹出确认框进行确认。
* Element 组件:ElMessageBox消息弹出框组件
##### src\api\dept.js 添加下列代码
```js
//根部门id删除部门
export const deleteByIdApi = (id) => request.delete(`/depts?id=${id}`);
```
##### src\views\dept\index.vue 修改如下代码
```vue
修改
删除
```
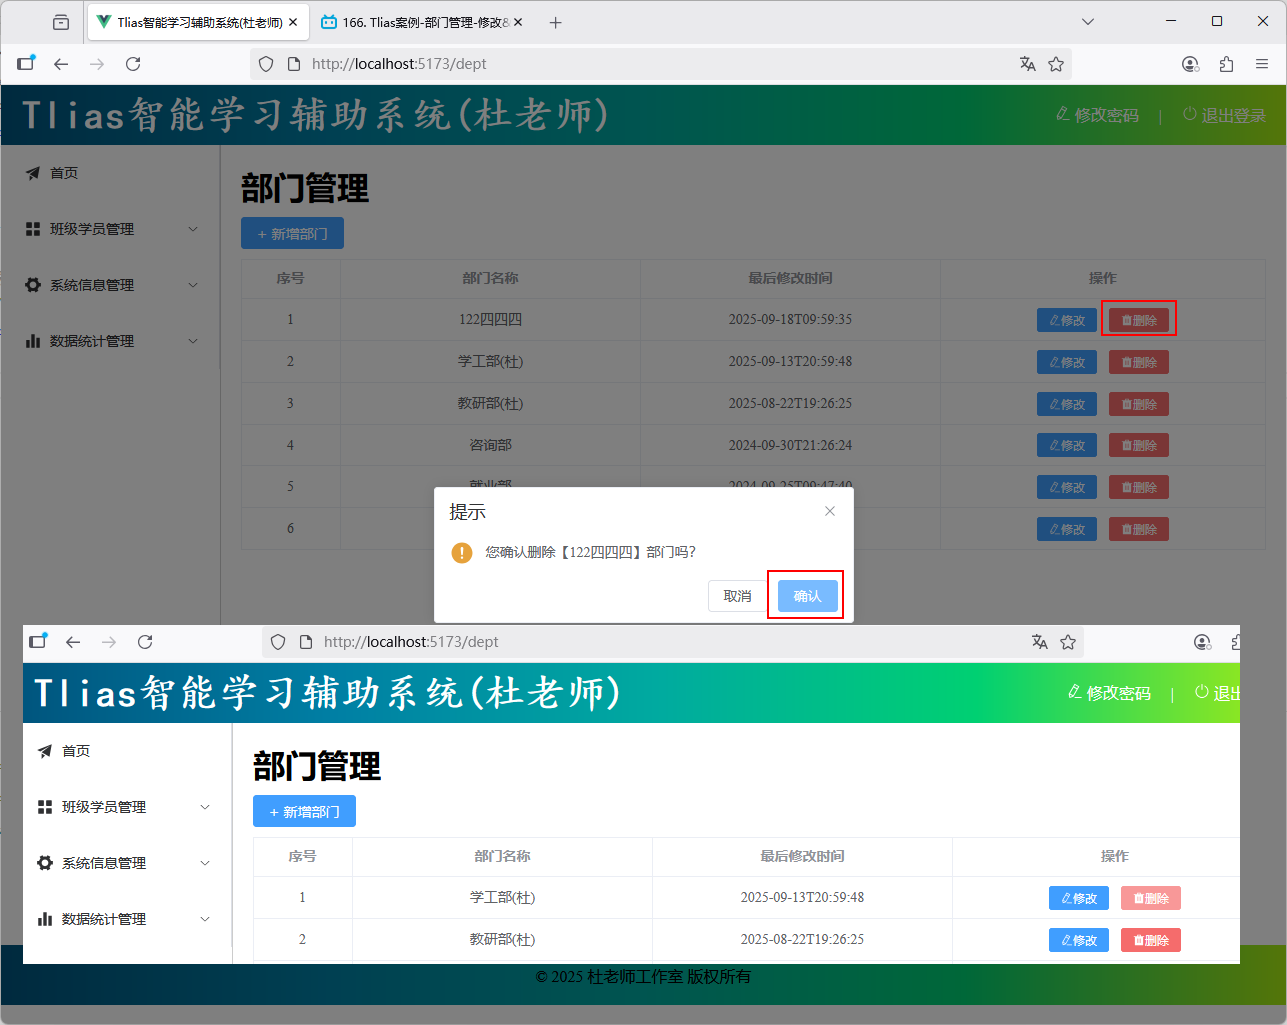 图29 删除部门验证