## Day07 后端Web实战:部门管理
---
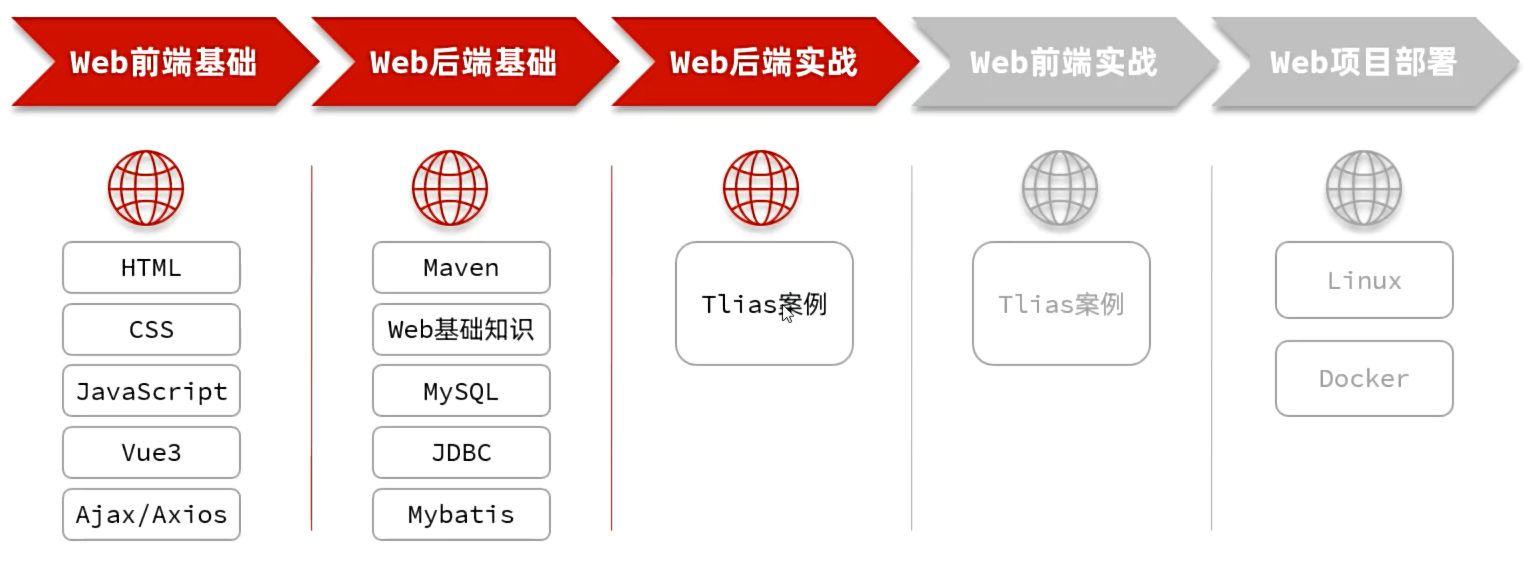 图1 第3部分【后端Web实战】
##### 【Tlias智能学习辅助系统】需求
图1 第3部分【后端Web实战】
##### 【Tlias智能学习辅助系统】需求
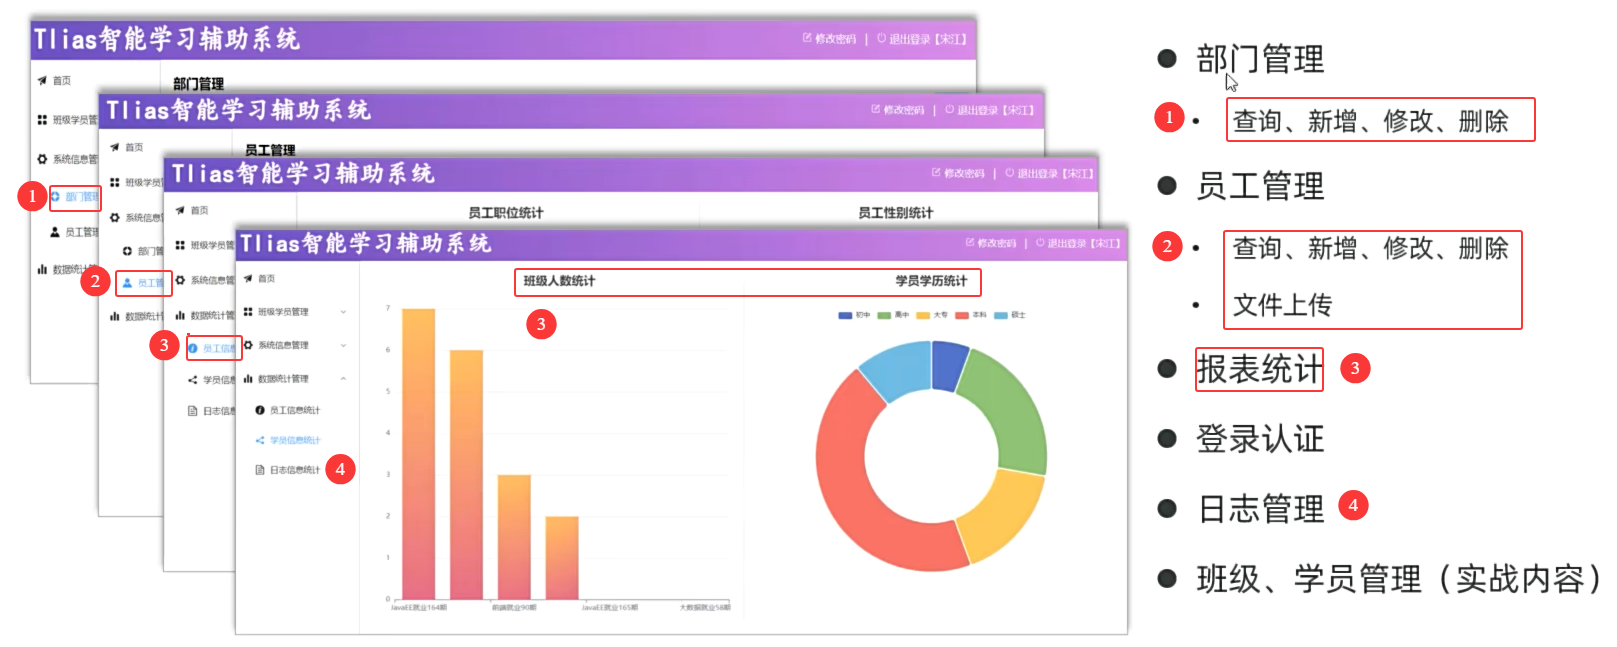 图2 【Tlias智能学习辅助系统】需求
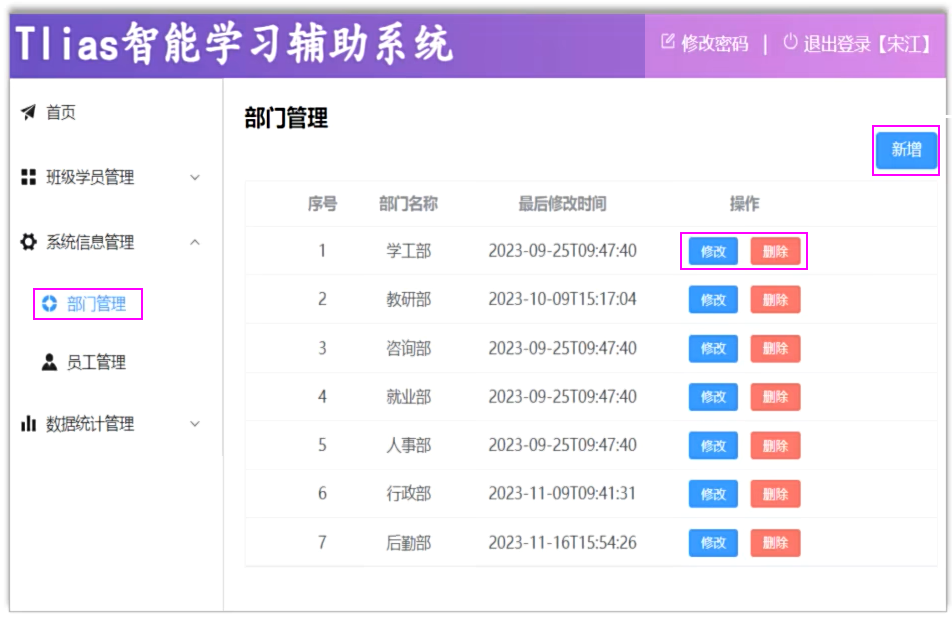 图3 【部门管理】需求
##### 目录
* 准备工作
* 查询部门
* 删除部门
* 新增部门
* 修改部门
* 日志技术
### 1. 准备工作
#### 1.1 开发规范-开发模式
##### ①前后端混合开发
图3 【部门管理】需求
##### 目录
* 准备工作
* 查询部门
* 删除部门
* 新增部门
* 修改部门
* 日志技术
### 1. 准备工作
#### 1.1 开发规范-开发模式
##### ①前后端混合开发
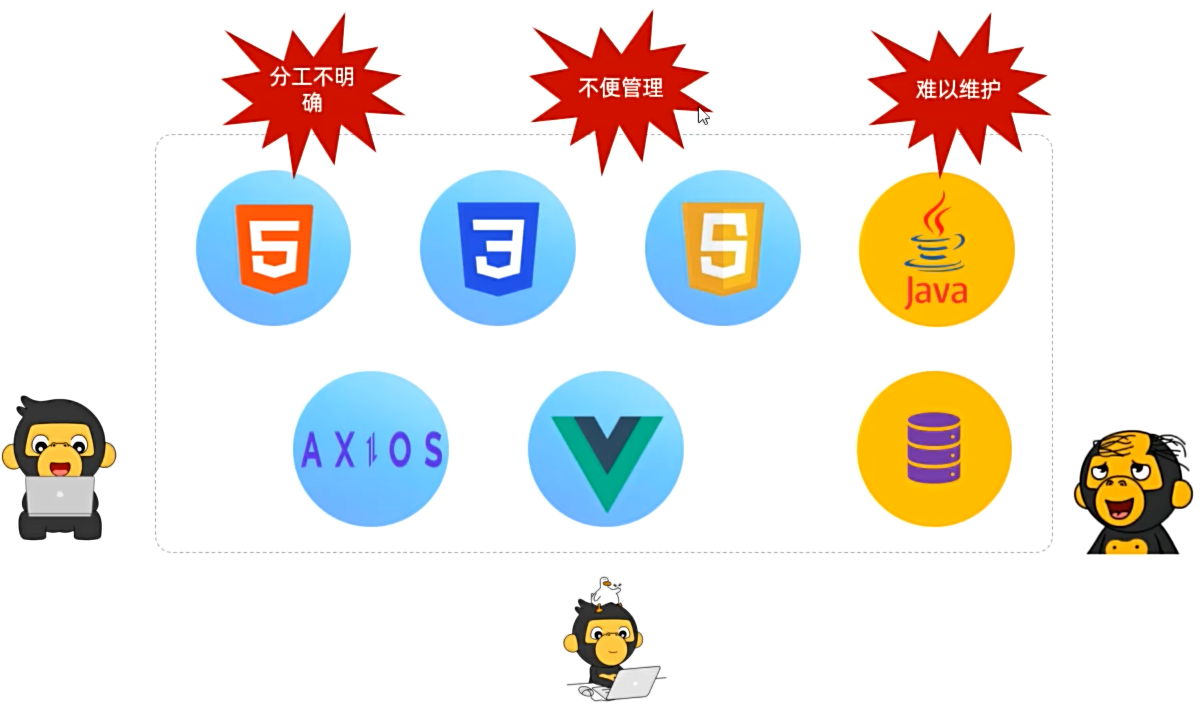 图4 前后端混合开发
##### ②前后端分离开发
图4 前后端混合开发
##### ②前后端分离开发
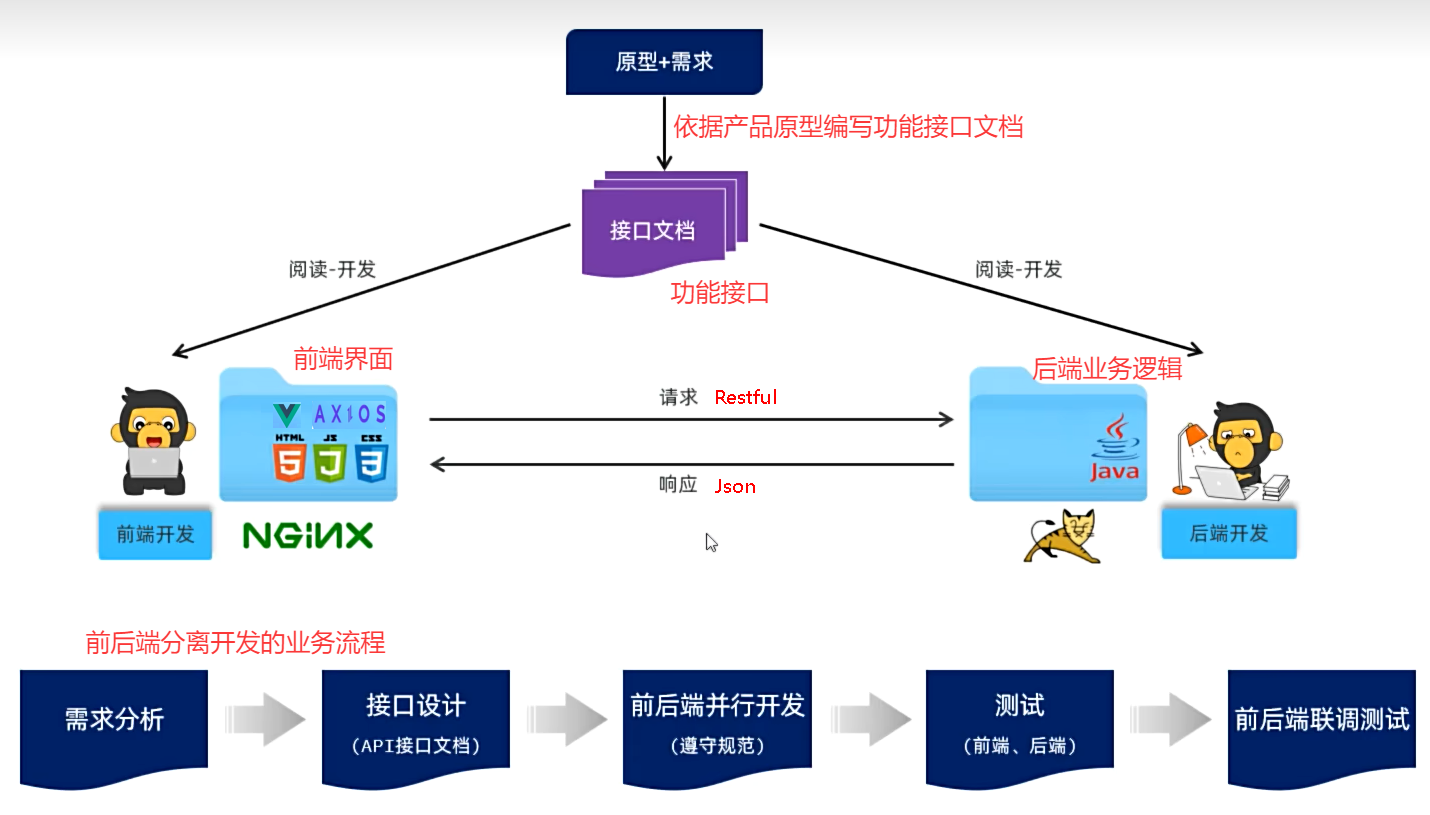 图5 前后端分离的开发流程
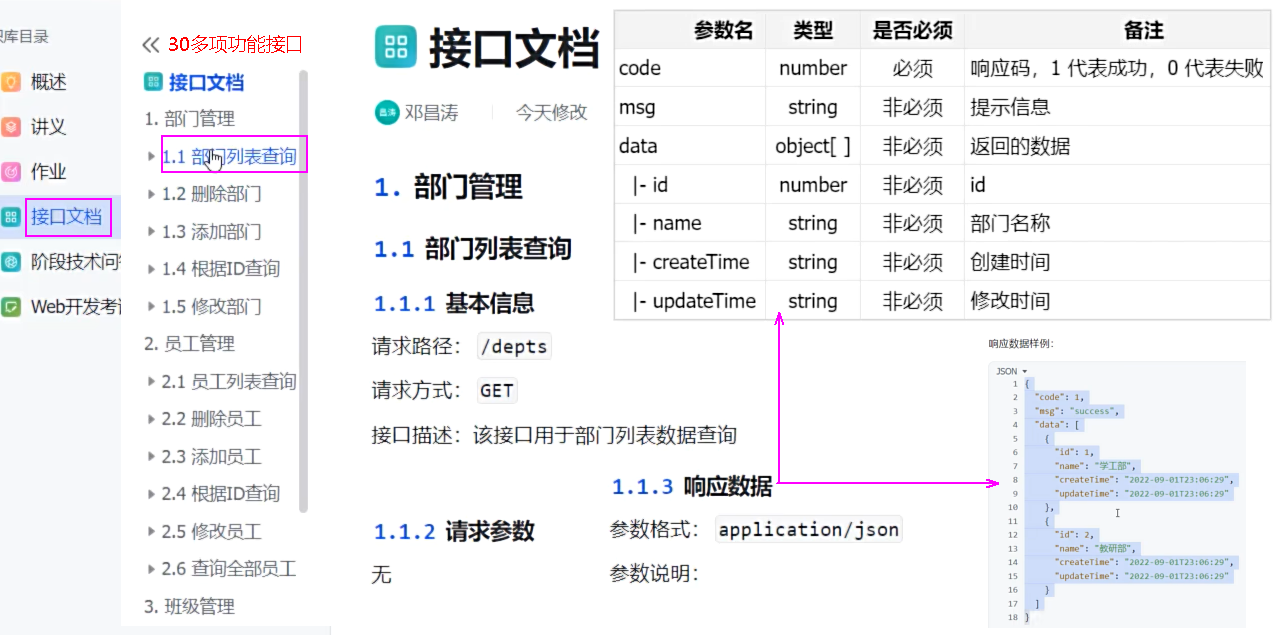 图6 接口文档格式图示
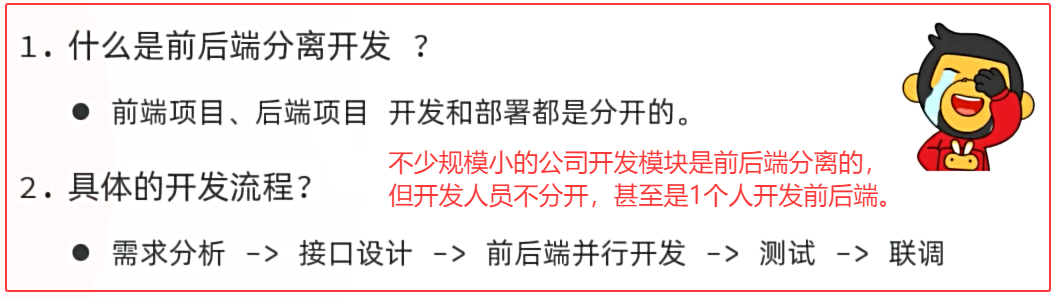 图7 小结
#### 1.2 开发规范-Restful风格
##### ①Restful
* REST(REpresentational State Transfer),表述性状态转换,它是一种软件架构风格。
| 传统风格url | 请求方式 | 含义 |
| ------------------------------------------ | -------- | --------------- |
| http://localhost:8080/user/getById?id=1 | GET | 查询id为1的用户 |
| http://localhost:8080/user/saveUser | POST | 新增用户 |
| http://localhost:8080/user/updateUser | POST | 修改用户 |
| http://localhost:8080/user/deleteUser?id=1 | GET | 删除id为1的用户 |
| REST风格url | 请求方式 | 含义 |
| ----------------------------- | -------- | --------------- |
| http://localhost:8080/users/1 | GET | 查询id为1的用户 |
| http://localhost:8080/users/1 | DELETE | 删除id为1的用户 |
| http://localhost:8080/users | POST | 新增用户 |
| http://localhost:8080/users | PUT | 修改用户 |
图7 小结
#### 1.2 开发规范-Restful风格
##### ①Restful
* REST(REpresentational State Transfer),表述性状态转换,它是一种软件架构风格。
| 传统风格url | 请求方式 | 含义 |
| ------------------------------------------ | -------- | --------------- |
| http://localhost:8080/user/getById?id=1 | GET | 查询id为1的用户 |
| http://localhost:8080/user/saveUser | POST | 新增用户 |
| http://localhost:8080/user/updateUser | POST | 修改用户 |
| http://localhost:8080/user/deleteUser?id=1 | GET | 删除id为1的用户 |
| REST风格url | 请求方式 | 含义 |
| ----------------------------- | -------- | --------------- |
| http://localhost:8080/users/1 | GET | 查询id为1的用户 |
| http://localhost:8080/users/1 | DELETE | 删除id为1的用户 |
| http://localhost:8080/users | POST | 新增用户 |
| http://localhost:8080/users | PUT | 修改用户 |
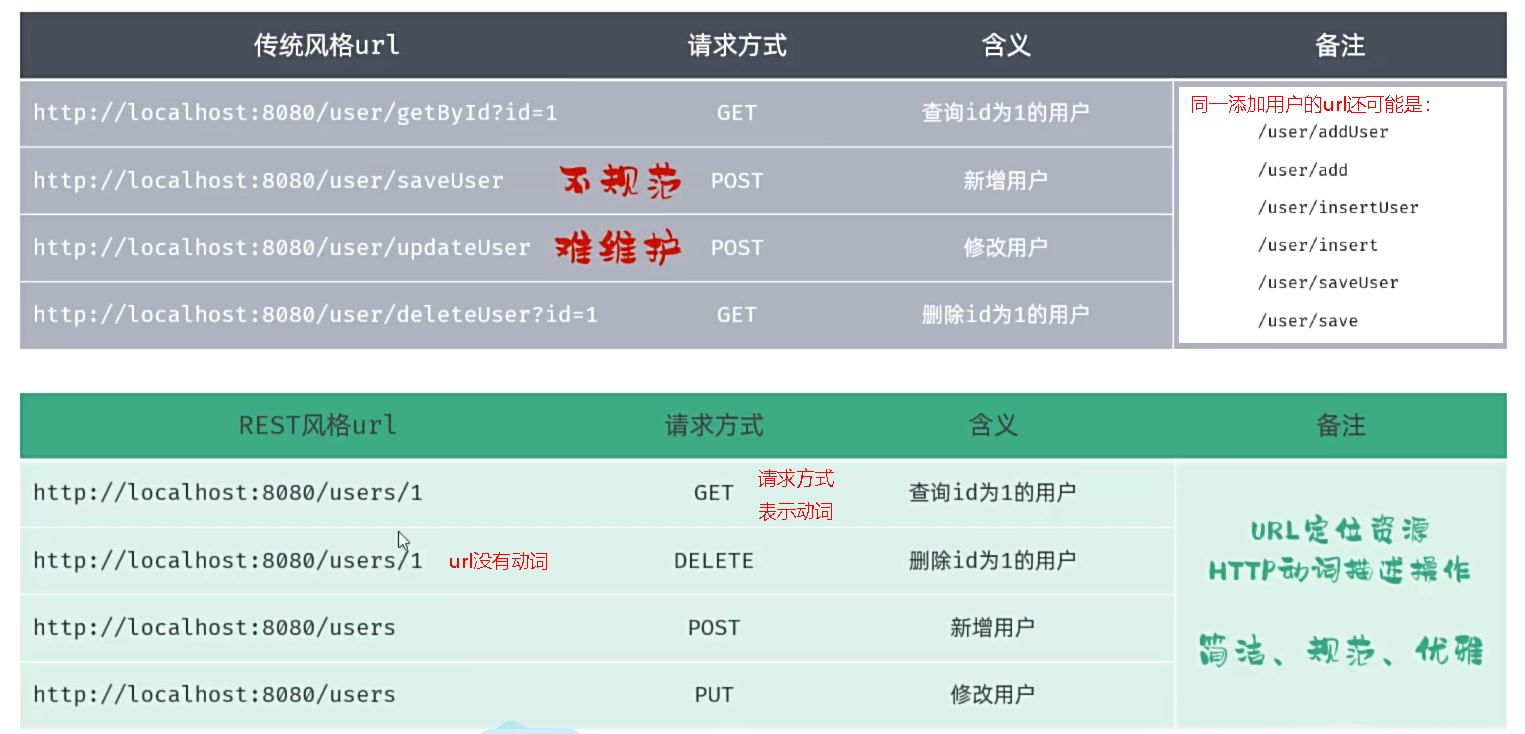 图8 传统风格url和REST风格url比较
* REST是风格,是约定方式,约定不是规定,可以打破。
* 描述功能模块通常使用复数形式(加s),表示此类资源,而非单个资源。如:users、books...
REST风格的特点 ?
* URL定义资源
* HTTP动词描述操作
REST风格中的四种请求方式及对应的操作?
* GET:查询
* POST:新增
* PUT:修改
* DELETE:删除
图8 传统风格url和REST风格url比较
* REST是风格,是约定方式,约定不是规定,可以打破。
* 描述功能模块通常使用复数形式(加s),表示此类资源,而非单个资源。如:users、books...
REST风格的特点 ?
* URL定义资源
* HTTP动词描述操作
REST风格中的四种请求方式及对应的操作?
* GET:查询
* POST:新增
* PUT:修改
* DELETE:删除
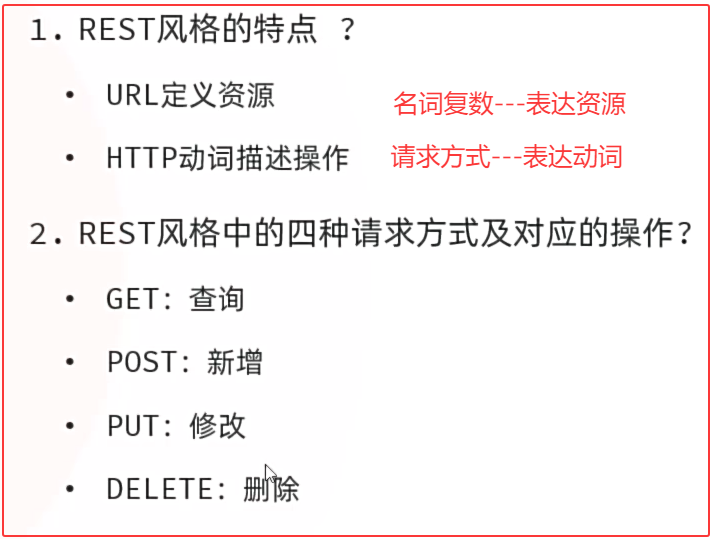 图9 Restful小结
##### ②Apifox
##### 思考:
* 前后端都在并行开发,后端开发完对应的接口之后,如何对接口进行请求测试呢?
* 前后端都在并行开发,前端开发过程中,如何获取到数据,测试页面的渲染展示呢?
图9 Restful小结
##### ②Apifox
##### 思考:
* 前后端都在并行开发,后端开发完对应的接口之后,如何对接口进行请求测试呢?
* 前后端都在并行开发,前端开发过程中,如何获取到数据,测试页面的渲染展示呢?
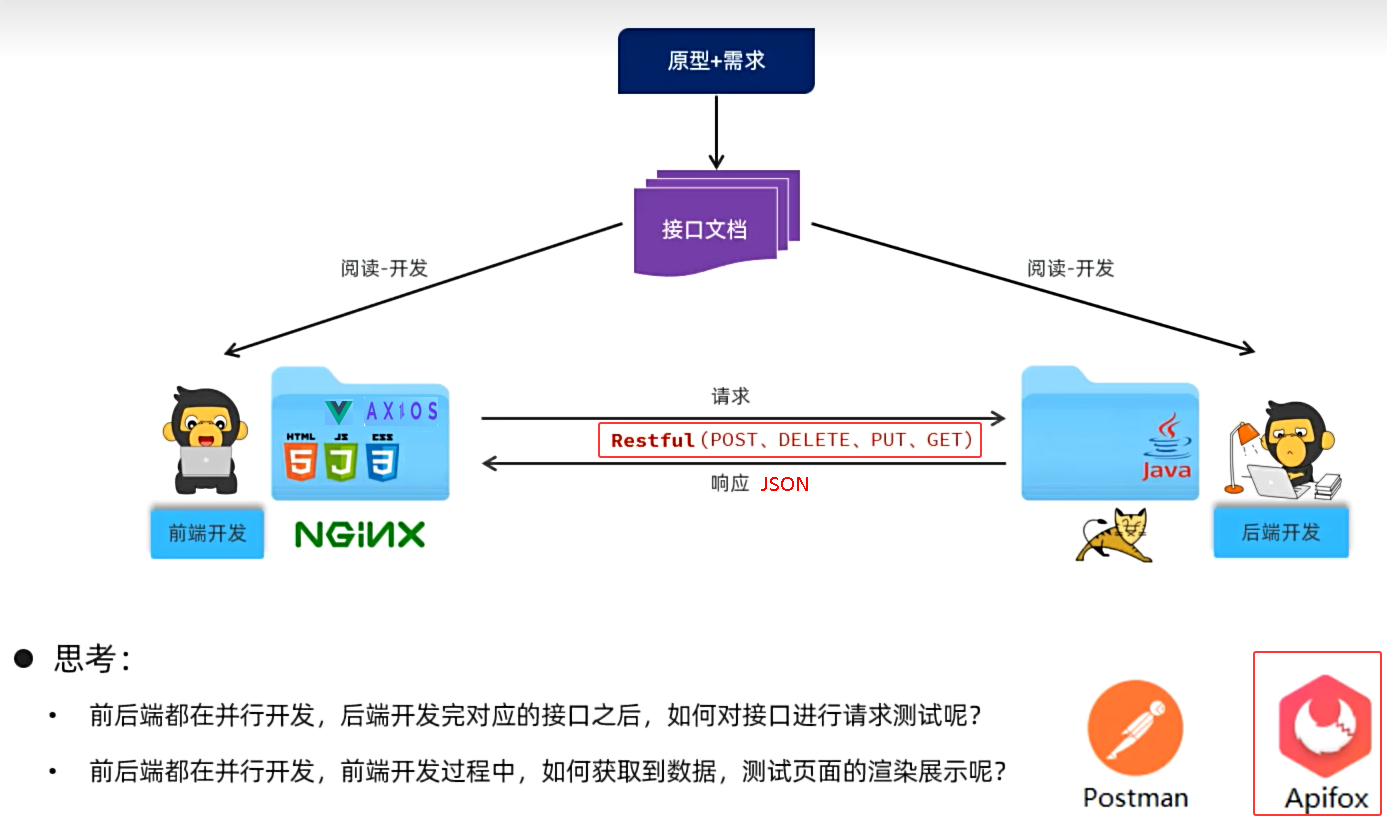 图10 API工具
##### Apifox
* 介绍:Apifox是一款集成了Api文档、Api调试、Api Mock、Api测试的一体化协作平台。
* 作用:接口文档管理、接口请求测试、Mock服务。
* 官网: https://apifox.com/
* Apifox = Postman + Swagger + Mock + JMeter
* 安装:Apifox-windows-latest.zip --> Apifox-2.7.30.exe 已管理员身份运行进行安装
图10 API工具
##### Apifox
* 介绍:Apifox是一款集成了Api文档、Api调试、Api Mock、Api测试的一体化协作平台。
* 作用:接口文档管理、接口请求测试、Mock服务。
* 官网: https://apifox.com/
* Apifox = Postman + Swagger + Mock + JMeter
* 安装:Apifox-windows-latest.zip --> Apifox-2.7.30.exe 已管理员身份运行进行安装
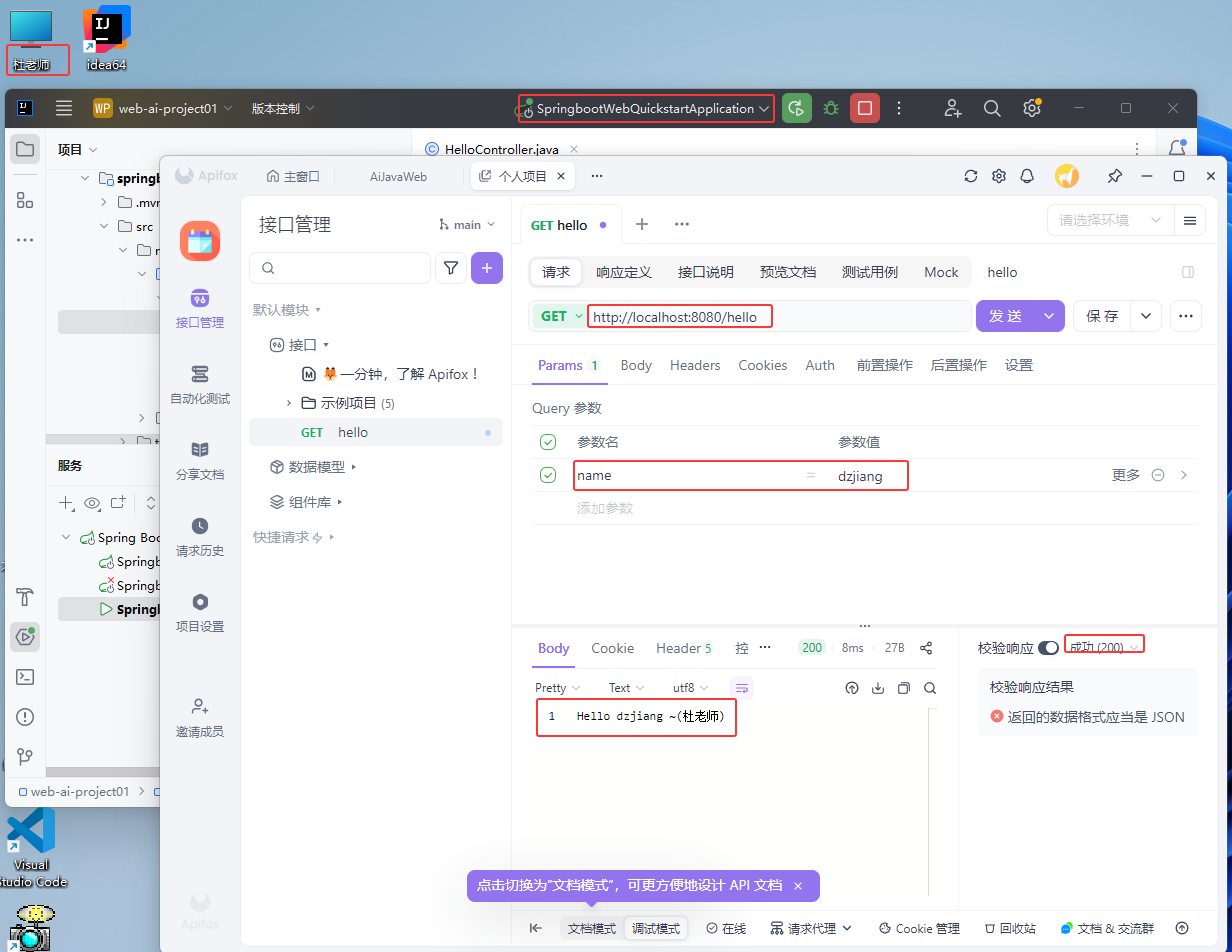 图11 Apifox安装、测试验证
为什么要使用Apifox?
* 由于浏览器地址栏发起的请求,都是GET方式的请求,如果我们需要发起POST、PUT、DELETE方式的请求,就需要借助于这类工具
图11 Apifox安装、测试验证
为什么要使用Apifox?
* 由于浏览器地址栏发起的请求,都是GET方式的请求,如果我们需要发起POST、PUT、DELETE方式的请求,就需要借助于这类工具
 图12 Apifox小结
#### 1.3 工程搭建
* 创建空项目(工作空间web-ai-project02),创建SpringBoot工程(模块tlias-web-management),并引入web开发起步依赖、mybatis、mysql驱动、lombok。
* 创建数据库表dept,并在application.yml中配置数据库的基本信息。
* 准备基础代码结构,并引入实体类Dept及统一的响应结果封装类 Result。
##### ①创建空项目、SpringBoot工程
图12 Apifox小结
#### 1.3 工程搭建
* 创建空项目(工作空间web-ai-project02),创建SpringBoot工程(模块tlias-web-management),并引入web开发起步依赖、mybatis、mysql驱动、lombok。
* 创建数据库表dept,并在application.yml中配置数据库的基本信息。
* 准备基础代码结构,并引入实体类Dept及统一的响应结果封装类 Result。
##### ①创建空项目、SpringBoot工程
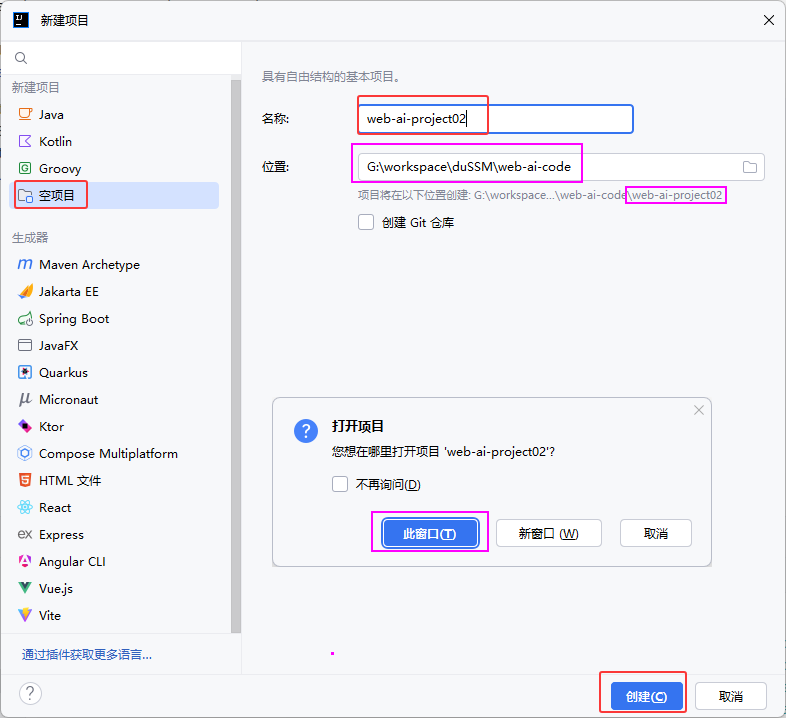 图13 创建空项目(web-ai-project02)
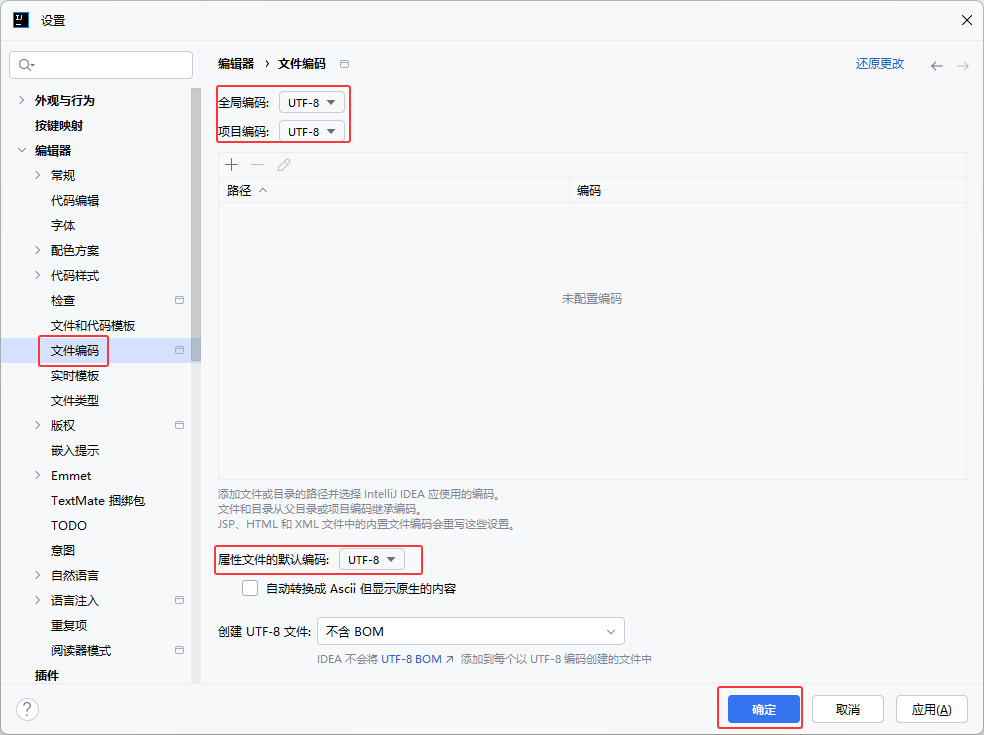 图14 设置项目字符编码(utf8)
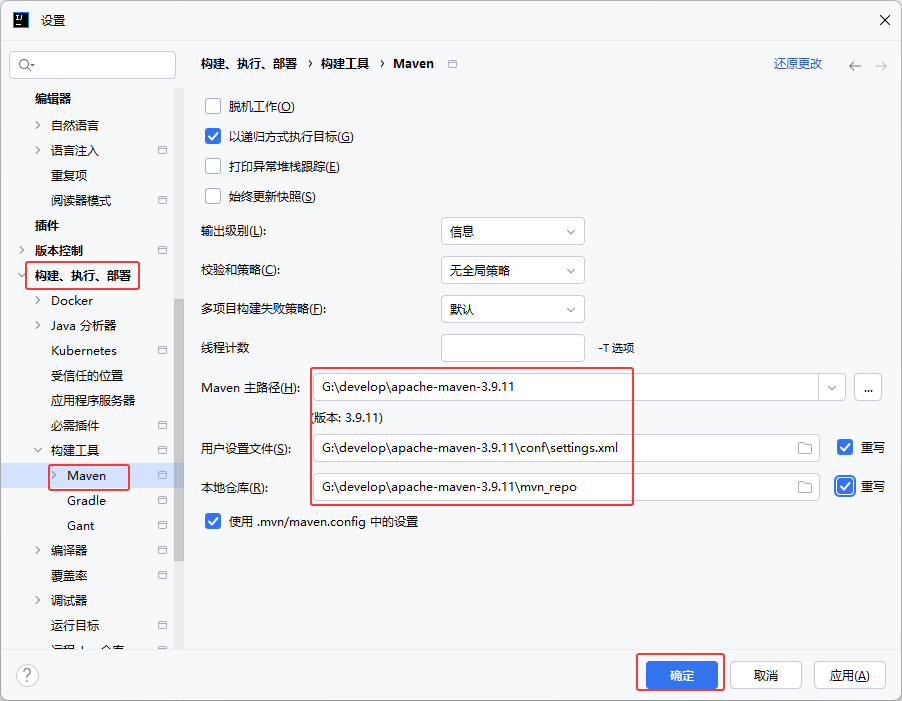 图15 设置项目Maven配置
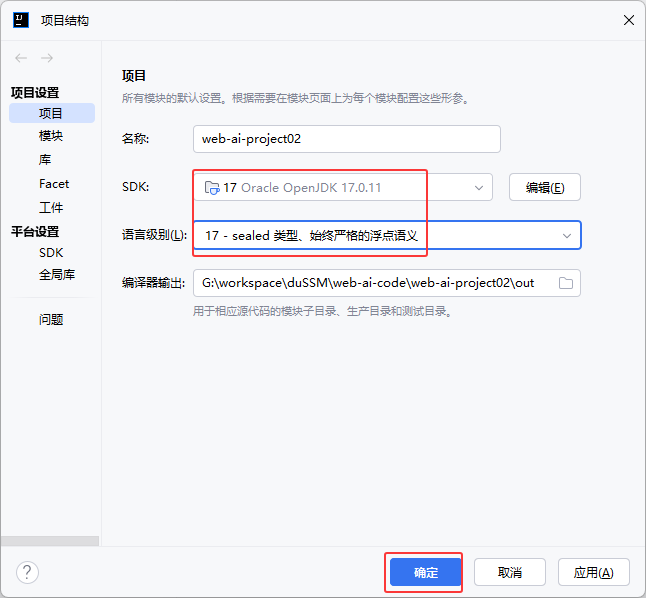 图16 设置项目的SDK和语言级别17
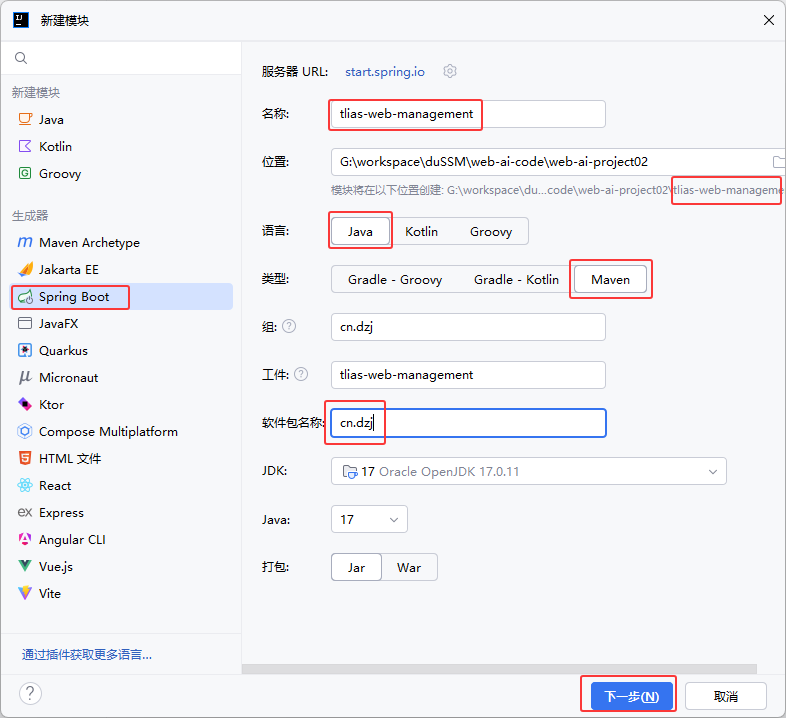 图17 创建Springboot新模块①
 图18 创建Springboot新模块② 设置依赖
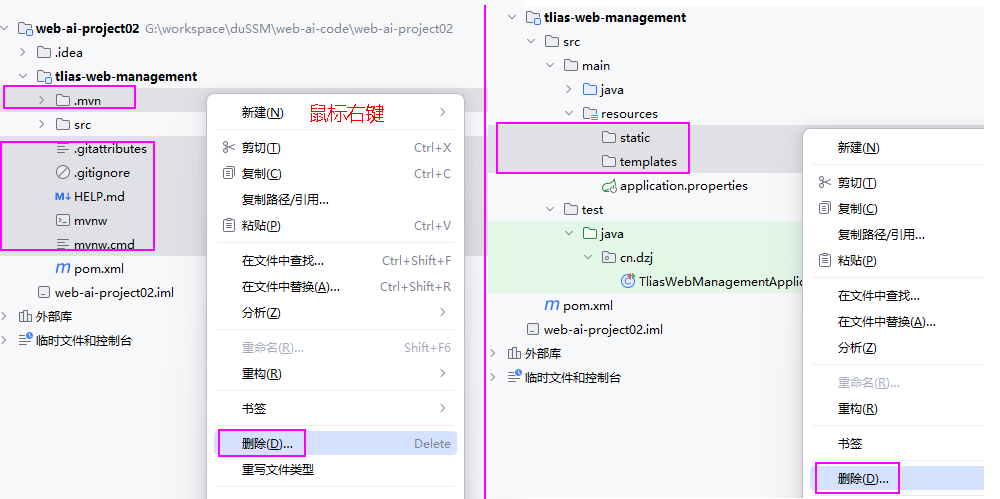 图19 删除Springboot模块中多余的配置文件和两个静态目录
##### ②创建数据库tlias、表dept,配置application.yml
图19 删除Springboot模块中多余的配置文件和两个静态目录
##### ②创建数据库tlias、表dept,配置application.yml
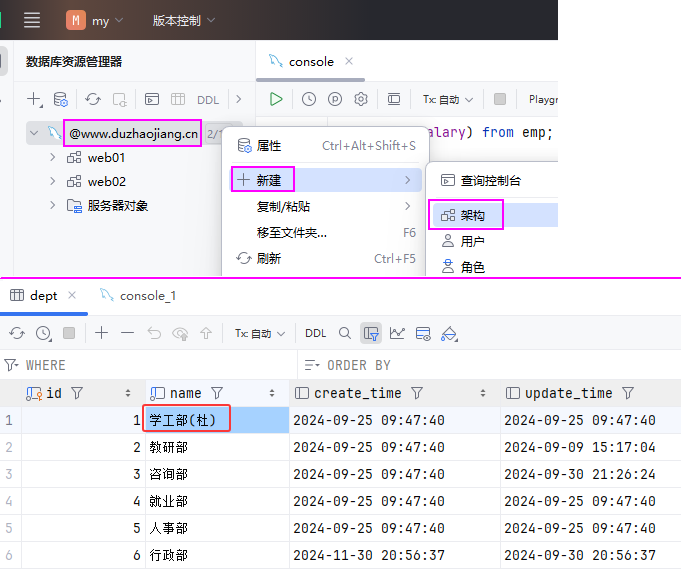 图20 创建数据库和数据表
```sql
create schema tlias;
use tlias;
CREATE TABLE dept (
id int unsigned PRIMARY KEY AUTO_INCREMENT COMMENT 'ID, 主键',
name varchar(10) NOT NULL UNIQUE COMMENT '部门名称',
create_time datetime DEFAULT NULL COMMENT '创建时间',
update_time datetime DEFAULT NULL COMMENT '修改时间'
) COMMENT '部门表';
INSERT INTO dept VALUES
(1,'学工部(杜)','2024-09-25 09:47:40','2024-09-25 09:47:40'),
(2,'教研部','2024-09-25 09:47:40','2024-09-09 15:17:04'),
(3,'咨询部','2024-09-25 09:47:40','2024-09-30 21:26:24'),
(4,'就业部','2024-09-25 09:47:40','2024-09-25 09:47:40'),
(5,'人事部','2024-09-25 09:47:40','2024-09-25 09:47:40'),
(6,'行政部','2024-11-30 20:56:37','2024-09-30 20:56:37');
```
src/main/resources/application.yml
```yaml
spring:
application:
name: tlias-web-management
#数据库的连接信息
datasource:
url: jdbc:mysql://www.duzhaojiang.cn:3306/tlias?useSSL=false&serverTimezone=Asia/Shanghai&allowPublicKeyRetrieval=true
driver-class-name: com.mysql.cj.jdbc.Driver
username: root
password: ********
#Mybatis的相关配置
mybatis:
configuration:
log-impl: org.apache.ibatis.logging.stdout.StdOutImpl
```
##### ③准备基础代码结构,创建Dept.java、Result.java
图20 创建数据库和数据表
```sql
create schema tlias;
use tlias;
CREATE TABLE dept (
id int unsigned PRIMARY KEY AUTO_INCREMENT COMMENT 'ID, 主键',
name varchar(10) NOT NULL UNIQUE COMMENT '部门名称',
create_time datetime DEFAULT NULL COMMENT '创建时间',
update_time datetime DEFAULT NULL COMMENT '修改时间'
) COMMENT '部门表';
INSERT INTO dept VALUES
(1,'学工部(杜)','2024-09-25 09:47:40','2024-09-25 09:47:40'),
(2,'教研部','2024-09-25 09:47:40','2024-09-09 15:17:04'),
(3,'咨询部','2024-09-25 09:47:40','2024-09-30 21:26:24'),
(4,'就业部','2024-09-25 09:47:40','2024-09-25 09:47:40'),
(5,'人事部','2024-09-25 09:47:40','2024-09-25 09:47:40'),
(6,'行政部','2024-11-30 20:56:37','2024-09-30 20:56:37');
```
src/main/resources/application.yml
```yaml
spring:
application:
name: tlias-web-management
#数据库的连接信息
datasource:
url: jdbc:mysql://www.duzhaojiang.cn:3306/tlias?useSSL=false&serverTimezone=Asia/Shanghai&allowPublicKeyRetrieval=true
driver-class-name: com.mysql.cj.jdbc.Driver
username: root
password: ********
#Mybatis的相关配置
mybatis:
configuration:
log-impl: org.apache.ibatis.logging.stdout.StdOutImpl
```
##### ③准备基础代码结构,创建Dept.java、Result.java
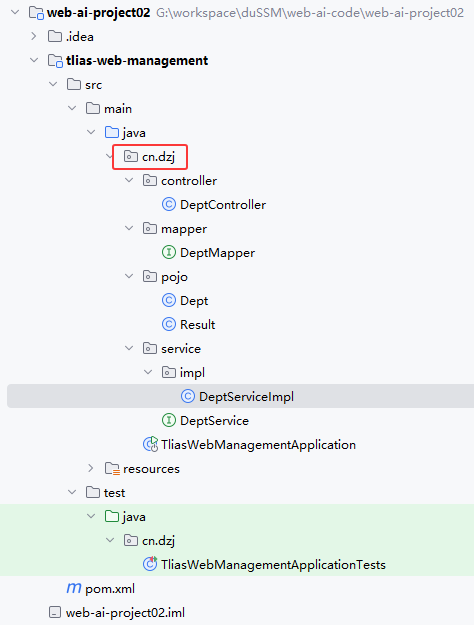 图21 基础代码目录结构
###### cn/dzj/pojo/Dept.java
```java
package cn.dzj.pojo;
import lombok.AllArgsConstructor;
import lombok.Data;
import lombok.NoArgsConstructor;
import java.time.LocalDateTime;
@Data
@AllArgsConstructor
@NoArgsConstructor
public class Dept {
private Integer id;
private String name;
private LocalDateTime createTime;
private LocalDateTime updateTime;
}
```
###### cn/dzj/pojo/Result.java
```java
package cn.dzj.pojo;
import lombok.Data;
/**
* 后端统一返回结果
*/
@Data
public class Result {
private Integer code; //编码:1成功,0为失败
private String msg; //错误信息
private Object data; //数据
public static Result success() {
Result result = new Result();
result.code = 1;
result.msg = "success";
return result;
}
public static Result success(Object object) {
Result result = new Result();
result.data = object;
result.code = 1;
result.msg = "success";
return result;
}
public static Result error(String msg) {
Result result = new Result();
result.msg = msg;
result.code = 0;
return result;
}
}
```
###### cn/dzj/mapper/DeptMapper.java
```java
package cn.dzj.mapper;
import org.apache.ibatis.annotations.Mapper;
@Mapper
public interface DeptMapper {
}
```
###### cn/dzj/service/DeptService.java
```java
package cn.dzj.service;
public interface DeptService {
}
```
###### cn/dzj/service/impl/DeptServiceImpl.java
```java
package cn.dzj.service.impl;
import cn.dzj.service.DeptService;
import org.springframework.stereotype.Service;
@Service
public class DeptServiceImpl implements DeptService {
}
```
###### cn/dzj/controller/DeptController.java
```java
package cn.dzj.controller;
import org.springframework.web.bind.annotation.RestController;
@RestController
public class DeptController {
}
```
图21 基础代码目录结构
###### cn/dzj/pojo/Dept.java
```java
package cn.dzj.pojo;
import lombok.AllArgsConstructor;
import lombok.Data;
import lombok.NoArgsConstructor;
import java.time.LocalDateTime;
@Data
@AllArgsConstructor
@NoArgsConstructor
public class Dept {
private Integer id;
private String name;
private LocalDateTime createTime;
private LocalDateTime updateTime;
}
```
###### cn/dzj/pojo/Result.java
```java
package cn.dzj.pojo;
import lombok.Data;
/**
* 后端统一返回结果
*/
@Data
public class Result {
private Integer code; //编码:1成功,0为失败
private String msg; //错误信息
private Object data; //数据
public static Result success() {
Result result = new Result();
result.code = 1;
result.msg = "success";
return result;
}
public static Result success(Object object) {
Result result = new Result();
result.data = object;
result.code = 1;
result.msg = "success";
return result;
}
public static Result error(String msg) {
Result result = new Result();
result.msg = msg;
result.code = 0;
return result;
}
}
```
###### cn/dzj/mapper/DeptMapper.java
```java
package cn.dzj.mapper;
import org.apache.ibatis.annotations.Mapper;
@Mapper
public interface DeptMapper {
}
```
###### cn/dzj/service/DeptService.java
```java
package cn.dzj.service;
public interface DeptService {
}
```
###### cn/dzj/service/impl/DeptServiceImpl.java
```java
package cn.dzj.service.impl;
import cn.dzj.service.DeptService;
import org.springframework.stereotype.Service;
@Service
public class DeptServiceImpl implements DeptService {
}
```
###### cn/dzj/controller/DeptController.java
```java
package cn.dzj.controller;
import org.springframework.web.bind.annotation.RestController;
@RestController
public class DeptController {
}
```
 图22 Resaul返回结果格式统一规范
### 2. 查询部门
#### 2.1 接口开发
图22 Resaul返回结果格式统一规范
### 2. 查询部门
#### 2.1 接口开发
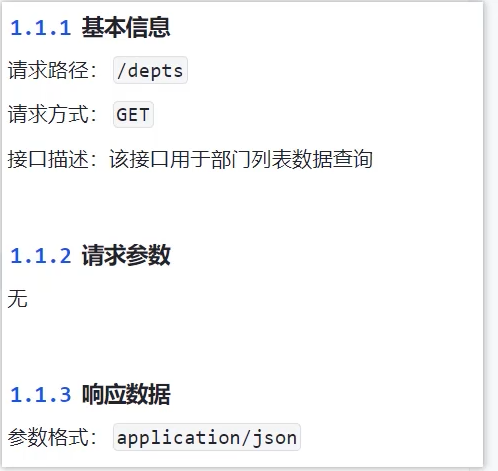 图23 查询部分的接口文档
##### 思路分析
* 明确了查询部门的需求之后,再来梳理一下实现该功能时,三层架构每一层的职责:
图23 查询部分的接口文档
##### 思路分析
* 明确了查询部门的需求之后,再来梳理一下实现该功能时,三层架构每一层的职责:
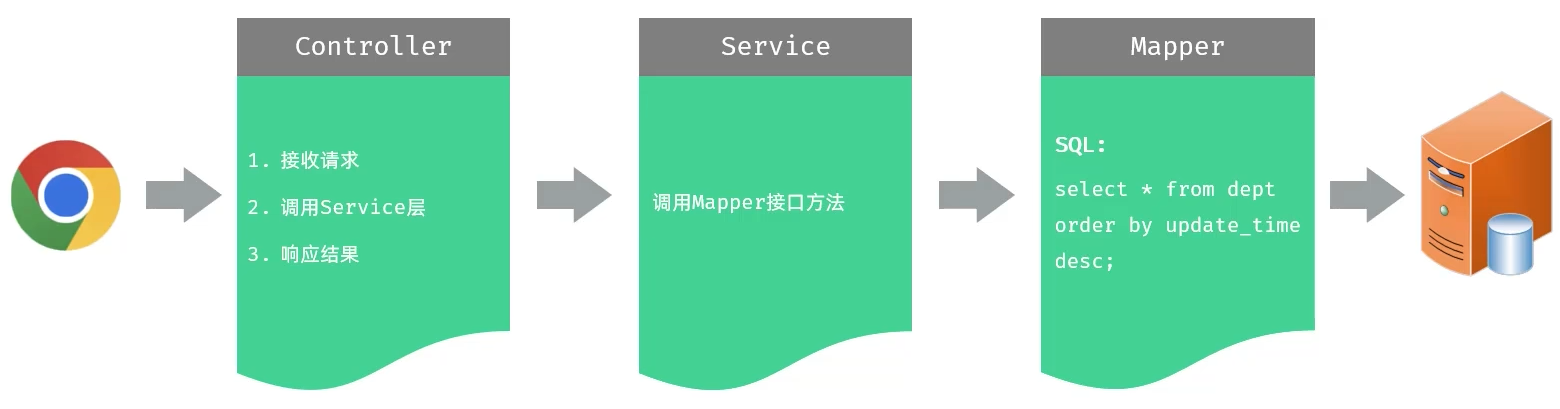 图24 查询部分的三层架构各层职责
##### 功能实现
###### cn/dzj/mapper/DeptMapper.java 主要代码
```java
@Mapper
public interface DeptMapper {
@Select("select id, name, create_time, update_time from dept order by update_time desc")
List findAll();
}
```
###### cn/dzj/service/DeptService.java 主要代码
```java
public interface DeptService {
List findAll();
}
```
###### cn/dzj/service/impl/DeptServiceImpl.java 主要代码
```java
@Service
public class DeptServiceImpl implements DeptService {
@Autowired
private DeptMapper deptMapper;
@Override
public List findAll() {
return deptMapper.findAll();
}
}
```
###### cn/dzj/controller/DeptController.java
```java
@RestController
public class DeptController {
@Autowired
private DeptService deptService;
//@RequestMapping(value ="/depts",method=RequestMethod.GET)//method:指定请求方式
@GetMapping("/depts")
public Result list() {
System.out.println("查询全部部门数据");
List deptList = deptService.findAll();
return Result.success(deptList);
}
}
```
图24 查询部分的三层架构各层职责
##### 功能实现
###### cn/dzj/mapper/DeptMapper.java 主要代码
```java
@Mapper
public interface DeptMapper {
@Select("select id, name, create_time, update_time from dept order by update_time desc")
List findAll();
}
```
###### cn/dzj/service/DeptService.java 主要代码
```java
public interface DeptService {
List findAll();
}
```
###### cn/dzj/service/impl/DeptServiceImpl.java 主要代码
```java
@Service
public class DeptServiceImpl implements DeptService {
@Autowired
private DeptMapper deptMapper;
@Override
public List findAll() {
return deptMapper.findAll();
}
}
```
###### cn/dzj/controller/DeptController.java
```java
@RestController
public class DeptController {
@Autowired
private DeptService deptService;
//@RequestMapping(value ="/depts",method=RequestMethod.GET)//method:指定请求方式
@GetMapping("/depts")
public Result list() {
System.out.println("查询全部部门数据");
List deptList = deptService.findAll();
return Result.success(deptList);
}
}
```
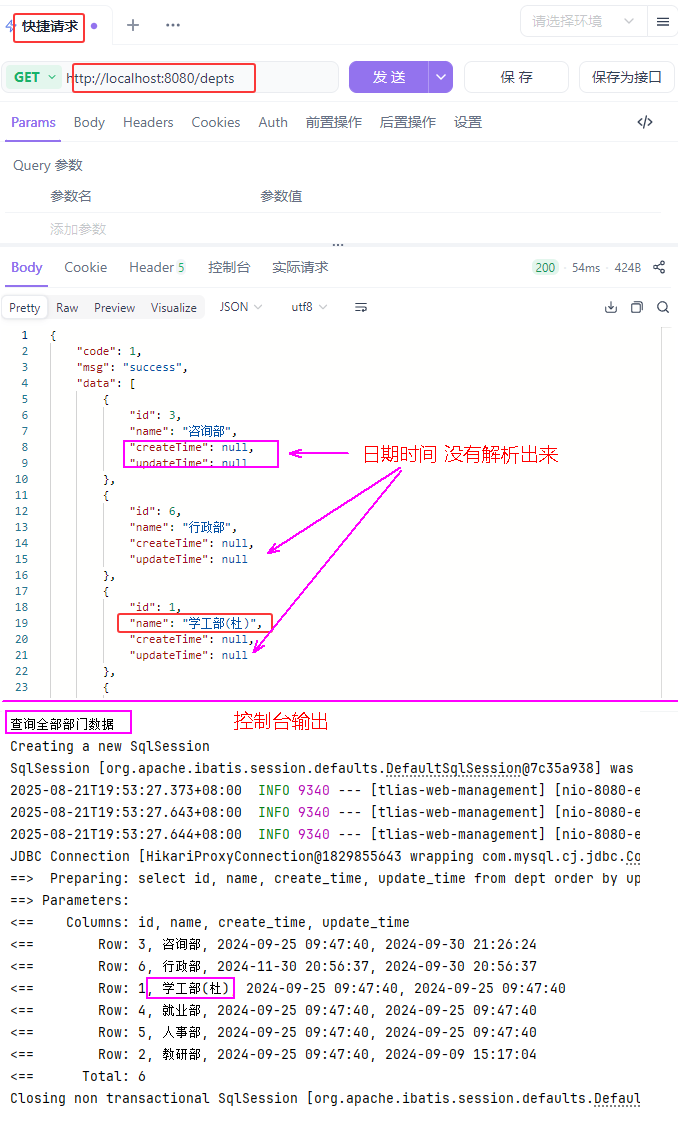 图25 查询部门测试验证1
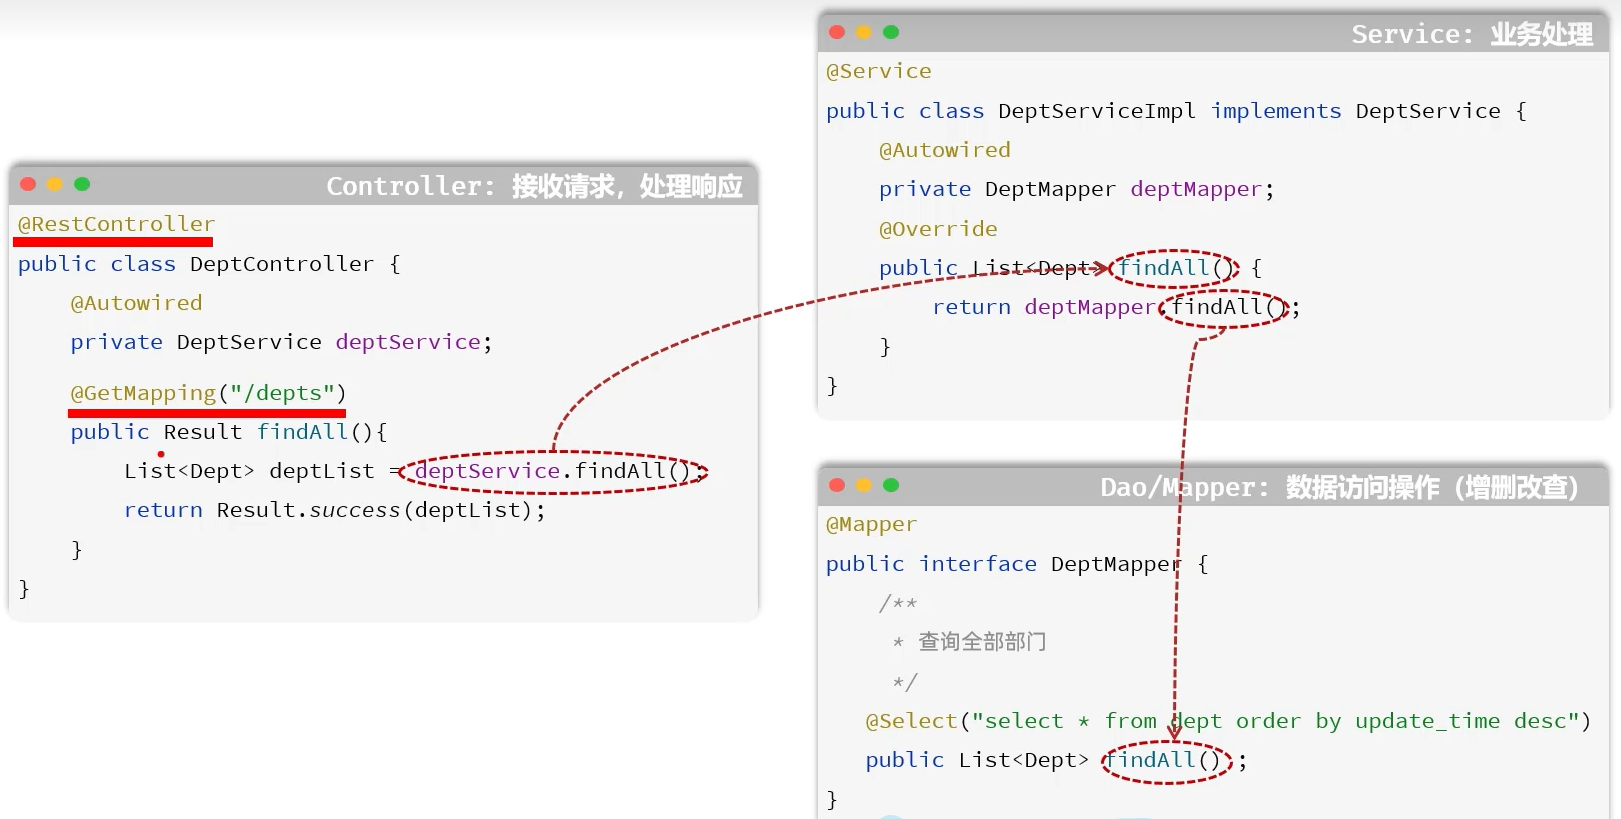 图26 三层调用关系
##### 数据封装
* 实体类属性名 和 数据库表查询返回的字段名一致,mybatis会自动封装。
* 如果实体类属性名 和 数据库表查询返回的字段名不一致,不能自动封装。
图26 三层调用关系
##### 数据封装
* 实体类属性名 和 数据库表查询返回的字段名一致,mybatis会自动封装。
* 如果实体类属性名 和 数据库表查询返回的字段名不一致,不能自动封装。
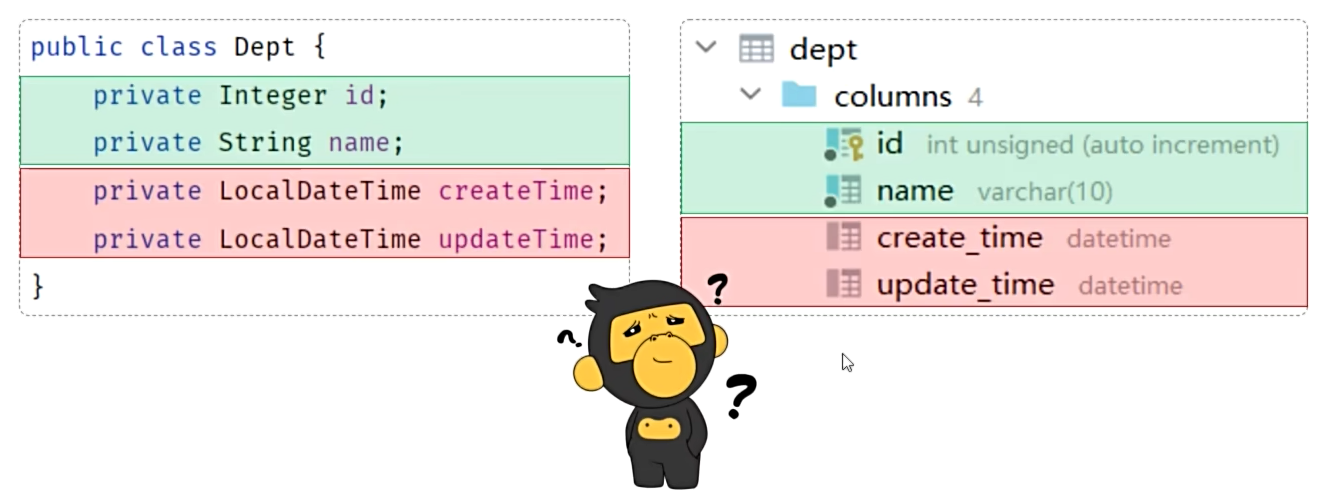 图27 属性名和表字段名不一致
* 手动结果映射:通过 @Results及@Result 进行手动结果映射。
```java
@Results({
@Result(column = "create_time", property = "createTime"),
@Result(column = "update_time", property = "updateTime")
})
@Select("select id, name, create_time, update_time from dept order by update_time desc")
public List findAll();
```
* 起别名:在SQL语句中,对不一样的列名起别名,别名和实体类属性名一样。
```java
@Select("select id, name, create_time createTime, update_time updateTime from dept ...")
public List findAll();
```
* 开启驼峰命名:如果字段名与属性名符合驼峰命名规则,mybatis会自动通过驼峰命名规则映射。
```yaml
mybatis:
configuration:
map-underscore-to-camel-case: true
```
图27 属性名和表字段名不一致
* 手动结果映射:通过 @Results及@Result 进行手动结果映射。
```java
@Results({
@Result(column = "create_time", property = "createTime"),
@Result(column = "update_time", property = "updateTime")
})
@Select("select id, name, create_time, update_time from dept order by update_time desc")
public List findAll();
```
* 起别名:在SQL语句中,对不一样的列名起别名,别名和实体类属性名一样。
```java
@Select("select id, name, create_time createTime, update_time updateTime from dept ...")
public List findAll();
```
* 开启驼峰命名:如果字段名与属性名符合驼峰命名规则,mybatis会自动通过驼峰命名规则映射。
```yaml
mybatis:
configuration:
map-underscore-to-camel-case: true
```
 图28 属性名和表字段名不一致解决方法
###### cn/dzj/mapper/DeptMapper.java
```java
public interface DeptMapper {
/**
* 查询所有部门数据
*/
//方式一:手动结果映射
// @Results({
// @Result(column = "create_time", property = "createTime"),
// @Result(column = "update_time", property = "updateTime")
// })
//方式二:起别名
//@Select("select id,name, create_time createTime, update_time updateTime from dept order by update_time desc")
//方式三:开启驼峰命名
@Select("select id, name, create_time, update_time from dept order by update_time desc")
List findAll();
}
```
图28 属性名和表字段名不一致解决方法
###### cn/dzj/mapper/DeptMapper.java
```java
public interface DeptMapper {
/**
* 查询所有部门数据
*/
//方式一:手动结果映射
// @Results({
// @Result(column = "create_time", property = "createTime"),
// @Result(column = "update_time", property = "updateTime")
// })
//方式二:起别名
//@Select("select id,name, create_time createTime, update_time updateTime from dept order by update_time desc")
//方式三:开启驼峰命名
@Select("select id, name, create_time, update_time from dept order by update_time desc")
List findAll();
}
```
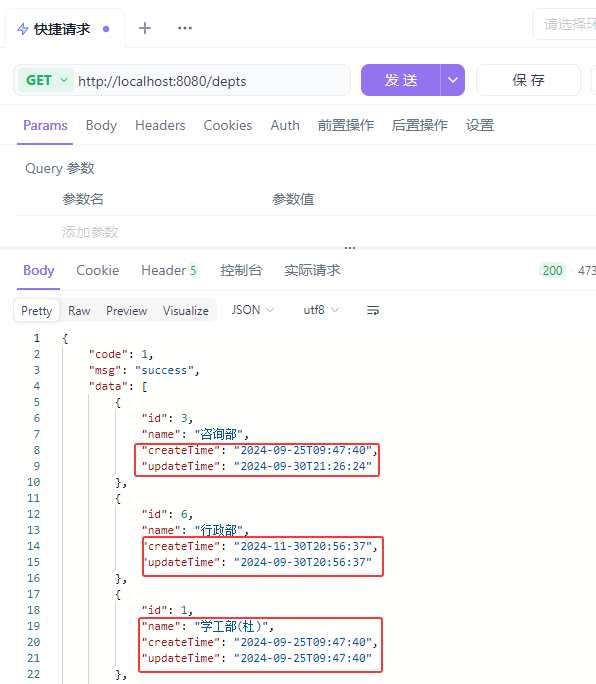 图29 查询部门测试验证2
##### 小结
Mybatis默认数据封装的规则 ?
* 实体类属性名 和 数据库表的字段名一致,mybatis会自动封装
如果字段名与实体类属性名不一致,如何解决 ?
* 手动结果映射 @Results、@Result
* 起别名
* 开启驼峰命名开关(要求: xxx_abc -> xxxAbc)
图29 查询部门测试验证2
##### 小结
Mybatis默认数据封装的规则 ?
* 实体类属性名 和 数据库表的字段名一致,mybatis会自动封装
如果字段名与实体类属性名不一致,如何解决 ?
* 手动结果映射 @Results、@Result
* 起别名
* 开启驼峰命名开关(要求: xxx_abc -> xxxAbc)
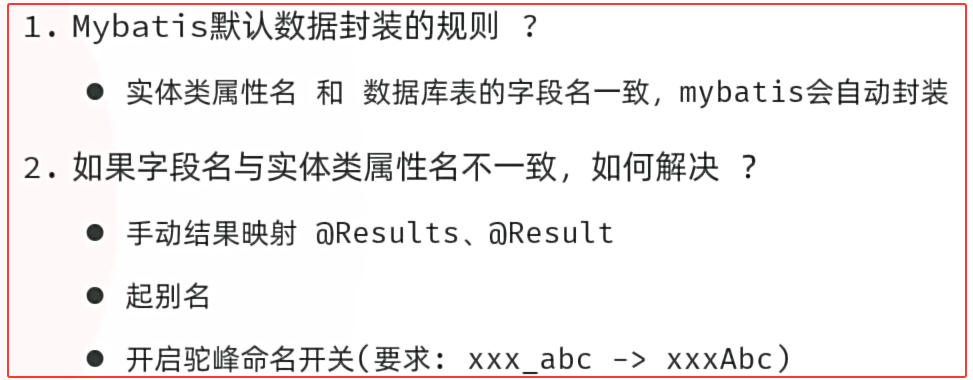 图30 小结
#### 2.2 前后端联调测试
* 将资料中提供的前端工程文件夹中的压缩包,拷贝到一个没有中文不带空格的目录下,解压。
* 启动nginx,访问测试:http://localhost:90
图30 小结
#### 2.2 前后端联调测试
* 将资料中提供的前端工程文件夹中的压缩包,拷贝到一个没有中文不带空格的目录下,解压。
* 启动nginx,访问测试:http://localhost:90
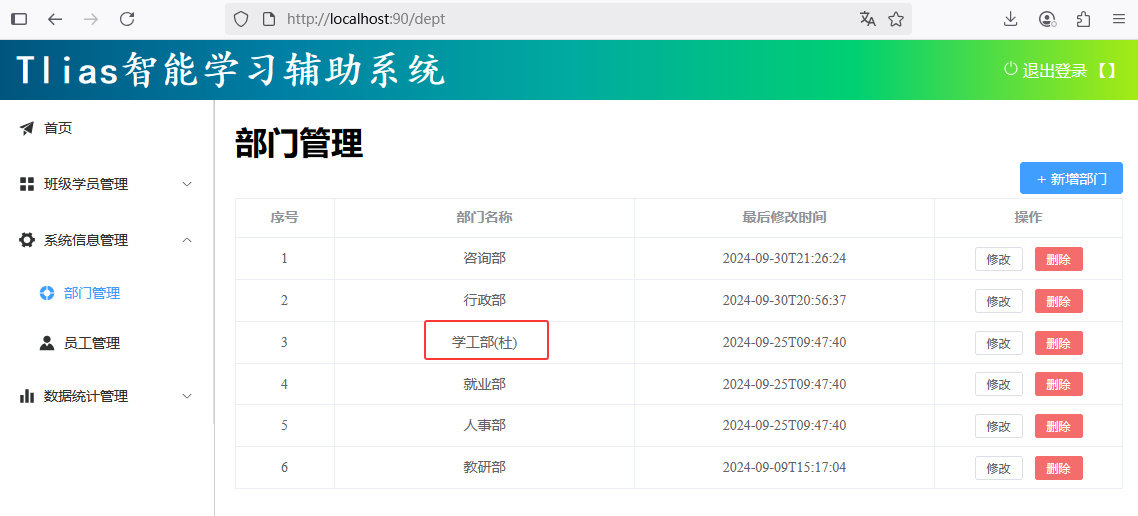 图31 查询部门前后端联调测试验证2
前端工程请求服务器的地址为http://localhost:90/api/depts,是如何访问到后端的tomcat服务器的?
图31 查询部门前后端联调测试验证2
前端工程请求服务器的地址为http://localhost:90/api/depts,是如何访问到后端的tomcat服务器的?
 图32 小结
* 反向代理是一种网络架构,通过代理服务器为后端的服务器做代理,客户端的请求直接请求代理服务器,然后转发给后端的服务器。(安全、灵活、负载均衡)
##### Nginx代理服务器配置
图32 小结
* 反向代理是一种网络架构,通过代理服务器为后端的服务器做代理,客户端的请求直接请求代理服务器,然后转发给后端的服务器。(安全、灵活、负载均衡)
##### Nginx代理服务器配置
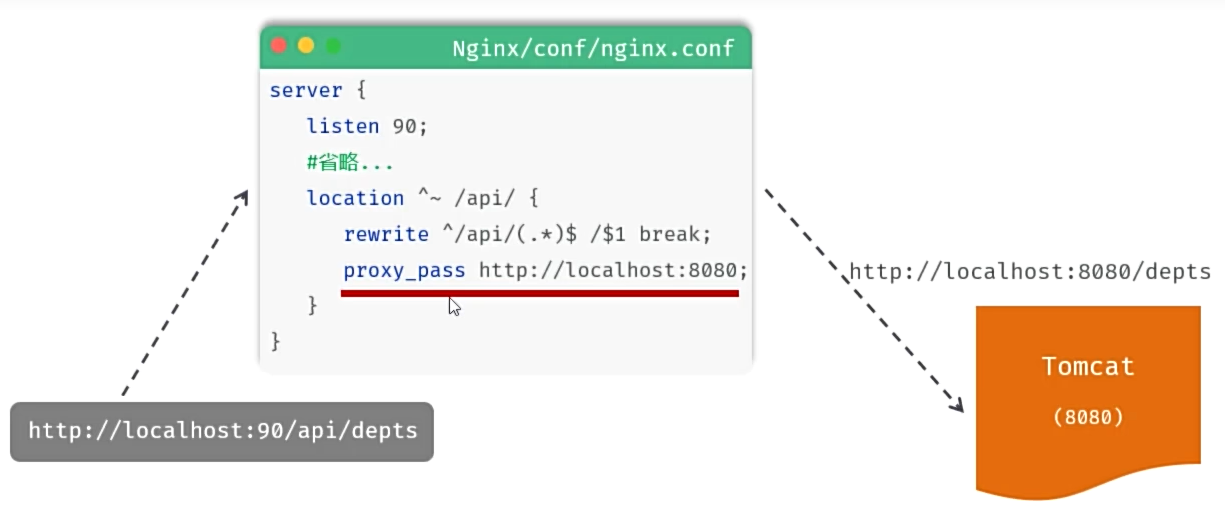 图33 Nginx代理服务器配置
* location:用于定义匹配路径匹配的规则。
* ^~ /api/:表示精确匹配,即只匹配以/api/开头的路径。
* rewrite:该指令用于重写匹配到的路径。
* proxy_pass:该指令用于代理转发,它将匹配到的请求转发给位于后端的指令服务器。
##### 小结
什么是反向代理?
* 反向代理是一种网络架构技术,通过反向代理服务器为后端服务器做代理 (安全、灵活、负载均衡)
Nginx中反向代理的配置 ?
图33 Nginx代理服务器配置
* location:用于定义匹配路径匹配的规则。
* ^~ /api/:表示精确匹配,即只匹配以/api/开头的路径。
* rewrite:该指令用于重写匹配到的路径。
* proxy_pass:该指令用于代理转发,它将匹配到的请求转发给位于后端的指令服务器。
##### 小结
什么是反向代理?
* 反向代理是一种网络架构技术,通过反向代理服务器为后端服务器做代理 (安全、灵活、负载均衡)
Nginx中反向代理的配置 ?
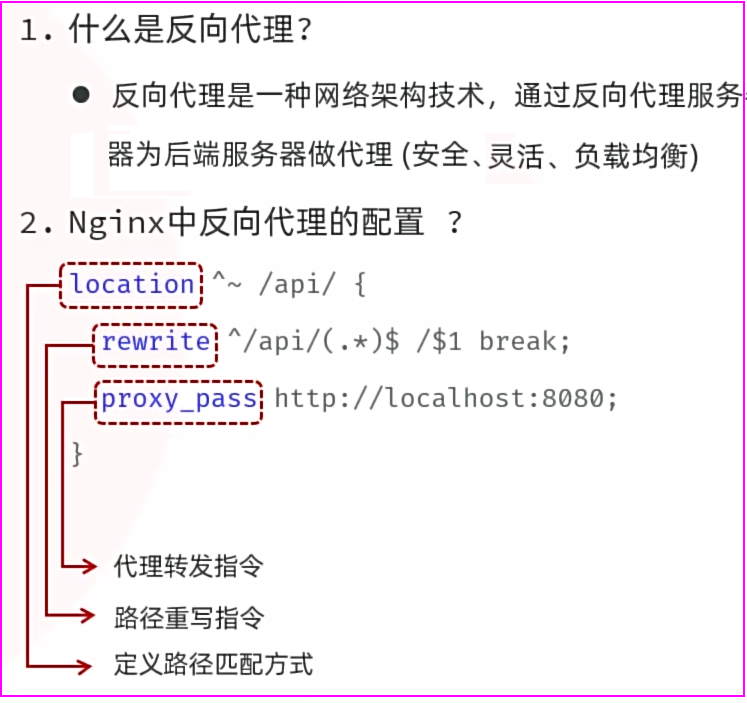 图34 反向代理服务器小结
### 3.删除部门
##### 需求分析
图34 反向代理服务器小结
### 3.删除部门
##### 需求分析
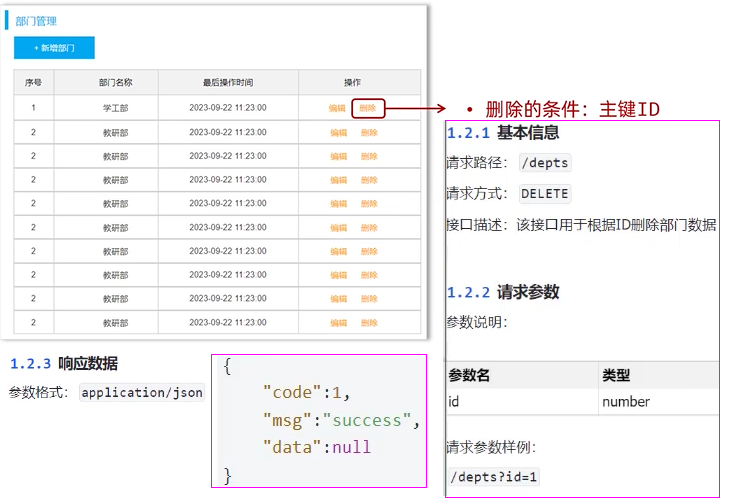 图35 删除部分需求
##### 思路分析
* 明确了删除部门的需求之后,再来梳理一下实现该功能时,三层架构每一层的职责:
图35 删除部分需求
##### 思路分析
* 明确了删除部门的需求之后,再来梳理一下实现该功能时,三层架构每一层的职责:
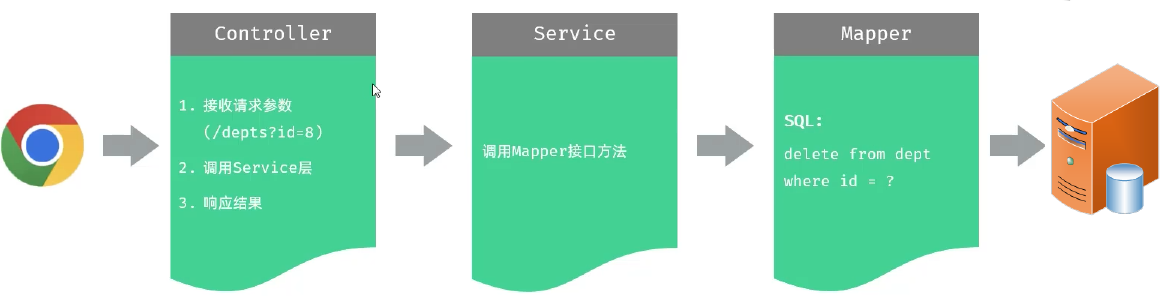 图36 三层架构每层的职责
##### Controller接收参数
接收请求参数:DELETE /depts?id=8 简单参数
方式一:通过原始的 HttpServletRequest 对象获取请求参数。
```java
@DeleteMapping("/depts")
public Result delete(HttpServletRequest request){
String idStr = request.getParameter("id");
int id = Integer.parseInt(idStr);
System.out.println("根据ID删除部门: " + id);
return Result.success();
}
```
方式二:通过Spring提供的 @RequestParam 注解,将请求参数绑定给方法形参。
```java
@DeleteMapping("/depts")
public Result delete(@RequestParam("id") Integer deptId){
System.out.println("根据ID删除部门: " + deptId);
return Result.success();
}
```
注意:@RequestParam注解required属性默认为true,代表该参数必须传递,如果不传递将报错。 如果参数可选,可以将属性设置为false。
方式三:如果请求参数名与形参变量名相同,直接定义方法形参即可接收。(省略@RequestParam 推荐)
```java
@DeleteMapping("/depts")
public Result delete(Integer id){
System.out.println("根据ID删除部门: " + id);
return Result.success();
}
```
图36 三层架构每层的职责
##### Controller接收参数
接收请求参数:DELETE /depts?id=8 简单参数
方式一:通过原始的 HttpServletRequest 对象获取请求参数。
```java
@DeleteMapping("/depts")
public Result delete(HttpServletRequest request){
String idStr = request.getParameter("id");
int id = Integer.parseInt(idStr);
System.out.println("根据ID删除部门: " + id);
return Result.success();
}
```
方式二:通过Spring提供的 @RequestParam 注解,将请求参数绑定给方法形参。
```java
@DeleteMapping("/depts")
public Result delete(@RequestParam("id") Integer deptId){
System.out.println("根据ID删除部门: " + deptId);
return Result.success();
}
```
注意:@RequestParam注解required属性默认为true,代表该参数必须传递,如果不传递将报错。 如果参数可选,可以将属性设置为false。
方式三:如果请求参数名与形参变量名相同,直接定义方法形参即可接收。(省略@RequestParam 推荐)
```java
@DeleteMapping("/depts")
public Result delete(Integer id){
System.out.println("根据ID删除部门: " + id);
return Result.success();
}
```
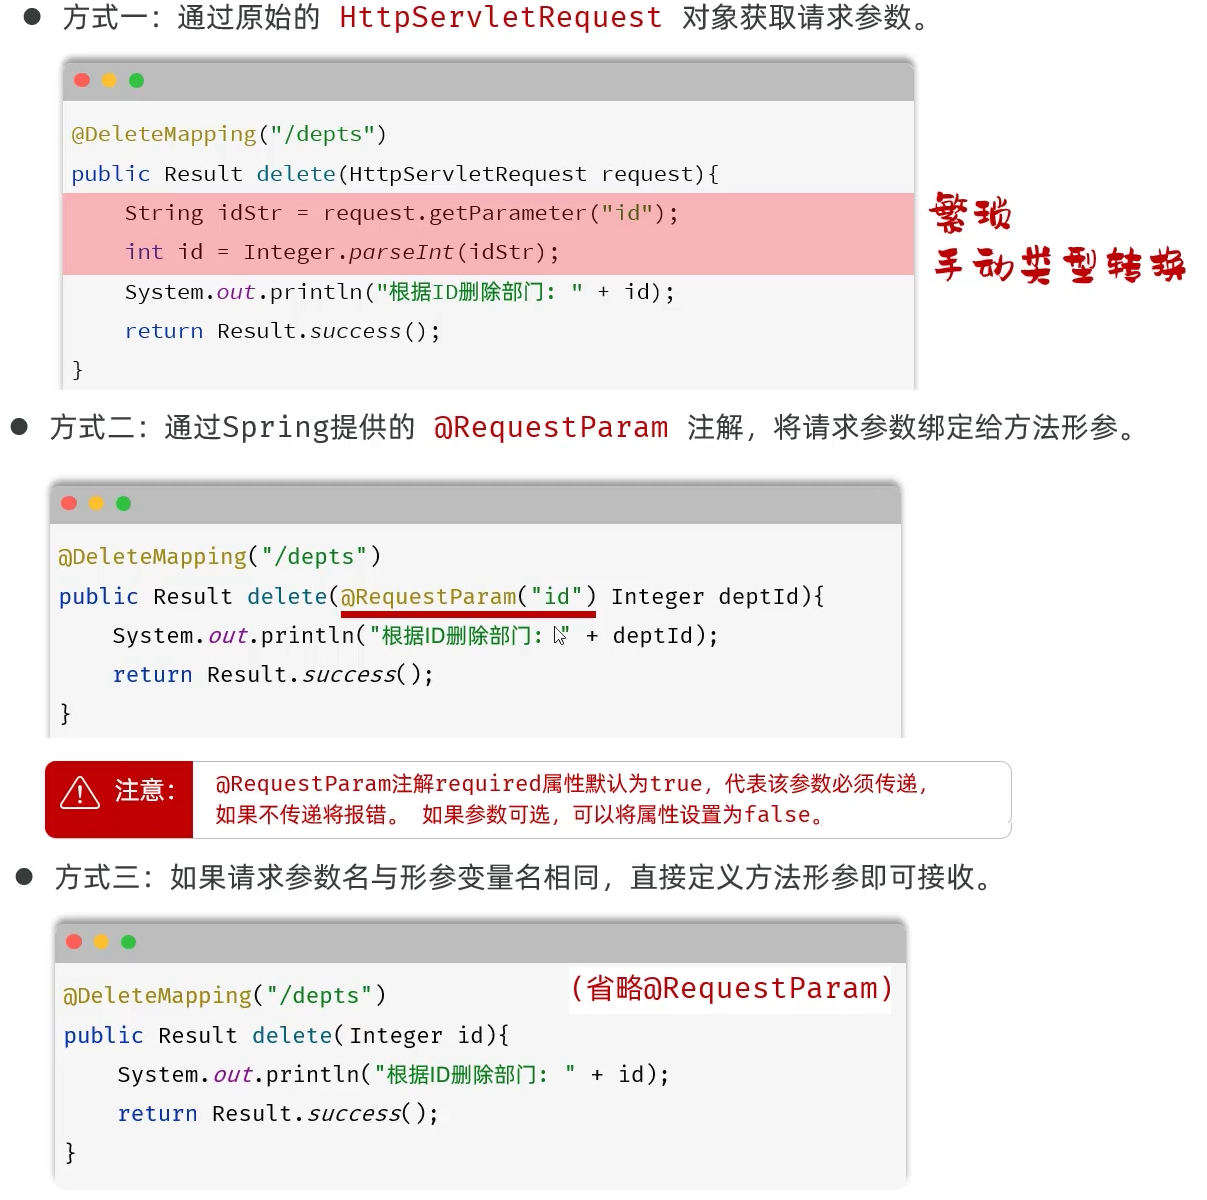 图37 Controller接受简单参数的方式
##### 小结
简单参数接收方式
* 方式一:通过原始的HttpServletRequest对象获取 ```String xxx = request.getParameter("xxx");```
* 方式二:通过@RequestParam注解进行参数绑定 ```public Result del(@RequestParam("id")Integer deptId){}```
* 方式三:保证请求参数名与形参变量名相同,直接接收 (推荐)
* 注意事项: 一旦加了@RequestParam注解,该参数必须传递,因为默认required为true
图37 Controller接受简单参数的方式
##### 小结
简单参数接收方式
* 方式一:通过原始的HttpServletRequest对象获取 ```String xxx = request.getParameter("xxx");```
* 方式二:通过@RequestParam注解进行参数绑定 ```public Result del(@RequestParam("id")Integer deptId){}```
* 方式三:保证请求参数名与形参变量名相同,直接接收 (推荐)
* 注意事项: 一旦加了@RequestParam注解,该参数必须传递,因为默认required为true
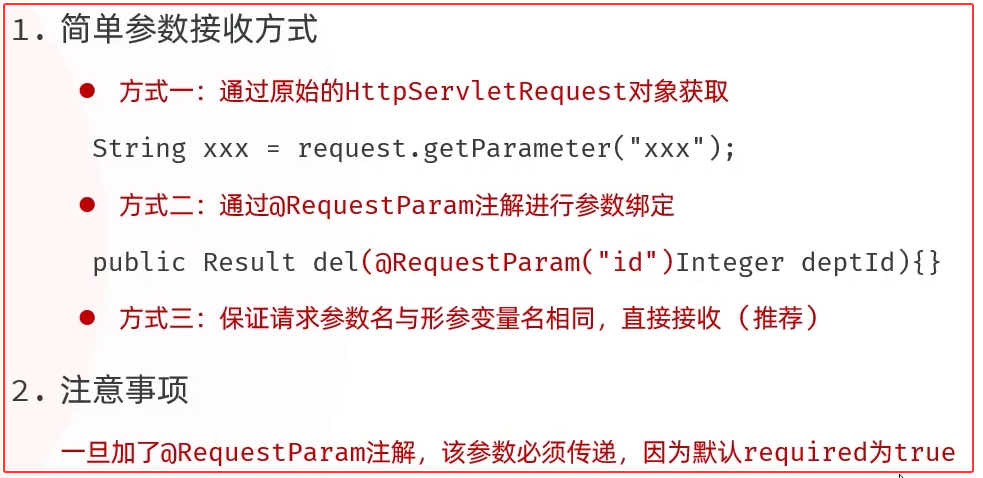 图38 Controller接受简单参数小结
##### 删除部门
cn/dzj/controller/DeptController.java 添加下列方法
```java
@DeleteMapping("/depts")
public Result delete(Integer id){
System.out.println("根据ID删除部门数据: " + id);
deptService.delete(id);
return Result.success();
}
```
cn/dzj/service/impl/DeptServiceImpl.java 添加下列方法
```java
@Override
public void delete(Integer id) {
deptMapper.delete(id);
}
```
cn/dzj/mapper/DeptMapper.java 添加下列方法
```java
@Delete("delete from dept where id = #{id}")
void delete(Integer id);
```
图38 Controller接受简单参数小结
##### 删除部门
cn/dzj/controller/DeptController.java 添加下列方法
```java
@DeleteMapping("/depts")
public Result delete(Integer id){
System.out.println("根据ID删除部门数据: " + id);
deptService.delete(id);
return Result.success();
}
```
cn/dzj/service/impl/DeptServiceImpl.java 添加下列方法
```java
@Override
public void delete(Integer id) {
deptMapper.delete(id);
}
```
cn/dzj/mapper/DeptMapper.java 添加下列方法
```java
@Delete("delete from dept where id = #{id}")
void delete(Integer id);
```
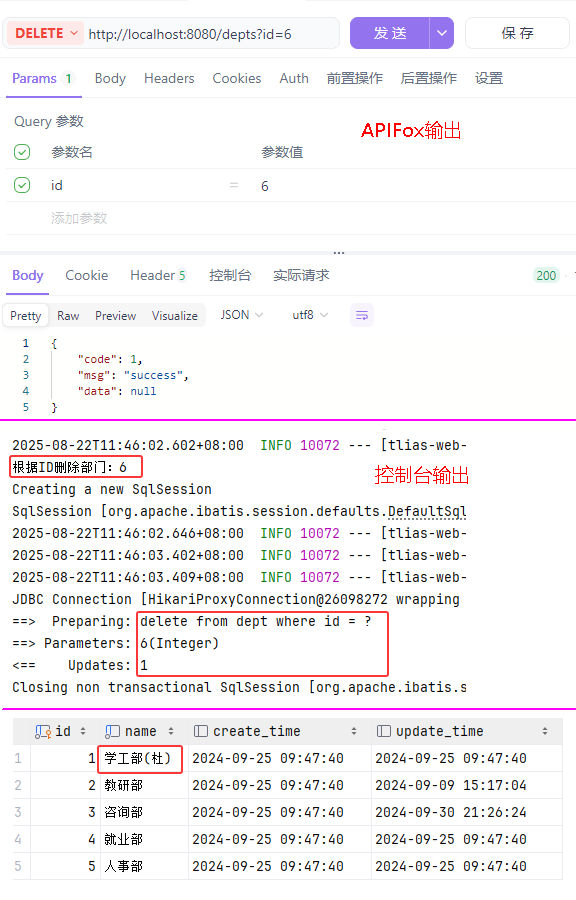 图39 删除部门测试验证
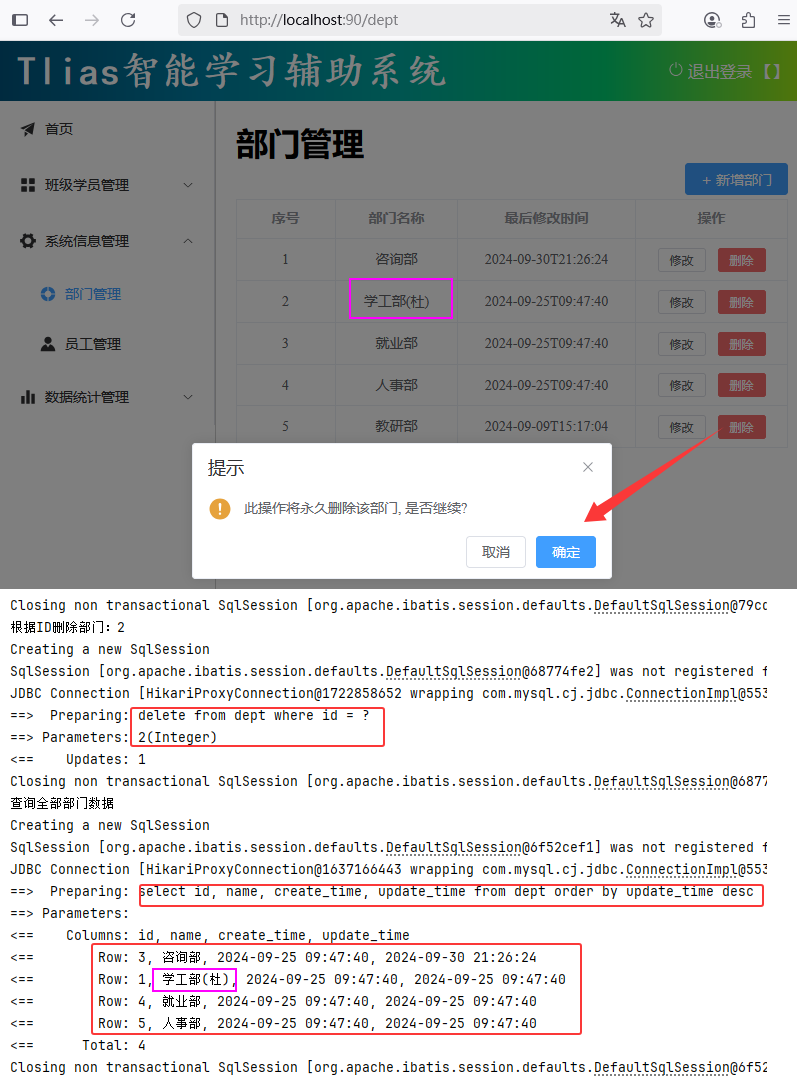 图40 删除部门前后端联调测试验证
### 4.新增部门
##### 需求分析
图40 删除部门前后端联调测试验证
### 4.新增部门
##### 需求分析
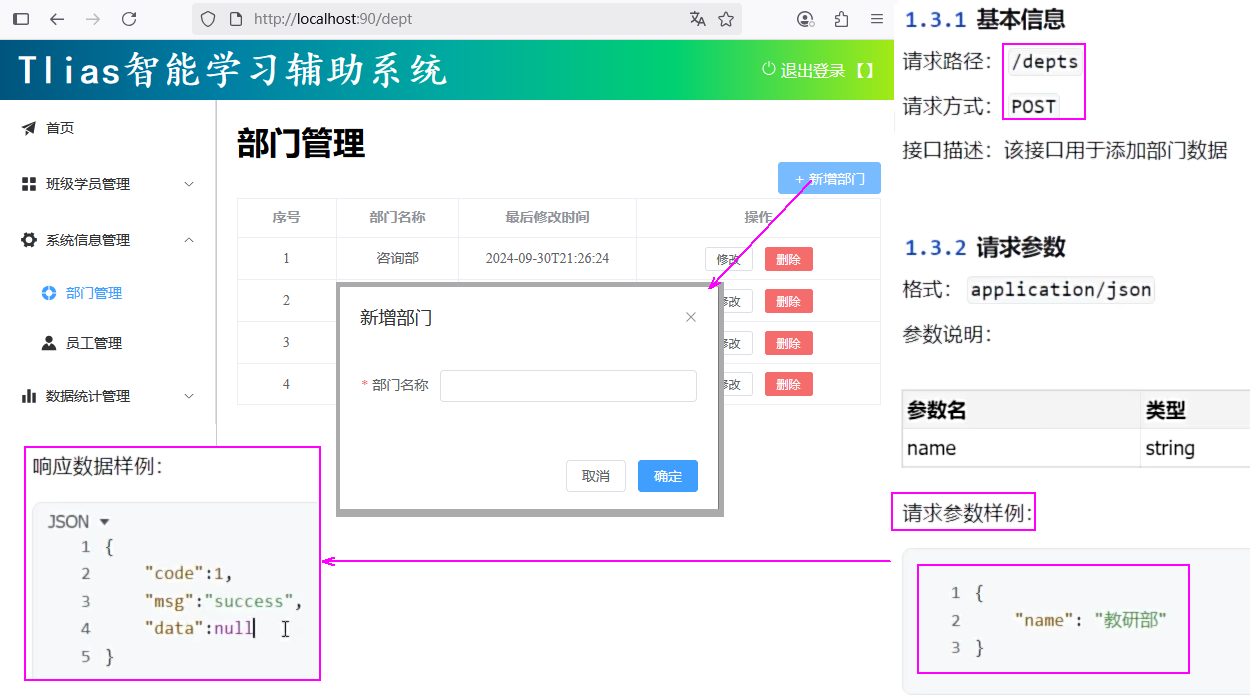 图41 新增部门需求
##### 思路分析
* 明确了新增部门的需求之后,再来梳理一下实现该功能时,三层架构每一层的职责:
图41 新增部门需求
##### 思路分析
* 明确了新增部门的需求之后,再来梳理一下实现该功能时,三层架构每一层的职责:
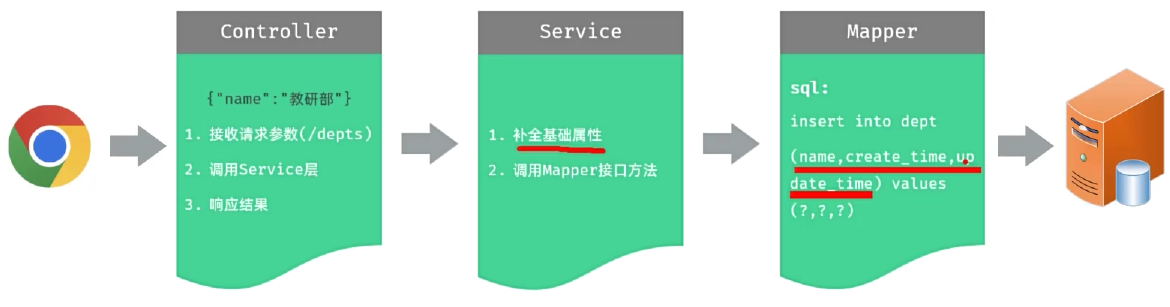 图42 三层架构每层的职责
##### Controller接收参数
* JSON格式的参数,通常会使用一个实体对象进行接收 。
* 规则:JSON对象数据的键名与方法形参对象的属性名相同,并需要使用@RequestBody注解标识。
图42 三层架构每层的职责
##### Controller接收参数
* JSON格式的参数,通常会使用一个实体对象进行接收 。
* 规则:JSON对象数据的键名与方法形参对象的属性名相同,并需要使用@RequestBody注解标识。
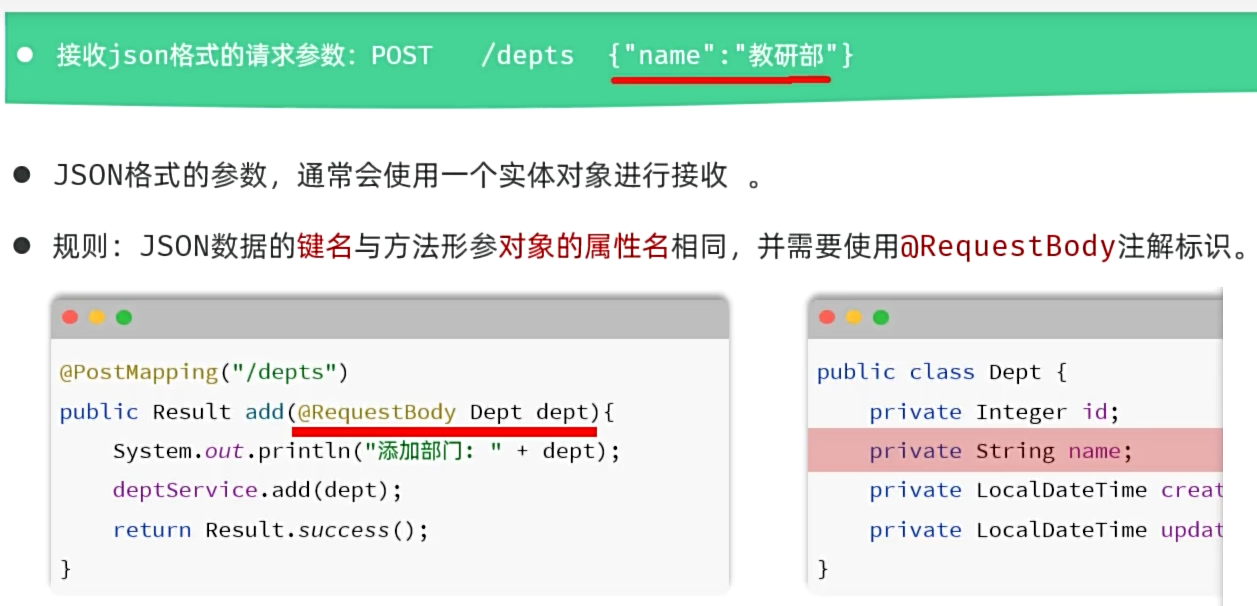 图43 Controller接受JSON对象的数据
##### 新增部门
cn/dzj/controller/DeptController.java 添加下列方法
```java
@PostMapping("/depts")
public Result add(@RequestBody Dept dept){
System.out.println("添加部门: " + dept);
deptService.add(dept);
return Result.success();
}
```
cn/dzj/service/impl/DeptServiceImpl.java 添加下列方法
```java
@Override
public void add(Dept dept) {
dept.setCreateTime(LocalDateTime.now());
dept.setUpdateTime(LocalDateTime.now());
deptMapper.add(dept);
}
```
cn/dzj/mapper/DeptMapper.java 添加下列方法
```java
@Insert("insert into dept(name, create_time, update_time) values(#{name}, #{createTime}, #{updateTime})")
void add(Dept dept);
```
图43 Controller接受JSON对象的数据
##### 新增部门
cn/dzj/controller/DeptController.java 添加下列方法
```java
@PostMapping("/depts")
public Result add(@RequestBody Dept dept){
System.out.println("添加部门: " + dept);
deptService.add(dept);
return Result.success();
}
```
cn/dzj/service/impl/DeptServiceImpl.java 添加下列方法
```java
@Override
public void add(Dept dept) {
dept.setCreateTime(LocalDateTime.now());
dept.setUpdateTime(LocalDateTime.now());
deptMapper.add(dept);
}
```
cn/dzj/mapper/DeptMapper.java 添加下列方法
```java
@Insert("insert into dept(name, create_time, update_time) values(#{name}, #{createTime}, #{updateTime})")
void add(Dept dept);
```
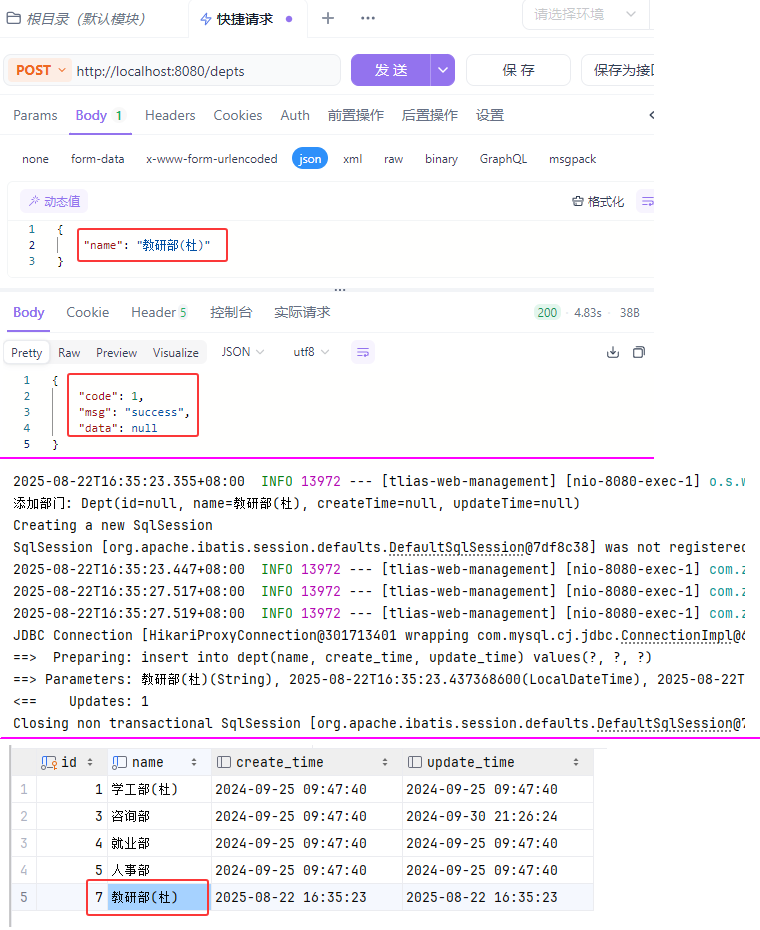 图44 新增部门测试验证
 图45 新增部门前后端联调测试验证
##### 小结
如何接收JSON格式的请求参数 ?
* 通常通过实体对象接收,保证json格式的键名与对象属性名保持一致,并添加@RequestBody注解
json格式的请求参数适用场景?
* 主要在POST、PUT请求中,在请求体传递请求参数
图45 新增部门前后端联调测试验证
##### 小结
如何接收JSON格式的请求参数 ?
* 通常通过实体对象接收,保证json格式的键名与对象属性名保持一致,并添加@RequestBody注解
json格式的请求参数适用场景?
* 主要在POST、PUT请求中,在请求体传递请求参数
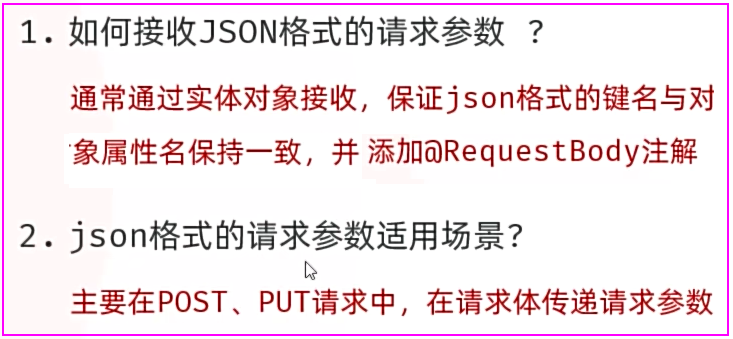 图46 新增部门小结
### 5.修改部门
##### 需求
图46 新增部门小结
### 5.修改部门
##### 需求
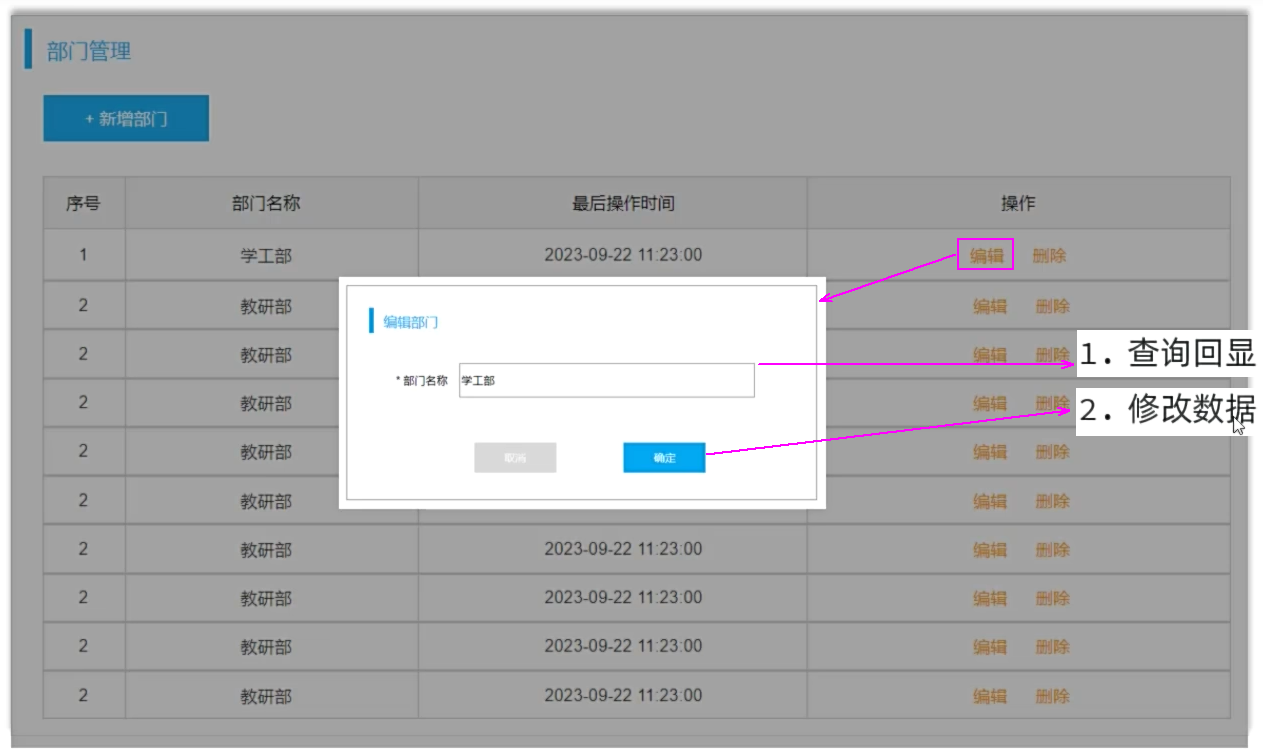 图47 修改部门的步骤
#### 5.1 查询回显
##### 需求
图47 修改部门的步骤
#### 5.1 查询回显
##### 需求
 图48 查询回显需求题
##### 思路
图48 查询回显需求题
##### 思路
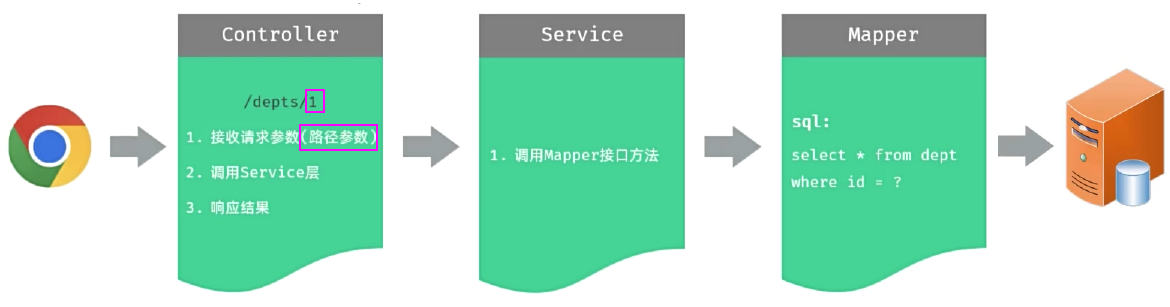 图49 三层架构每层的职责
##### Controller接收参数 -- 路径参数
* 接收请求参数(路径参数):GET /depts/1
* 路径参数:通过请求URL直接传递参数,使用{…}来标识该路径参数,需要使用 @PathVariable 获取路径参数。
```java
@GetMapping("/depts/{id}")
public Result getInfo(@PathVariable("id") Integer deptId){
System.out.println("根据ID查询部门数据: " + deptId);
return Result.success();
}
```
{…}来标识该路径参数和接受的参数变量同名省略("id")
```java
@GetMapping("/depts/{id}")
public Result getInfo(@PathVariable Integer id){
System.out.println("根据ID查询部门数据: " + id);
return Result.success();
}
```
##### 根据ID查询部门
cn/dzj/controller/DeptController.java 添加下列方法
```java
@GetMapping("/depts/{id}")
public Result getInfo(@PathVariable Integer id){
System.out.println("根据ID查询部门数据: " + id);
Dept dept = deptService.getInfo(id);
return Result.success(dept);
}
```
cn/dzj/service/impl/DeptServiceImpl.java 添加下列方法
```java
@Override
public Dept getInfo(Integer id) {
return deptMapper.getById(id);
}
```
cn/dzj/mapper/DeptMapper.java 添加下列方法
```java
@Select("select id, name, create_time, update_time from dept where id = #{id}")
Dept getById(Integer id);
```
图49 三层架构每层的职责
##### Controller接收参数 -- 路径参数
* 接收请求参数(路径参数):GET /depts/1
* 路径参数:通过请求URL直接传递参数,使用{…}来标识该路径参数,需要使用 @PathVariable 获取路径参数。
```java
@GetMapping("/depts/{id}")
public Result getInfo(@PathVariable("id") Integer deptId){
System.out.println("根据ID查询部门数据: " + deptId);
return Result.success();
}
```
{…}来标识该路径参数和接受的参数变量同名省略("id")
```java
@GetMapping("/depts/{id}")
public Result getInfo(@PathVariable Integer id){
System.out.println("根据ID查询部门数据: " + id);
return Result.success();
}
```
##### 根据ID查询部门
cn/dzj/controller/DeptController.java 添加下列方法
```java
@GetMapping("/depts/{id}")
public Result getInfo(@PathVariable Integer id){
System.out.println("根据ID查询部门数据: " + id);
Dept dept = deptService.getInfo(id);
return Result.success(dept);
}
```
cn/dzj/service/impl/DeptServiceImpl.java 添加下列方法
```java
@Override
public Dept getInfo(Integer id) {
return deptMapper.getById(id);
}
```
cn/dzj/mapper/DeptMapper.java 添加下列方法
```java
@Select("select id, name, create_time, update_time from dept where id = #{id}")
Dept getById(Integer id);
```
 图50 根据ID查询部门验证
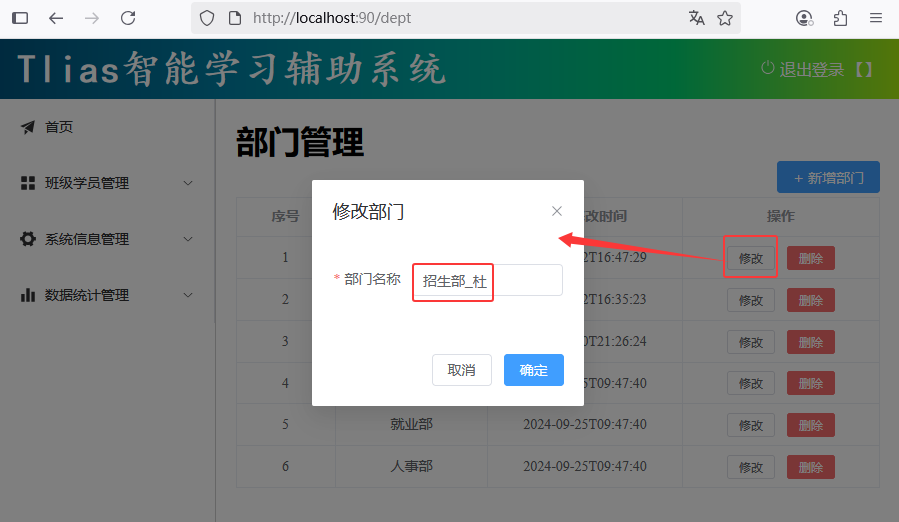 图51 根据ID查询部门前后端联调测试验证
##### 小结
图51 根据ID查询部门前后端联调测试验证
##### 小结
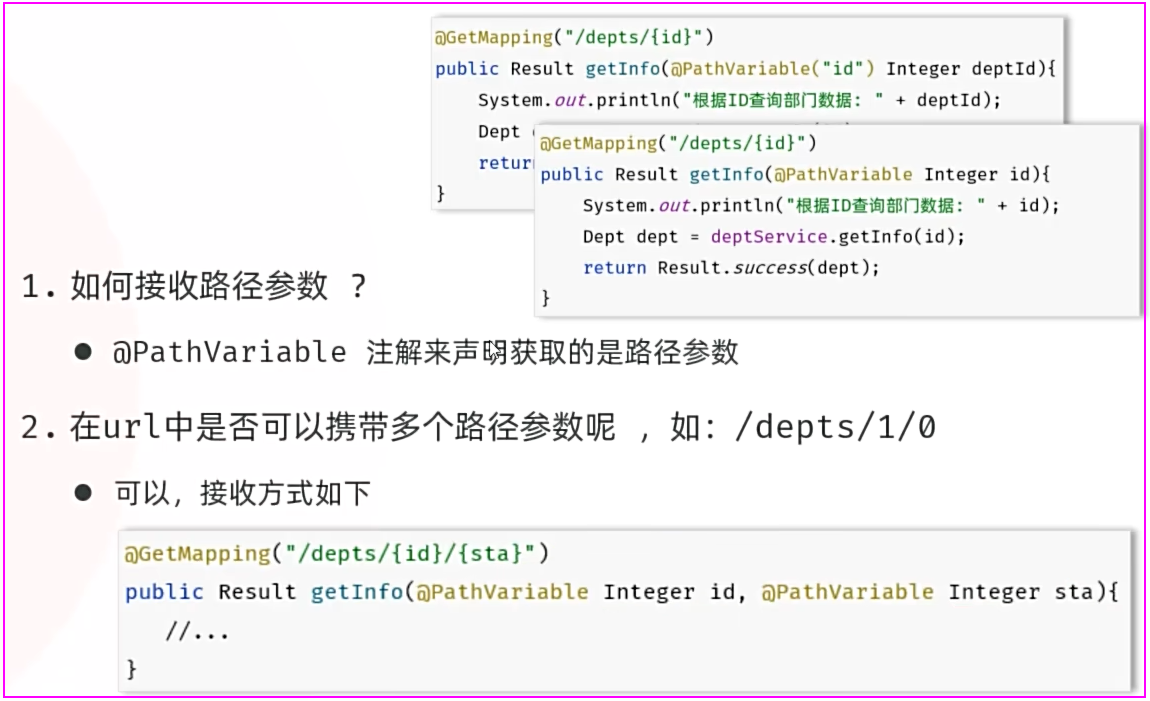 图52 根据ID查询部门小结
#### 5.2 修改数据
##### 需求
图52 根据ID查询部门小结
#### 5.2 修改数据
##### 需求
 图52 修改数据需求
##### 思路
图52 修改数据需求
##### 思路
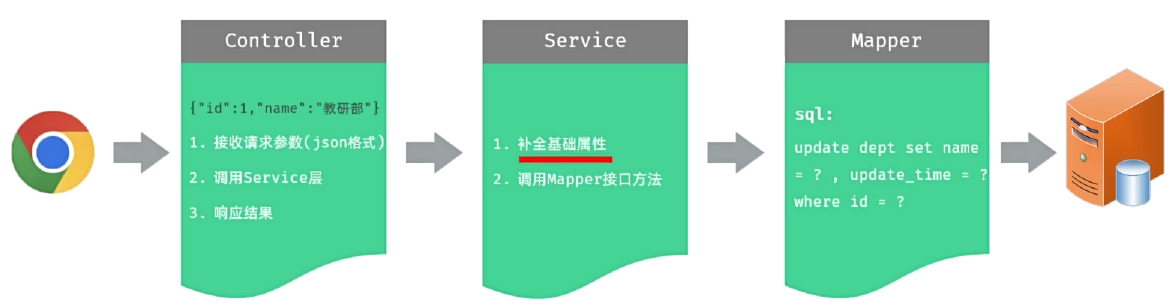 图54 三层架构每层的职责
##### Controller接收参数
##### 修改数据
cn/dzj/controller/DeptController.java 添加下列方法
```java
@PutMapping("/depts")
public Result update(@RequestBody Dept dept){
System.out.println("修改部门数据: " + dept);
deptService.update(dept);
return Result.success();
}
```
cn/dzj/service/impl/DeptServiceImpl.java 添加下列方法
```java
@Override
public void update(Dept dept) {
//1.补全基础属性-updateTime
dept.setUpdateTime(LocalDateTime.now());
//2,调用Mapper接口方法更新部门
deptMapper.update(dept);
}
```
cn/dzj/mapper/DeptMapper.java 添加下列方法
```java
@Update("update dept set name = #{name}, update_time = #{updateTime} where id = #{id}")
void update(Dept dept);
```
图54 三层架构每层的职责
##### Controller接收参数
##### 修改数据
cn/dzj/controller/DeptController.java 添加下列方法
```java
@PutMapping("/depts")
public Result update(@RequestBody Dept dept){
System.out.println("修改部门数据: " + dept);
deptService.update(dept);
return Result.success();
}
```
cn/dzj/service/impl/DeptServiceImpl.java 添加下列方法
```java
@Override
public void update(Dept dept) {
//1.补全基础属性-updateTime
dept.setUpdateTime(LocalDateTime.now());
//2,调用Mapper接口方法更新部门
deptMapper.update(dept);
}
```
cn/dzj/mapper/DeptMapper.java 添加下列方法
```java
@Update("update dept set name = #{name}, update_time = #{updateTime} where id = #{id}")
void update(Dept dept);
```
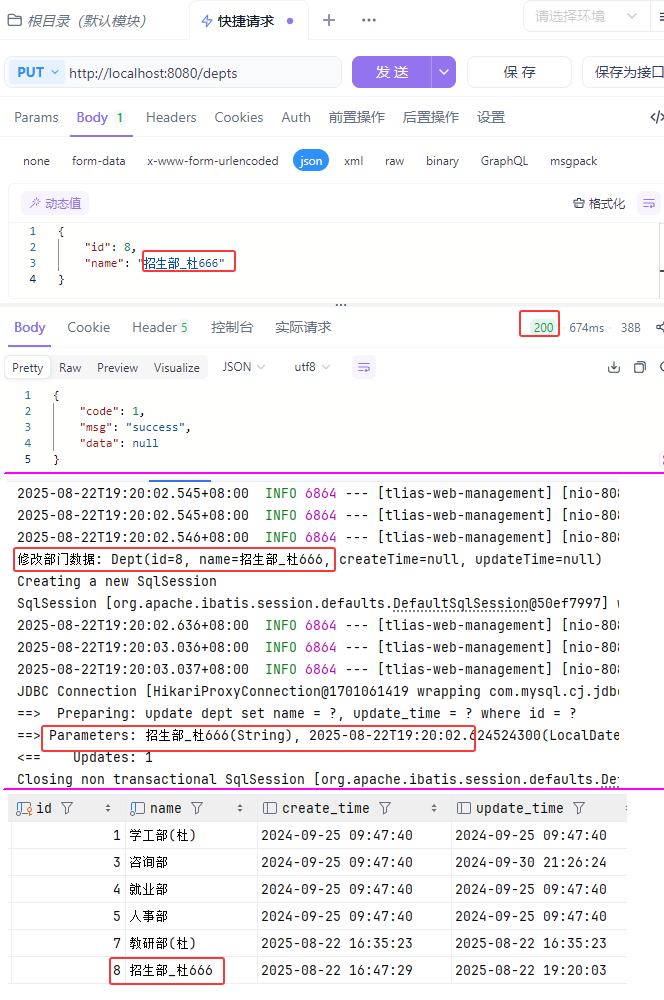 图55 修改部门测试验证
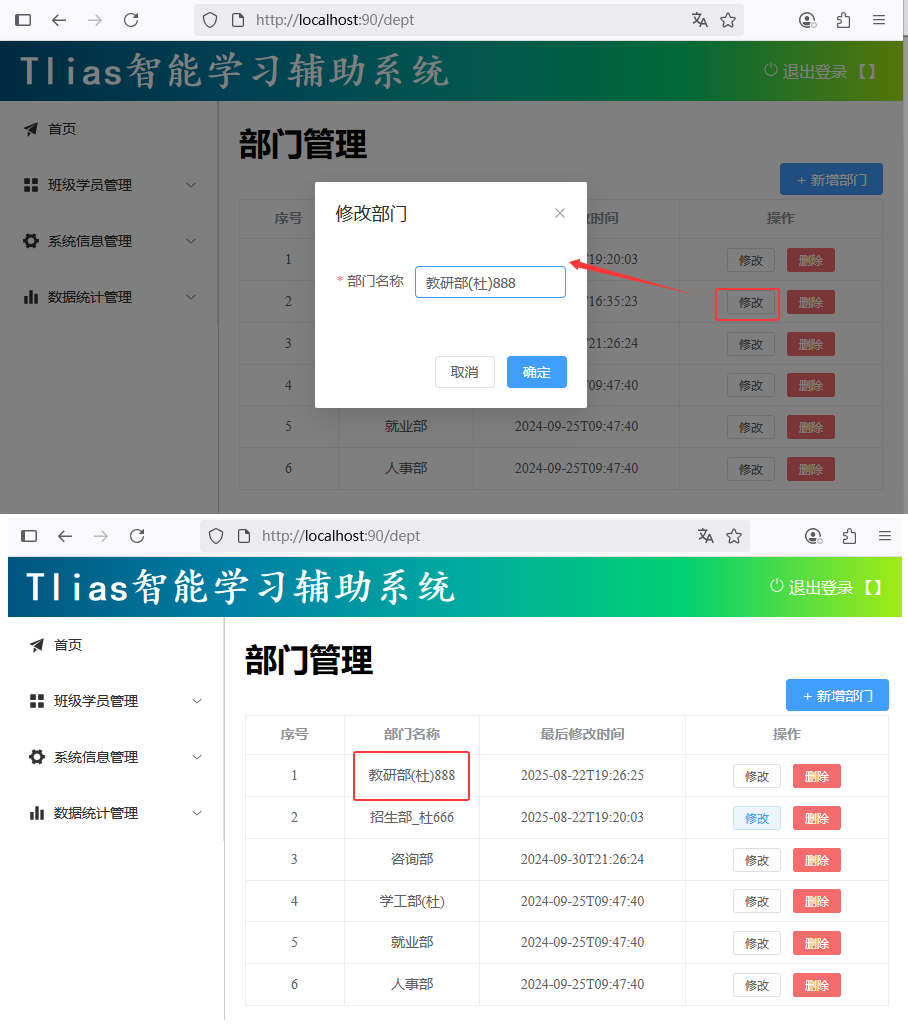 图56 修改部门前后端联调测试验证
##### @RequestMapping
图56 修改部门前后端联调测试验证
##### @RequestMapping
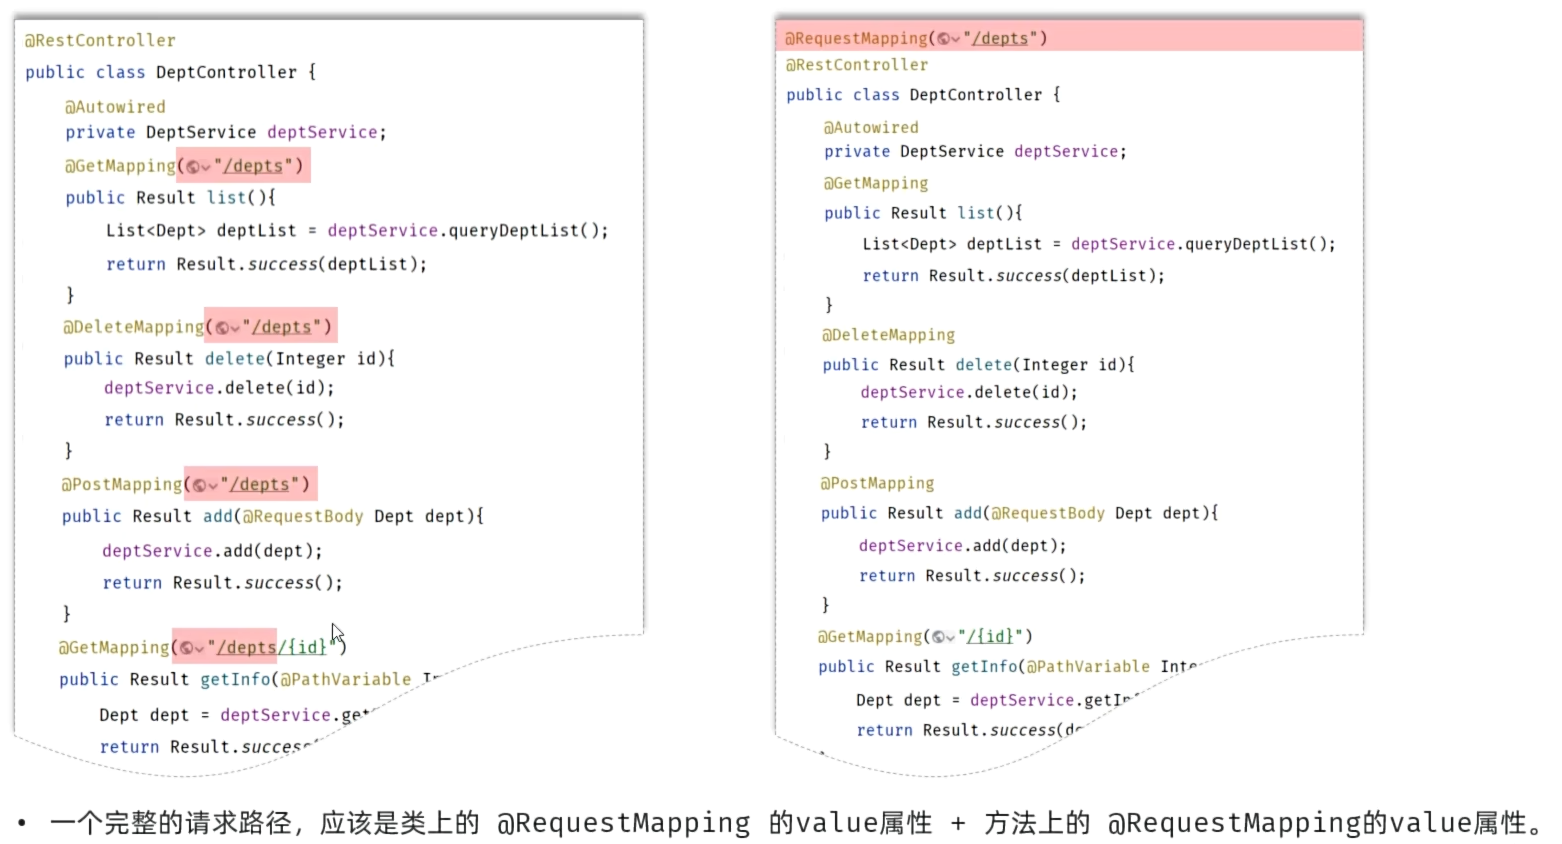 图57 @RequestMapping
###### cn/dzj/controller/DeptController.java 主要代码
```java
@RequestMapping("/depts")
@RestController
public class DeptController {
@Autowired
private DeptService deptService;
//@RequestMapping(value ="/depts",method=RequestMethod.GET)//method:指定请求方式
@GetMapping
public Result list() {
System.out.println("查询全部部门数据");
List deptList = deptService.findAll();
return Result.success(deptList);
}
/**
* 删除部门:省略@RequestParam(前端传递的请求参数名与服务端方法形参名一致)
*/
@DeleteMapping
public Result delete(Integer id) {
System.out.println("根据ID删除部门:" + id);
deptService.delete(id);
return Result.success();
}
@PostMapping
public Result add(@RequestBody Dept dept) {
System.out.println("添加部门: " + dept);
deptService.add(dept);
return Result.success();
}
/*
* 根据ID查询部门
*/
@GetMapping("/{id}")
public Result getInfo(@PathVariable Integer id) {
System.out.println("根据ID查询部门:" + id);
Dept dept = deptService.getInfo(id);
return Result.success(dept);
}
@PutMapping
public Result update(@RequestBody Dept dept){
System.out.println("修改部门数据: " + dept);
deptService.update(dept);
return Result.success();
}
}
```
##### 小结
图57 @RequestMapping
###### cn/dzj/controller/DeptController.java 主要代码
```java
@RequestMapping("/depts")
@RestController
public class DeptController {
@Autowired
private DeptService deptService;
//@RequestMapping(value ="/depts",method=RequestMethod.GET)//method:指定请求方式
@GetMapping
public Result list() {
System.out.println("查询全部部门数据");
List deptList = deptService.findAll();
return Result.success(deptList);
}
/**
* 删除部门:省略@RequestParam(前端传递的请求参数名与服务端方法形参名一致)
*/
@DeleteMapping
public Result delete(Integer id) {
System.out.println("根据ID删除部门:" + id);
deptService.delete(id);
return Result.success();
}
@PostMapping
public Result add(@RequestBody Dept dept) {
System.out.println("添加部门: " + dept);
deptService.add(dept);
return Result.success();
}
/*
* 根据ID查询部门
*/
@GetMapping("/{id}")
public Result getInfo(@PathVariable Integer id) {
System.out.println("根据ID查询部门:" + id);
Dept dept = deptService.getInfo(id);
return Result.success(dept);
}
@PutMapping
public Result update(@RequestBody Dept dept){
System.out.println("修改部门数据: " + dept);
deptService.update(dept);
return Result.success();
}
}
```
##### 小结
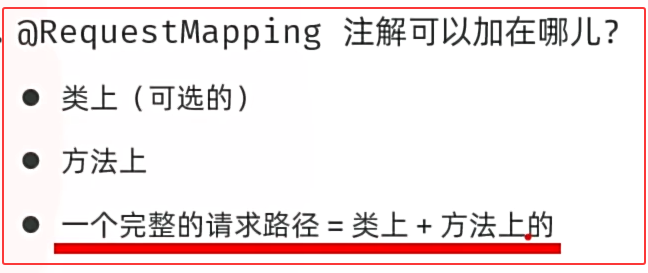 图58 @RequestMapping小结
### 6.日志技术
##### 问题的提出
图58 @RequestMapping小结
### 6.日志技术
##### 问题的提出
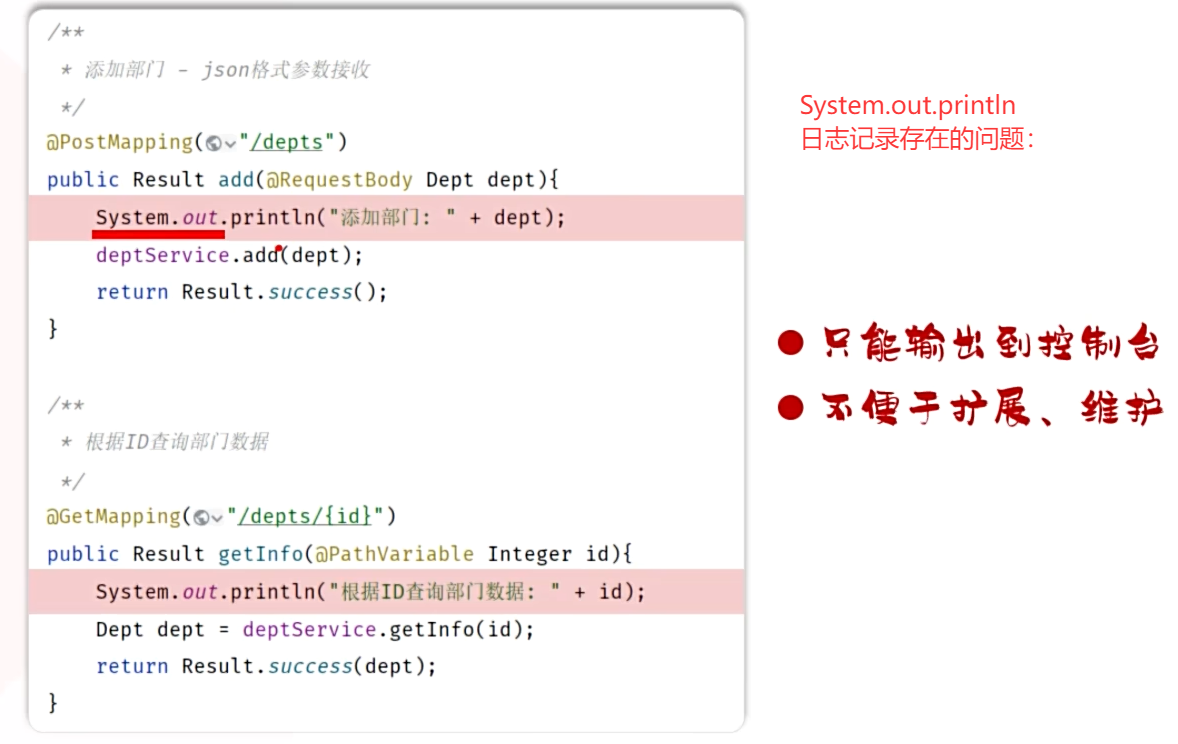 图59 日志记录存在的问题
##### 日志技术
* 好比生活中的日记,可以记录你生活中的点点滴滴。
* 程序中的日志,是用来记录应用程序的运行信息、状态信息、错误信息等。
图59 日志记录存在的问题
##### 日志技术
* 好比生活中的日记,可以记录你生活中的点点滴滴。
* 程序中的日志,是用来记录应用程序的运行信息、状态信息、错误信息等。
 图60 日志的用途
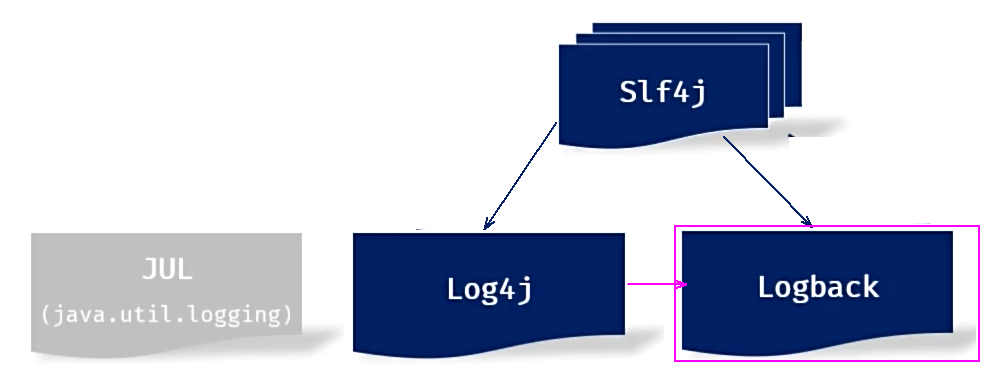 图61 日志技术
* JUL:这是JavaSE平台提供的官方日志框架,也被称为JUL。配置相对简单,但不够灵活,性能较差。
* Log4j:一个流行的日志框架,提供了灵活的配置选项,支持多种输出目标。
* Logback:基于Log4j升级而来,提供了更多的功能和配置选项,性能优于Log4j。
* Slf4j(Simple Logging Facade for Java):简单日志门面,提供了一套日志操作的标准接口及抽象类,允许应用程序使用不同的底层日志框架。
#### 6.1 Logback快速入门
* 准备工作:引入logback的依赖(springboot项目中该依赖已传递)、配置文件src/main/resources/logback.xml。
```xml
ch.qos.logback
logback-classic
1.4.11
```
图61 日志技术
* JUL:这是JavaSE平台提供的官方日志框架,也被称为JUL。配置相对简单,但不够灵活,性能较差。
* Log4j:一个流行的日志框架,提供了灵活的配置选项,支持多种输出目标。
* Logback:基于Log4j升级而来,提供了更多的功能和配置选项,性能优于Log4j。
* Slf4j(Simple Logging Facade for Java):简单日志门面,提供了一套日志操作的标准接口及抽象类,允许应用程序使用不同的底层日志框架。
#### 6.1 Logback快速入门
* 准备工作:引入logback的依赖(springboot项目中该依赖已传递)、配置文件src/main/resources/logback.xml。
```xml
ch.qos.logback
logback-classic
1.4.11
```
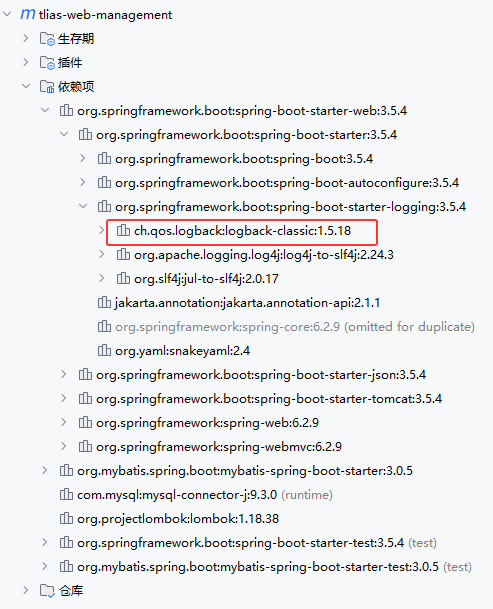 图62 logback的依赖已经传递
###### src/main/resources/logback.xml
```xml
%d{yyyy-MM-dd HH:mm:ss.SSS} [%thread] %-5level %logger{50} - %msg%n
```
* 记录日志:定义日志记录对象Logger,记录日志。
###### src/test/java/cn/dzj/LogTest.java
```java
package cn.dzj;
import org.junit.jupiter.api.Test;
import org.slf4j.Logger;
import org.slf4j.LoggerFactory;
import java.time.LocalDateTime;
public class LogTest {
@Test
public void testLog(){
System.out.println(LocalDateTime.now() + " : 开始计算...");
int sum = 0;
int[] nums = {1, 5, 3, 2, 1, 4, 5, 4, 6, 7, 4, 34, 2, 23};
for (int num : nums) {
sum += num;
}
System.out.println("计算结果为: "+sum);
System.out.println(LocalDateTime.now() + "结束计算...");
}
private static final Logger log = LoggerFactory.getLogger(LogTest.class);
@Test
public void testLog2(){
log.debug("开始计算...");
int sum = 0;
int[] nums = {1, 5, 3, 2, 1, 4, 5, 4, 6, 7, 4, 34, 2, 23};
for (int i = 0; i <= nums.length; i++) {
sum += nums[i];
}
log.info("计算结果为: "+sum);
log.debug("结束计算...");
}
}
```
图62 logback的依赖已经传递
###### src/main/resources/logback.xml
```xml
%d{yyyy-MM-dd HH:mm:ss.SSS} [%thread] %-5level %logger{50} - %msg%n
```
* 记录日志:定义日志记录对象Logger,记录日志。
###### src/test/java/cn/dzj/LogTest.java
```java
package cn.dzj;
import org.junit.jupiter.api.Test;
import org.slf4j.Logger;
import org.slf4j.LoggerFactory;
import java.time.LocalDateTime;
public class LogTest {
@Test
public void testLog(){
System.out.println(LocalDateTime.now() + " : 开始计算...");
int sum = 0;
int[] nums = {1, 5, 3, 2, 1, 4, 5, 4, 6, 7, 4, 34, 2, 23};
for (int num : nums) {
sum += num;
}
System.out.println("计算结果为: "+sum);
System.out.println(LocalDateTime.now() + "结束计算...");
}
private static final Logger log = LoggerFactory.getLogger(LogTest.class);
@Test
public void testLog2(){
log.debug("开始计算...");
int sum = 0;
int[] nums = {1, 5, 3, 2, 1, 4, 5, 4, 6, 7, 4, 34, 2, 23};
for (int i = 0; i <= nums.length; i++) {
sum += nums[i];
}
log.info("计算结果为: "+sum);
log.debug("结束计算...");
}
}
```
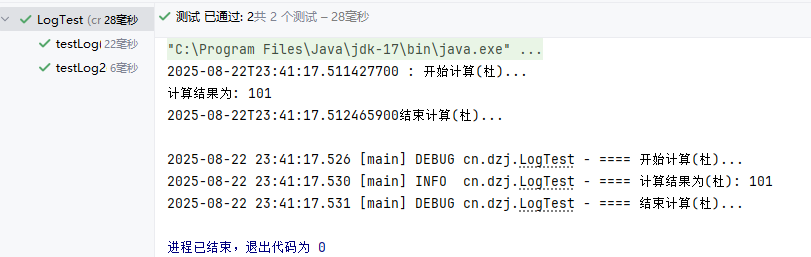 图63 System.out和log测试
##### 停止日志的输出
将 src/main/resources/logback.xml 日志输出级别改为off,将停止日志的输出
```xml
```
##### 小结
图63 System.out和log测试
##### 停止日志的输出
将 src/main/resources/logback.xml 日志输出级别改为off,将停止日志的输出
```xml
```
##### 小结
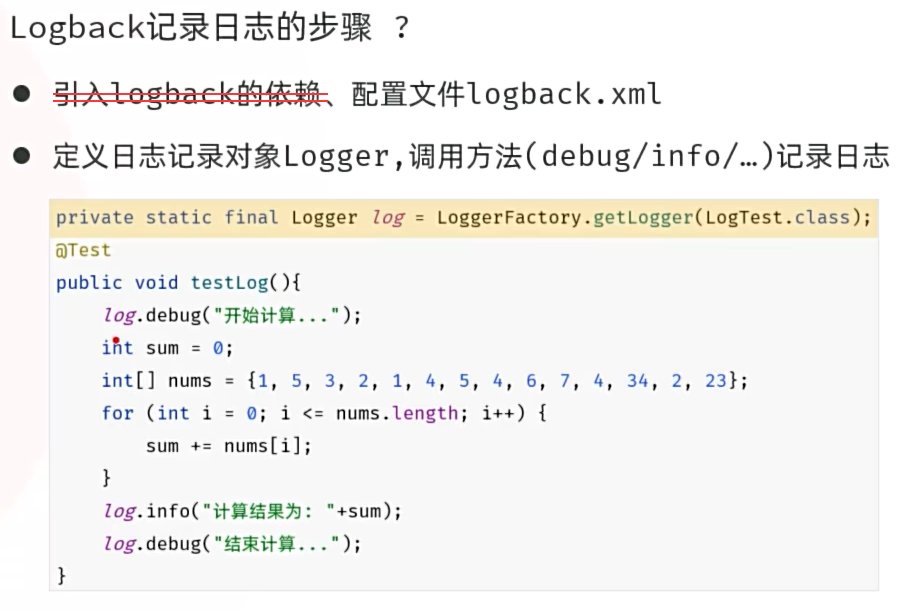 图64 logback小结
#### 6.2 Logback配置文件详解
* 配置文件名:src/main/resources/logback.xml
```xml
%d{yyyy-MM-dd HH:mm:ss.SSS} [%thread] %-5level %logger{50}-%msg%n
D:/tlias-%d{yyyy-MM-dd}-%i.log
30
10MB
%d{yyyy-MM-dd HH:mm:ss.SSS} [%thread] %-5level %logger{50}-%msg%n
```
* 该配置文件是对Logback日志框架输出的日志进行控制的,可以来配置输出的格式、位置及日志开关等。
* 常用的两种输出日志的位置:控制台、系统文件
```xml
...
...
```
* 开启日志(ALL),关闭日志(OFF)
```xml
```
图64 logback小结
#### 6.2 Logback配置文件详解
* 配置文件名:src/main/resources/logback.xml
```xml
%d{yyyy-MM-dd HH:mm:ss.SSS} [%thread] %-5level %logger{50}-%msg%n
D:/tlias-%d{yyyy-MM-dd}-%i.log
30
10MB
%d{yyyy-MM-dd HH:mm:ss.SSS} [%thread] %-5level %logger{50}-%msg%n
```
* 该配置文件是对Logback日志框架输出的日志进行控制的,可以来配置输出的格式、位置及日志开关等。
* 常用的两种输出日志的位置:控制台、系统文件
```xml
...
...
```
* 开启日志(ALL),关闭日志(OFF)
```xml
```
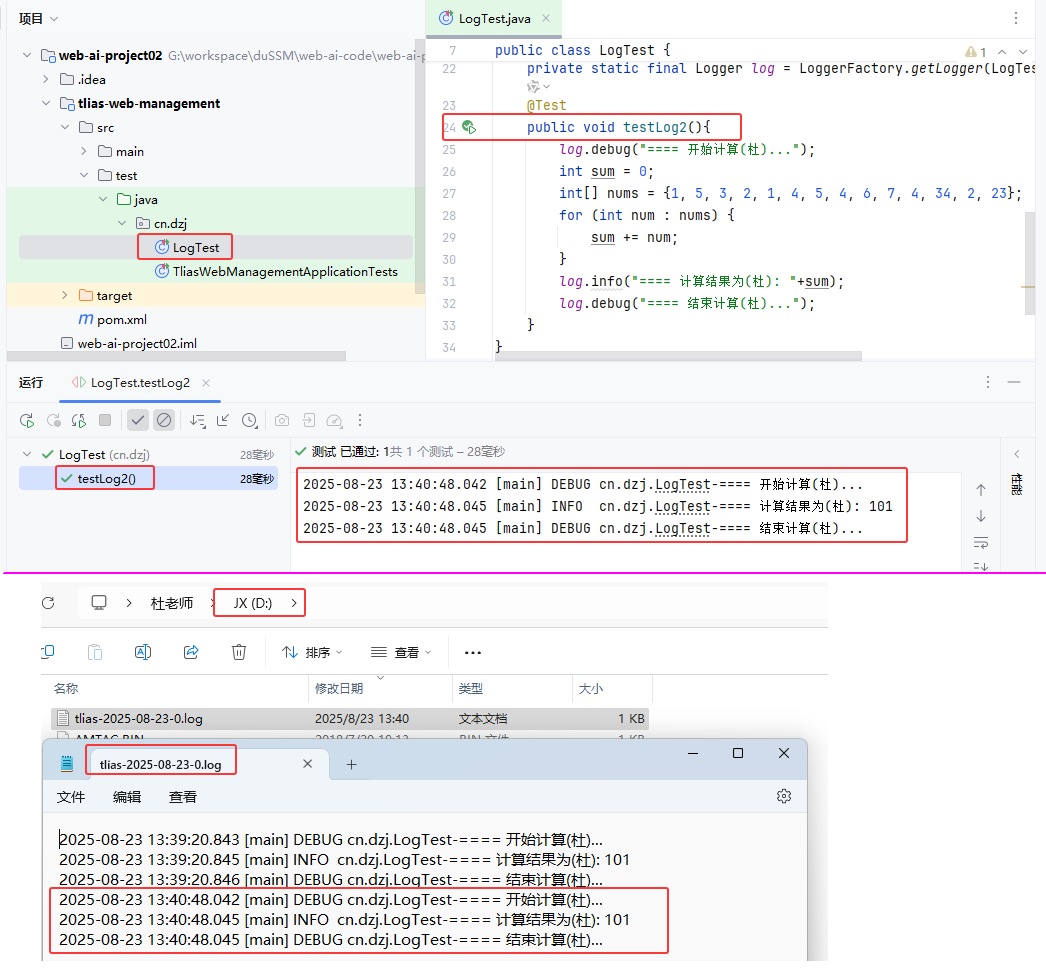 图65 日志输出测试验证
#### 6.3 Logback日志级别
* 日志级别指的是日志信息的类型,日志都会分级别,常见的日志级别如下(级别由低到高):
| **日志级别** | **说明** | **记录方式** |
| ------------ | ------------------------------------------------------------ | ---------------- |
| trace | 追踪,记录程序运行轨迹 【使用很少】 | log.trace("...") |
| debug | 调试,记录程序调试过程中的信息,实际应用中一般将其视为最低级别 【使用较多】 | log.debug("...") |
| info | 记录一般信息,描述程序运行的关键事件,如:网络连接、io操作 【使用较多】 | log.info("...") |
| warn | 警告信息,记录潜在有害的情况 【使用较多】 | log.warn("...") |
| error | 错误信息 【使用较多】 | log.error("...") |
* 可以在配置文件中,灵活的控制输出那些类型的日志。(
```xml
```
图65 日志输出测试验证
#### 6.3 Logback日志级别
* 日志级别指的是日志信息的类型,日志都会分级别,常见的日志级别如下(级别由低到高):
| **日志级别** | **说明** | **记录方式** |
| ------------ | ------------------------------------------------------------ | ---------------- |
| trace | 追踪,记录程序运行轨迹 【使用很少】 | log.trace("...") |
| debug | 调试,记录程序调试过程中的信息,实际应用中一般将其视为最低级别 【使用较多】 | log.debug("...") |
| info | 记录一般信息,描述程序运行的关键事件,如:网络连接、io操作 【使用较多】 | log.info("...") |
| warn | 警告信息,记录潜在有害的情况 【使用较多】 | log.warn("...") |
| error | 错误信息 【使用较多】 | log.error("...") |
* 可以在配置文件中,灵活的控制输出那些类型的日志。(
```xml
```
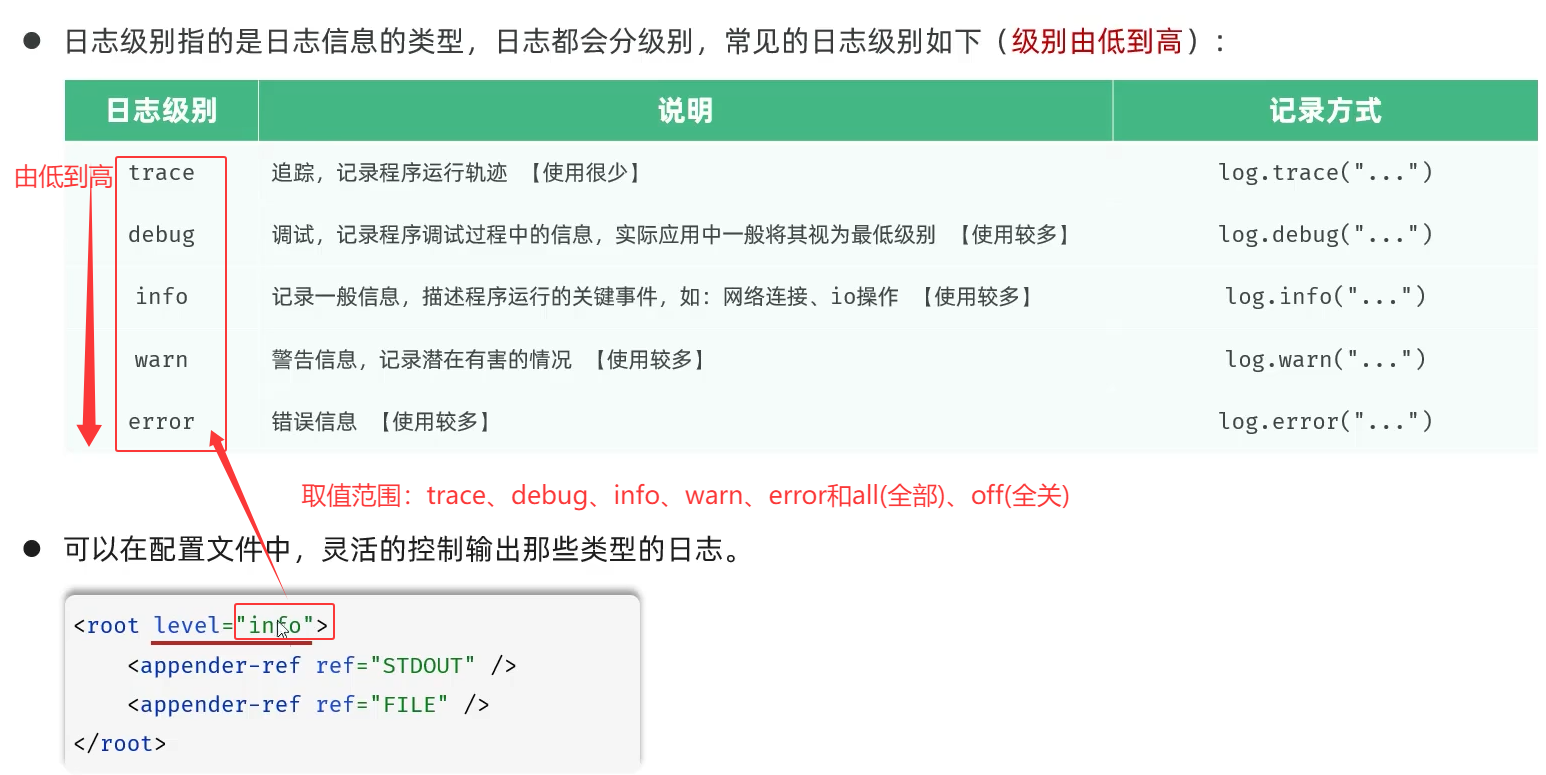 图66 日志级别
src/test/java/cn/dzj/LogTest.java testLog2()方法中加入下列3行
```java
log.trace("跟踪(杜)trace...");
log.warn("警告(杜)warn...");
log.error("错误(杜)error...");
```
图66 日志级别
src/test/java/cn/dzj/LogTest.java testLog2()方法中加入下列3行
```java
log.trace("跟踪(杜)trace...");
log.warn("警告(杜)warn...");
log.error("错误(杜)error...");
```
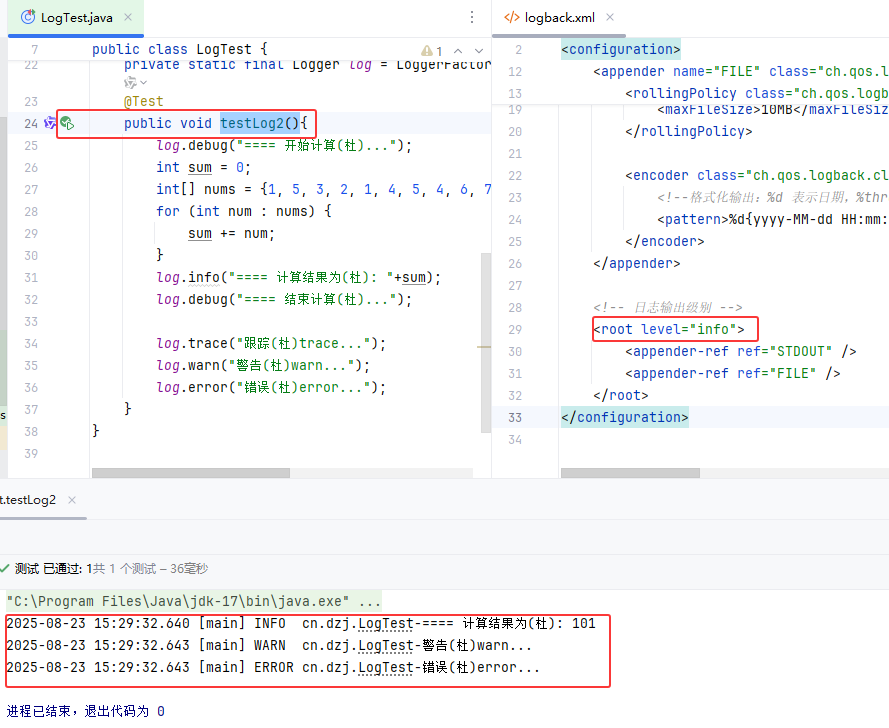 图67 日志级别输出测试验证
##### 优化tlias案例日志记录
###### cn/dzj/controller/DeptController.java 日志优化
```java
package cn.dzj.controller;
import cn.dzj.pojo.Dept;
import cn.dzj.pojo.Result;
import cn.dzj.service.DeptService;
import jakarta.servlet.http.HttpServletRequest;
import lombok.extern.slf4j.Slf4j;
import org.slf4j.Logger;
import org.slf4j.LoggerFactory;
import org.springframework.beans.factory.annotation.Autowired;
import org.springframework.web.bind.annotation.*;
import java.util.List;
@Slf4j
@RequestMapping("/depts")
@RestController
public class DeptController {
//private static final Logger log = LoggerFactory.getLogger(DeptController.class);
@Autowired
private DeptService deptService;
//@RequestMapping(value ="/depts",method=RequestMethod.GET)//method:指定请求方式
@GetMapping
public Result list() {
//System.out.println("查询全部部门数据");
log.info("查询全部部门数据");
List deptList = deptService.findAll();
return Result.success(deptList);
}
/*
*删除部门-方式一:HttpServletRequest获取请求参数
*/
/* @DeleteMapping("/depts")
public Result delete(HttpServletRequest request){
String idStr =request.getParameter("id");
int id =Integer.parseInt(idStr);
System.out.println("根据ID删除部门:"+id);
return Result.success();
}*/
/*
* 删除部门-方式二: @RequestParam
* 注意事项:一旦声明了aRequestParam,该参数在请求时必须传递,
* 如果不传递将会报错,(默认required为true)
*/
/* @DeleteMapping("/depts")
// public Result delete(@RequestParam("id") Integer deptId) {
public Result delete(@RequestParam(value = "id", required = false) Integer deptId){
System.out.println("根据ID删除部门:" + deptId);
return Result.success();
}*/
/**
* 删除部门-方式三:省略@RequestParam(前端传递的请求参数名与服务端方法形参名一致)
*/
@DeleteMapping
public Result delete(Integer id) {
//System.out.println("根据ID删除部门:" + id);
log.info("根据ID删除部门:" + id);
deptService.delete(id);
return Result.success();
}
@PostMapping
public Result add(@RequestBody Dept dept) {
//System.out.println("添加部门: " + dept);
log.info("添加部门: " + dept);
deptService.add(dept);
return Result.success();
}
/*
* 根据ID查询部门
*/
//@GetMapping("/depts/{id}")
/* public Result getInfo(@PathVariable("id") Integer deptId) {
System.out.println("根据ID查询部门:" + deptId);
return Result.success();
}*/
/*
* 根据ID查询部门
*/
@GetMapping("/{id}")
public Result getInfo(@PathVariable Integer id) {
//System.out.println("根据ID查询部门:" + id);
log.info("根据ID查询部门:" + id);
Dept dept = deptService.getInfo(id);
return Result.success(dept);
}
@PutMapping
public Result update(@RequestBody Dept dept){
//System.out.println("修改部门数据: " + dept);
log.info("修改部门数据: " + dept);
deptService.update(dept);
return Result.success();
}
}
```
图67 日志级别输出测试验证
##### 优化tlias案例日志记录
###### cn/dzj/controller/DeptController.java 日志优化
```java
package cn.dzj.controller;
import cn.dzj.pojo.Dept;
import cn.dzj.pojo.Result;
import cn.dzj.service.DeptService;
import jakarta.servlet.http.HttpServletRequest;
import lombok.extern.slf4j.Slf4j;
import org.slf4j.Logger;
import org.slf4j.LoggerFactory;
import org.springframework.beans.factory.annotation.Autowired;
import org.springframework.web.bind.annotation.*;
import java.util.List;
@Slf4j
@RequestMapping("/depts")
@RestController
public class DeptController {
//private static final Logger log = LoggerFactory.getLogger(DeptController.class);
@Autowired
private DeptService deptService;
//@RequestMapping(value ="/depts",method=RequestMethod.GET)//method:指定请求方式
@GetMapping
public Result list() {
//System.out.println("查询全部部门数据");
log.info("查询全部部门数据");
List deptList = deptService.findAll();
return Result.success(deptList);
}
/*
*删除部门-方式一:HttpServletRequest获取请求参数
*/
/* @DeleteMapping("/depts")
public Result delete(HttpServletRequest request){
String idStr =request.getParameter("id");
int id =Integer.parseInt(idStr);
System.out.println("根据ID删除部门:"+id);
return Result.success();
}*/
/*
* 删除部门-方式二: @RequestParam
* 注意事项:一旦声明了aRequestParam,该参数在请求时必须传递,
* 如果不传递将会报错,(默认required为true)
*/
/* @DeleteMapping("/depts")
// public Result delete(@RequestParam("id") Integer deptId) {
public Result delete(@RequestParam(value = "id", required = false) Integer deptId){
System.out.println("根据ID删除部门:" + deptId);
return Result.success();
}*/
/**
* 删除部门-方式三:省略@RequestParam(前端传递的请求参数名与服务端方法形参名一致)
*/
@DeleteMapping
public Result delete(Integer id) {
//System.out.println("根据ID删除部门:" + id);
log.info("根据ID删除部门:" + id);
deptService.delete(id);
return Result.success();
}
@PostMapping
public Result add(@RequestBody Dept dept) {
//System.out.println("添加部门: " + dept);
log.info("添加部门: " + dept);
deptService.add(dept);
return Result.success();
}
/*
* 根据ID查询部门
*/
//@GetMapping("/depts/{id}")
/* public Result getInfo(@PathVariable("id") Integer deptId) {
System.out.println("根据ID查询部门:" + deptId);
return Result.success();
}*/
/*
* 根据ID查询部门
*/
@GetMapping("/{id}")
public Result getInfo(@PathVariable Integer id) {
//System.out.println("根据ID查询部门:" + id);
log.info("根据ID查询部门:" + id);
Dept dept = deptService.getInfo(id);
return Result.success(dept);
}
@PutMapping
public Result update(@RequestBody Dept dept){
//System.out.println("修改部门数据: " + dept);
log.info("修改部门数据: " + dept);
deptService.update(dept);
return Result.success();
}
}
```
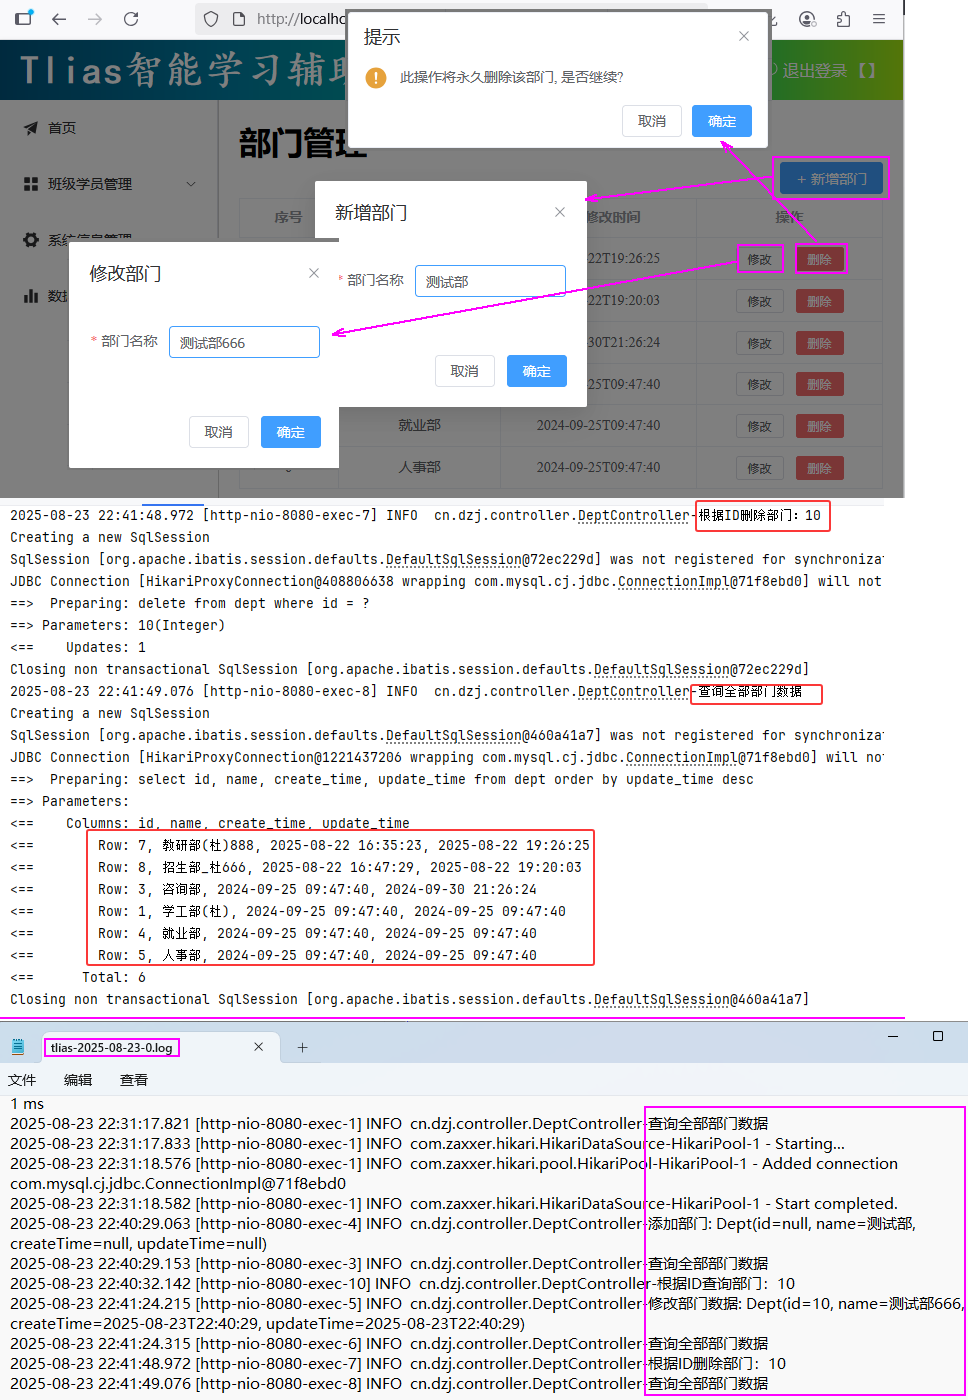 图68 日志优化测试验证
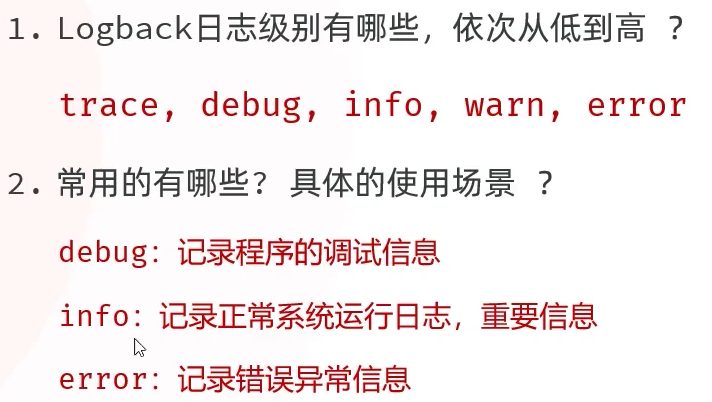 图69 Logback日志小结
①②③④⑤⑥⑦⑧⑨⑩
图69 Logback日志小结
①②③④⑤⑥⑦⑧⑨⑩