## Day04 Web后端基础
---
* 静态资源:服务器上存储的不会改变的数据,通常不会根据用户的请求而变化。比如:HTML、CSS、JS、图片、视频等(负责页面展示)
* 动态资源:服务器端根据用户请求和其他数据动态生成的,内容可能会在每次请求时都发生变化。比如:Servlet、JSP、Spring框架等(负责逻辑处理)
* B/S 架构:Browser/Server,浏览器/服务器架构模式。客户端只需浏览器,应用程序的逻辑和数据都存在服务器端。(维护方便、体验相对一般)
* C/S 架构: Client/Server,客户端/服务器架构模式。需要单独开发维护客户端。(体验不错 开发维护比较麻烦)
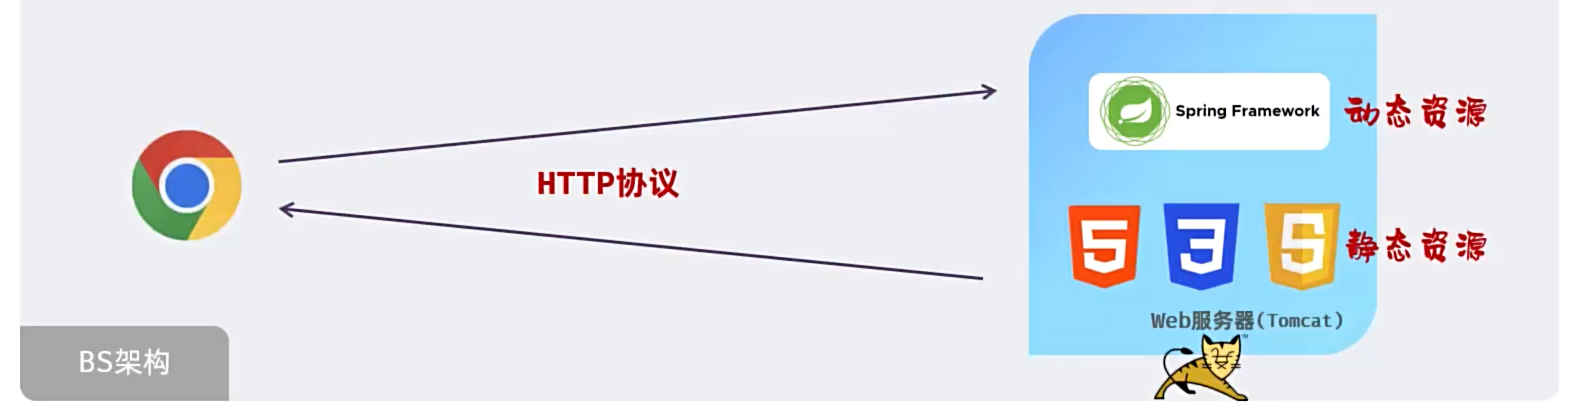 图1 BS架构
##### 目录
* SpringBoot Web入门
* HTTP协议
* SpringBoot Web案例
* 分层解耦
### 1. SpringBoot Web入门
#### Spring
* 官网:spring.io
* Spring发展到今天已经形成了一种开发生态圈,Spring提供了若干个子项目,每个项目用于完成特定的功能。
* Spring使Java编程对每个人来说都更快、更容易、更安全。Spring对速度、简单性和生产力的关注使其成为世界上最受欢迎的Java框架。
* 从配置到安全,从web应用程序到大数据——无论您的应用程序的基础设施需求是什么,都有一个Spring项目可以帮助您构建它。从小处着手,只使用您需要的东西——Spring的设计是模块化的。
图1 BS架构
##### 目录
* SpringBoot Web入门
* HTTP协议
* SpringBoot Web案例
* 分层解耦
### 1. SpringBoot Web入门
#### Spring
* 官网:spring.io
* Spring发展到今天已经形成了一种开发生态圈,Spring提供了若干个子项目,每个项目用于完成特定的功能。
* Spring使Java编程对每个人来说都更快、更容易、更安全。Spring对速度、简单性和生产力的关注使其成为世界上最受欢迎的Java框架。
* 从配置到安全,从web应用程序到大数据——无论您的应用程序的基础设施需求是什么,都有一个Spring项目可以帮助您构建它。从小处着手,只使用您需要的东西——Spring的设计是模块化的。
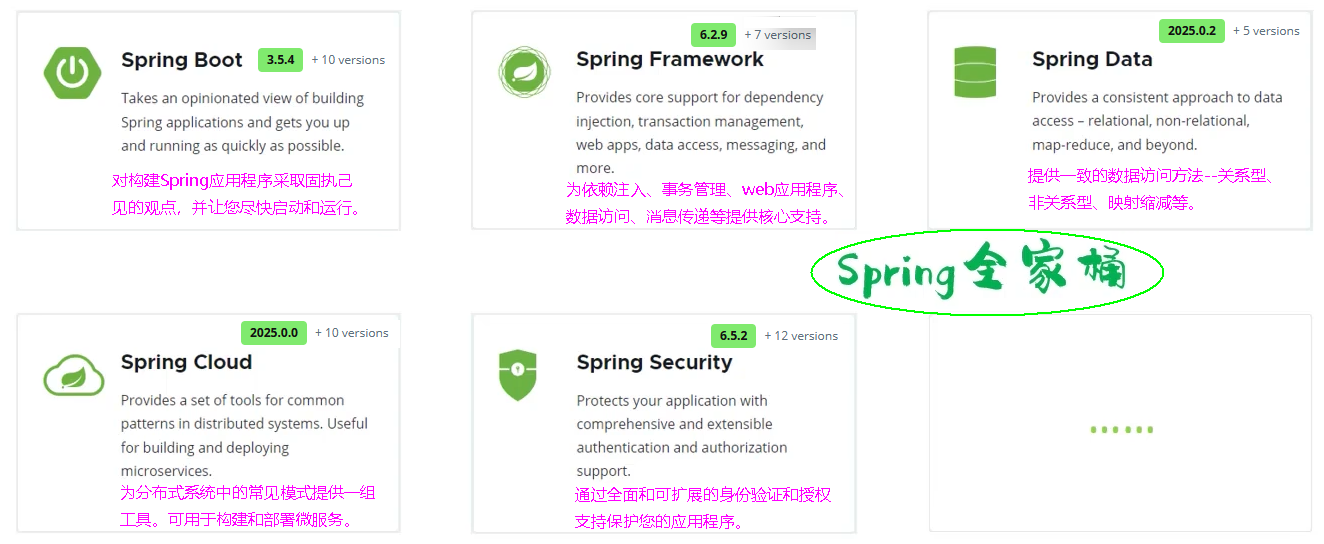 图2 Spring生态
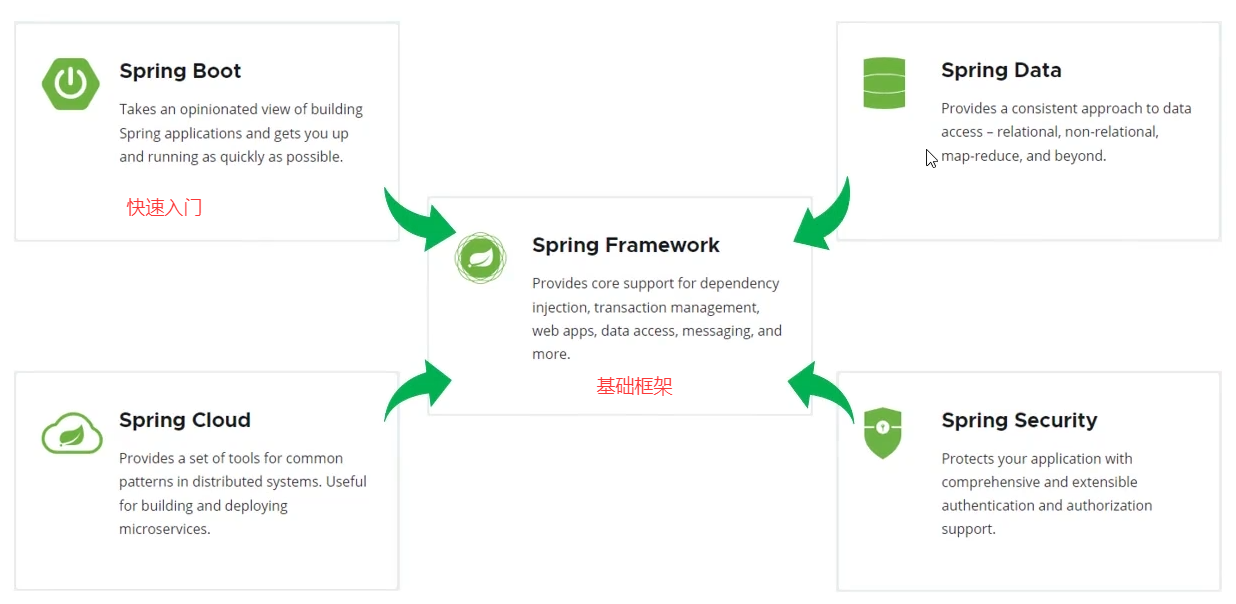 图3 Spring生态
##### Spring Boot
* Spring Boot可以帮助我们非常快速的构建应用程序、简化开发、提高效率。
图3 Spring生态
##### Spring Boot
* Spring Boot可以帮助我们非常快速的构建应用程序、简化开发、提高效率。
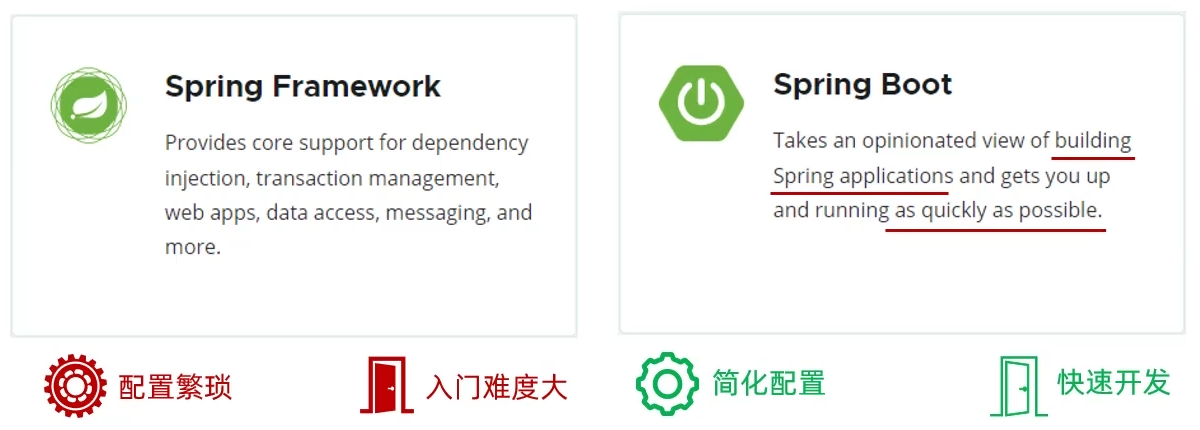 图4 SpringFramework与SpringBoot
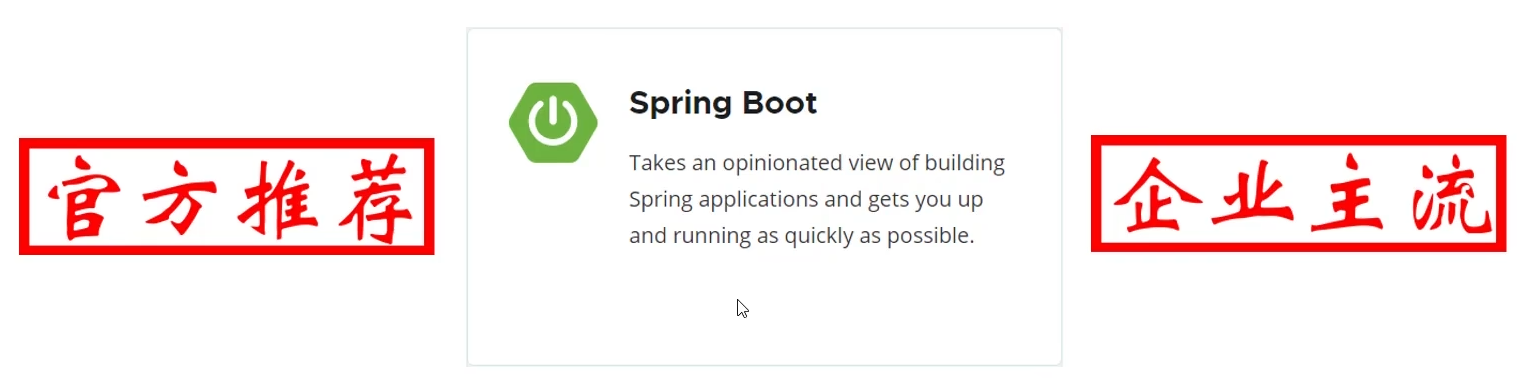 图5 SpringBoot
#### 1.1 入门程序
* 需求:基于SpringBoot开发一个Web应用,浏览器发起请求/hello之后,给浏览器返回一个字符串"Hello Xxx"。
* ①. 创建springboot工程(模块springboot-web-quickstart),并勾选web开发相关依赖。可删除.gitignore、HELP.md、mvnw、mvnw.cmd 四个文件。
* ②. 定义HelloController类,添加方法 hello,并添加注解。
* ③ 运行启动类,测试
##### HelloController.java
```java
package cn.dzj;
import org.springframework.web.bind.annotation.RequestMapping;
import org.springframework.web.bind.annotation.RestController;
@RestController //标识当前类是一个请求处理类
public class HelloController {
@RequestMapping("/hello")
public String hello(String name){
System.out.println("HelloController ... hello : " + name + "(杜老师)");
return "Hello " + name + " ~(杜老师) ";
}
}
```
图5 SpringBoot
#### 1.1 入门程序
* 需求:基于SpringBoot开发一个Web应用,浏览器发起请求/hello之后,给浏览器返回一个字符串"Hello Xxx"。
* ①. 创建springboot工程(模块springboot-web-quickstart),并勾选web开发相关依赖。可删除.gitignore、HELP.md、mvnw、mvnw.cmd 四个文件。
* ②. 定义HelloController类,添加方法 hello,并添加注解。
* ③ 运行启动类,测试
##### HelloController.java
```java
package cn.dzj;
import org.springframework.web.bind.annotation.RequestMapping;
import org.springframework.web.bind.annotation.RestController;
@RestController //标识当前类是一个请求处理类
public class HelloController {
@RequestMapping("/hello")
public String hello(String name){
System.out.println("HelloController ... hello : " + name + "(杜老师)");
return "Hello " + name + " ~(杜老师) ";
}
}
```
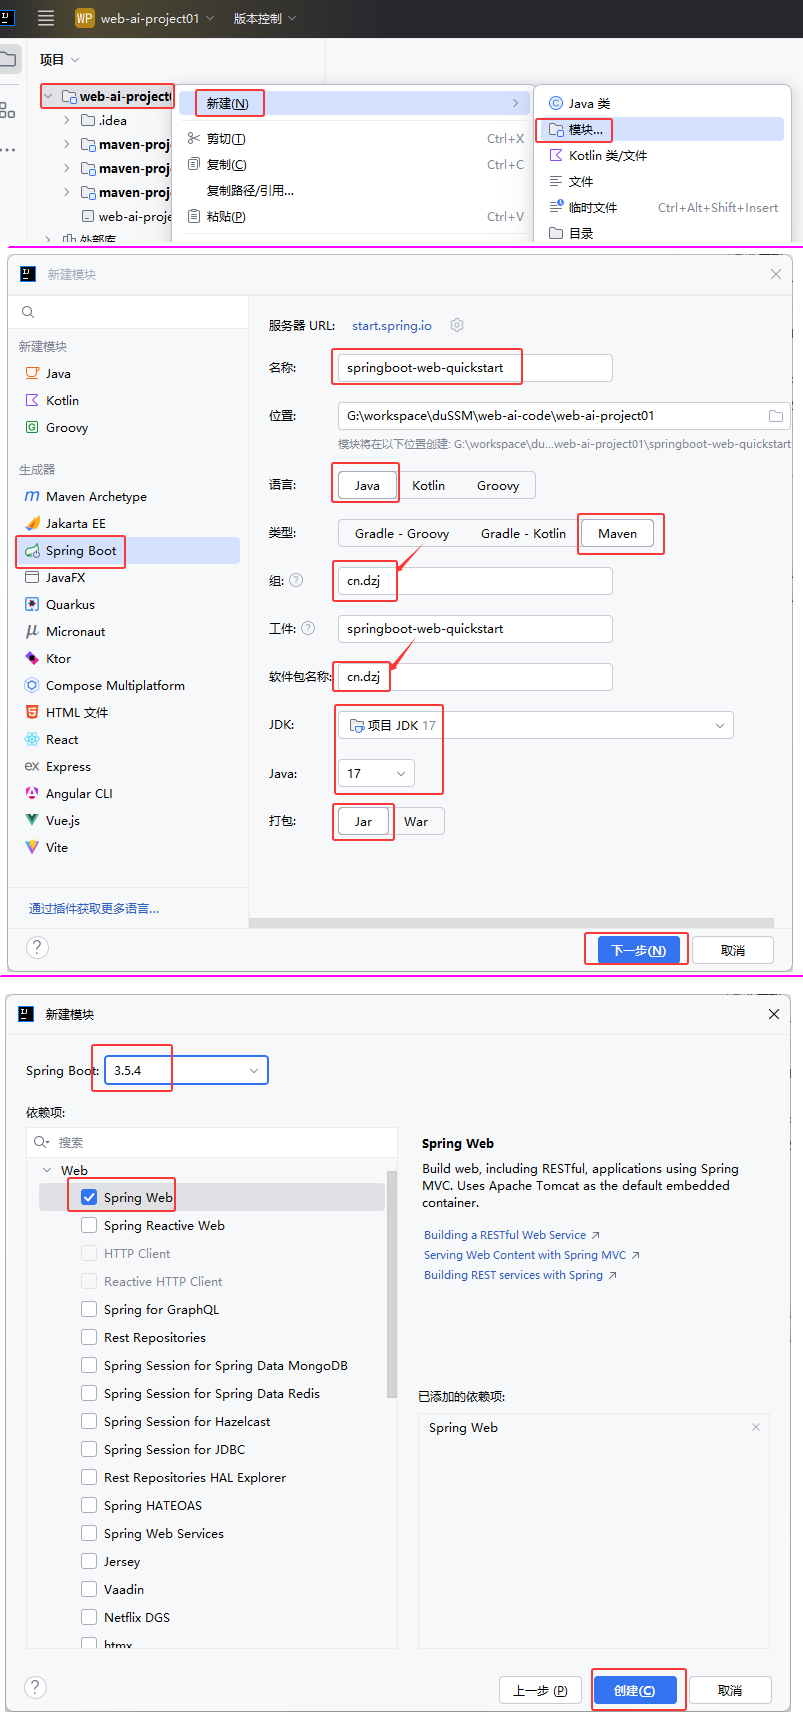 图6 创建SpringBoot入门模块
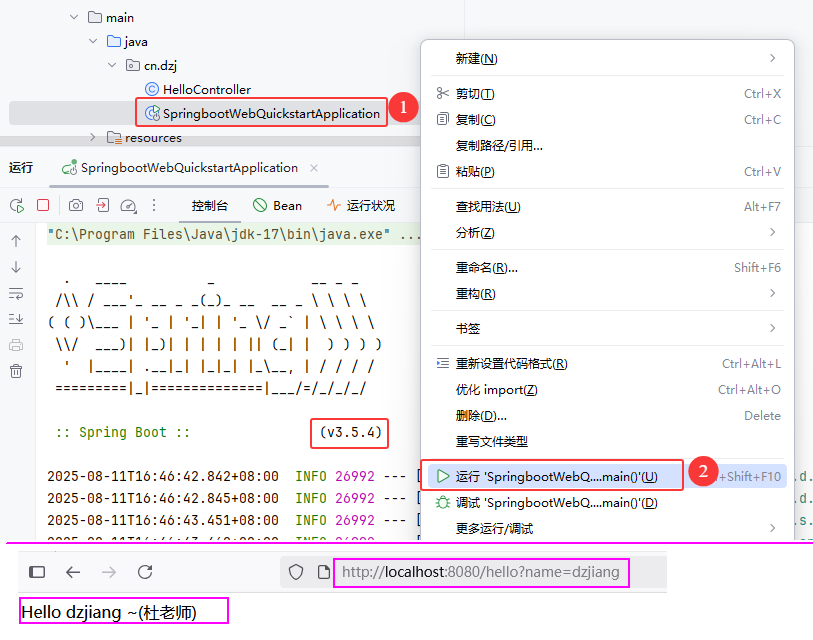 图7 运行SpringBoot入门模块
##### Spring官方脚手架连接不上解决方案
https://start.aliyun.com
图7 运行SpringBoot入门模块
##### Spring官方脚手架连接不上解决方案
https://start.aliyun.com
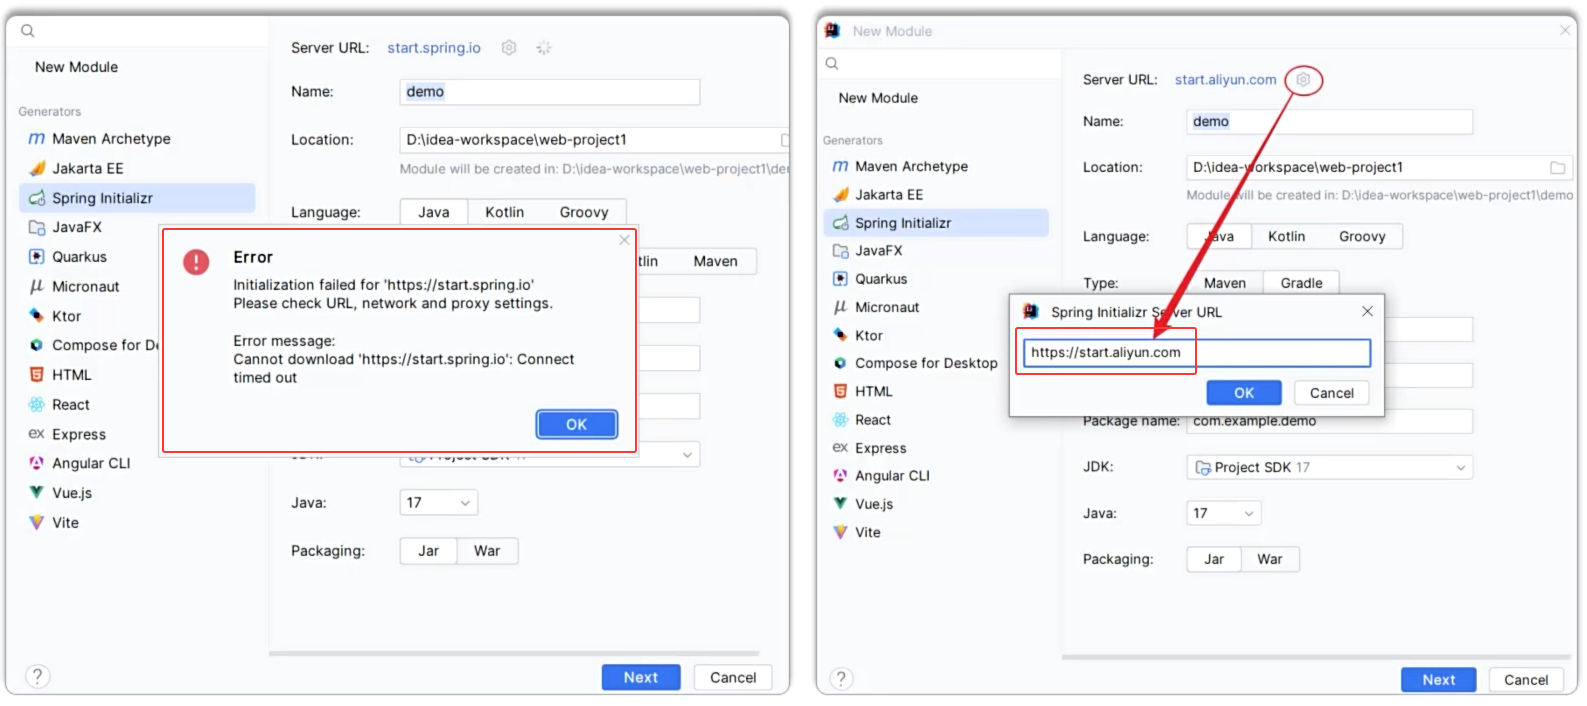 图8 阿里云创建springboot模块
图8 Maven小结
#### 1.2 入门程序剖析
##### 为什么一个main方法就将web应用启动了?
* 起步依赖:
* spring-boot-starter-web:包含了web应用开发所需要的常见依赖。
* spring-boot-starter-test:包含了单元测试所需要的常见依赖。
* 官方提供的starter:https://docs.spring.io/spring-boot/docs/3.1.3/reference/htmlsingle/#using.build-systems.starters
* https://docs.spring.io/spring-boot/docs/3.2.9/reference/htmlsingle/#using.build-systems.starters
图8 阿里云创建springboot模块
图8 Maven小结
#### 1.2 入门程序剖析
##### 为什么一个main方法就将web应用启动了?
* 起步依赖:
* spring-boot-starter-web:包含了web应用开发所需要的常见依赖。
* spring-boot-starter-test:包含了单元测试所需要的常见依赖。
* 官方提供的starter:https://docs.spring.io/spring-boot/docs/3.1.3/reference/htmlsingle/#using.build-systems.starters
* https://docs.spring.io/spring-boot/docs/3.2.9/reference/htmlsingle/#using.build-systems.starters
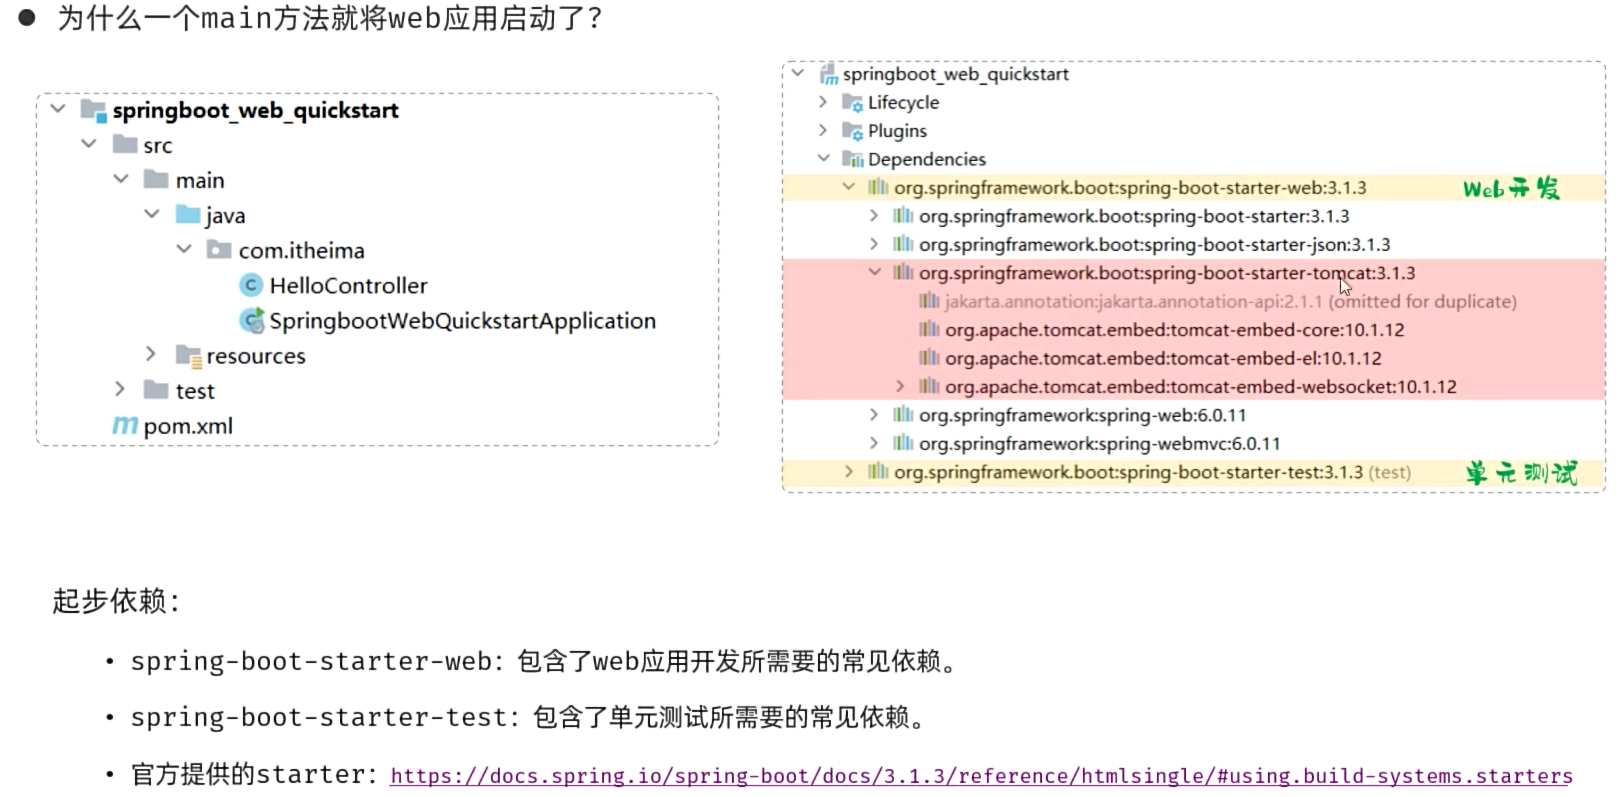 图9 入门程序剖析1
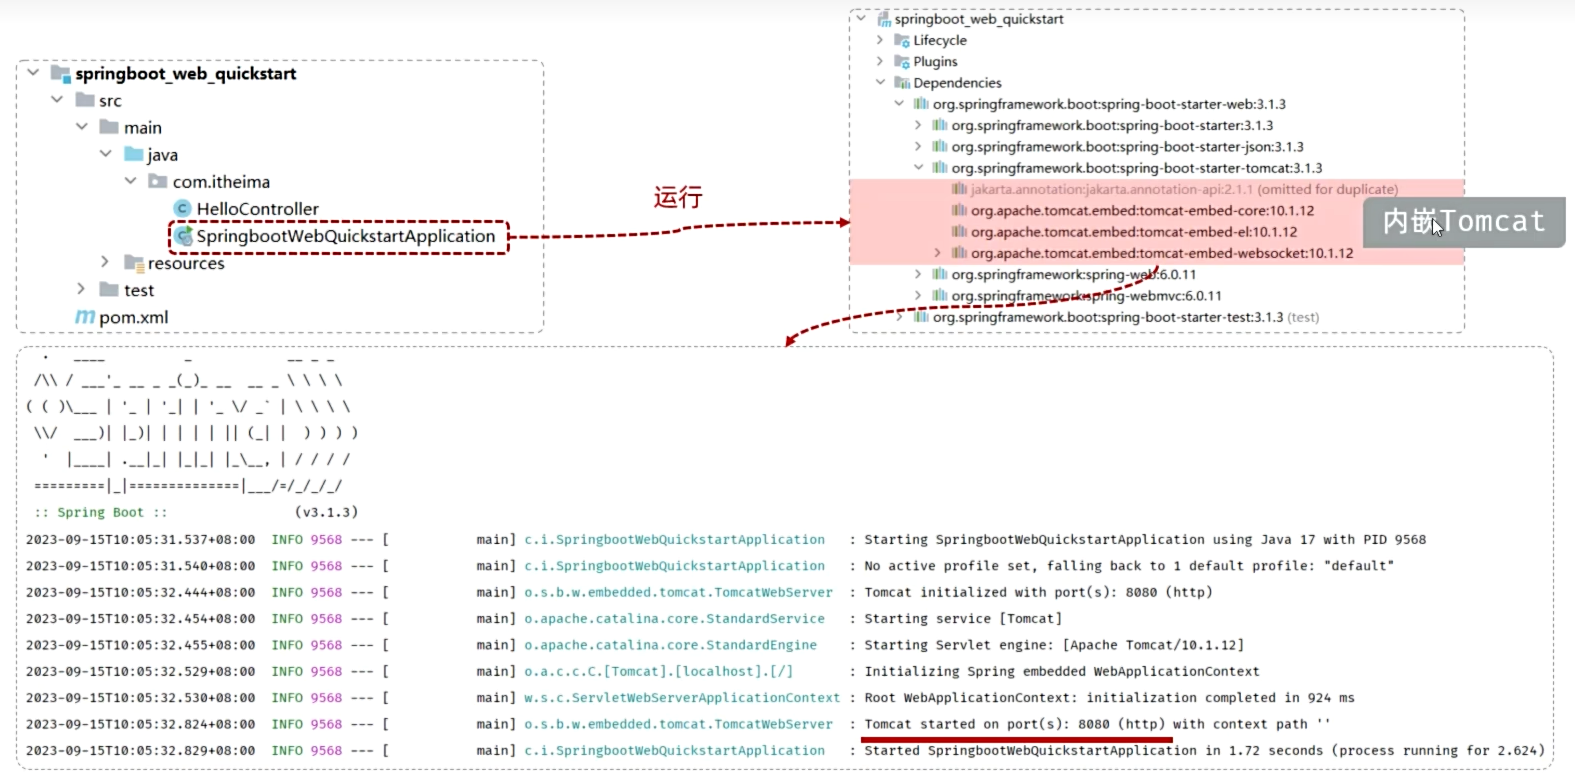 图10 入门程序剖析2
### 2. HTTP协议
##### HTTP协议
* 概念:Hyper Text Transfer Protocol,超文本传输协议,规定了浏览器和服务器之间数据传输的规则(数据格式)。
* 特点:
* ①基于TCP协议:面向连接,安全
* ②基于请求-响应模型的:一次请求对应一次响应
* ③HTTP协议是无状态的协议:对于事务处理没有记忆能力。每次请求-响应都是独立的。
* 缺点:多次请求间不能共享数据。
* 优点:速度快
#### 2.1 HTTP-请求协议
##### HTTP协议--请求数据格式
图10 入门程序剖析2
### 2. HTTP协议
##### HTTP协议
* 概念:Hyper Text Transfer Protocol,超文本传输协议,规定了浏览器和服务器之间数据传输的规则(数据格式)。
* 特点:
* ①基于TCP协议:面向连接,安全
* ②基于请求-响应模型的:一次请求对应一次响应
* ③HTTP协议是无状态的协议:对于事务处理没有记忆能力。每次请求-响应都是独立的。
* 缺点:多次请求间不能共享数据。
* 优点:速度快
#### 2.1 HTTP-请求协议
##### HTTP协议--请求数据格式
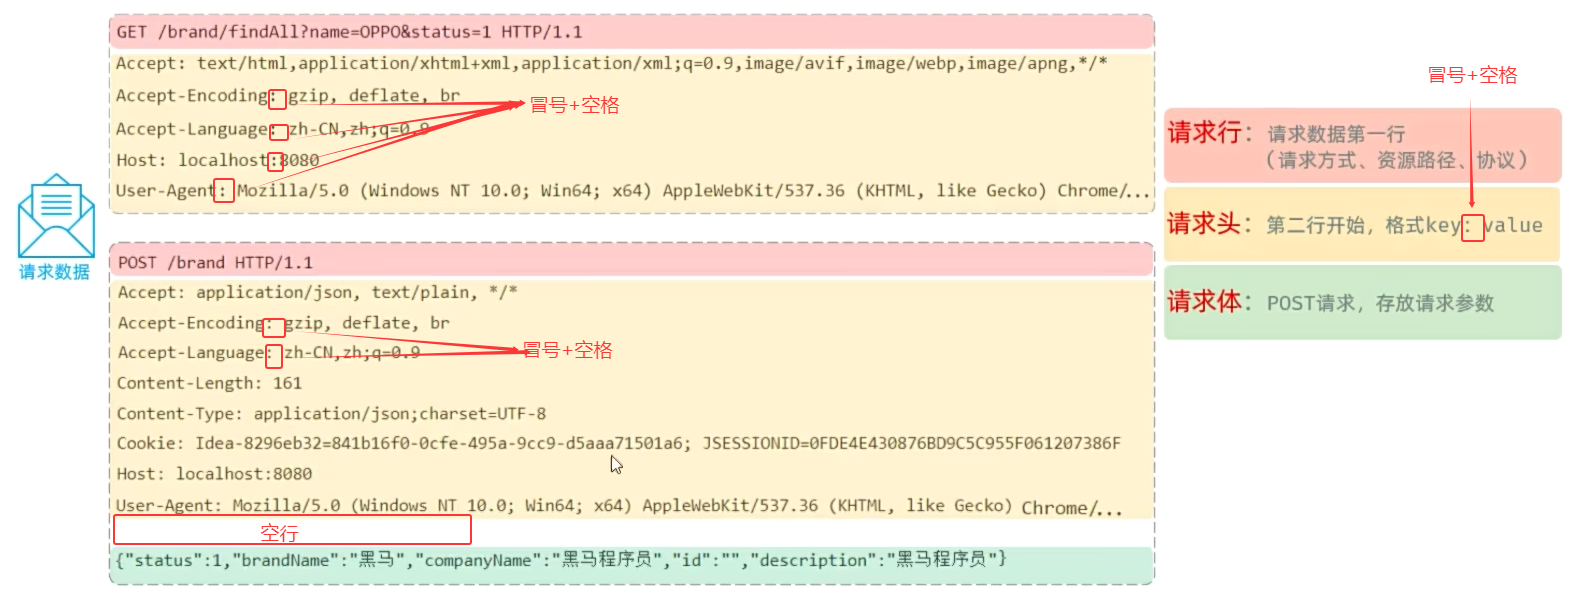 图12 http请求数据格式
##### 常见的http请求头
| Host | 请求的主机名 |
| --------------- | ------------------------------------------------------------ |
| User-Agent | 浏览器版本,例如Chrome浏览器的标识类似Mozilla/5.0 ... Chrome/79,IE浏览器的标识类似Mozilla/5.0 (Windows NT ...) like Gecko |
| Accept | 表示浏览器能接收的资源类型,如text/*,image/*或者*/*表示所有; |
| Accept-Language | 表示浏览器偏好的语言,服务器可以据此返回不同语言的网页; |
| Accept-Encoding | 表示浏览器可以支持的压缩类型,例如gzip, deflate等。 |
| Content-Type | 请求主体的数据类型。 |
| Content-Length | 请求主体的大小(单位:字节)。 |
* 请求方式-GET: 请求参数在请求行中,没有请求体,如:/brand/findAll?name=OPPO&status=1。GET请求大小在浏览器中是有限制的。
* 请求方式-POST: 请求参数在请求体中,POST请求大小是没有限制的。
##### 小结
Http协议中请求数据分为哪几个部分?
* 请求行(请求数据的第一行)
* 请求头(key:value)
* 请求体(与请求头之间隔了一个空行)
图12 http请求数据格式
##### 常见的http请求头
| Host | 请求的主机名 |
| --------------- | ------------------------------------------------------------ |
| User-Agent | 浏览器版本,例如Chrome浏览器的标识类似Mozilla/5.0 ... Chrome/79,IE浏览器的标识类似Mozilla/5.0 (Windows NT ...) like Gecko |
| Accept | 表示浏览器能接收的资源类型,如text/*,image/*或者*/*表示所有; |
| Accept-Language | 表示浏览器偏好的语言,服务器可以据此返回不同语言的网页; |
| Accept-Encoding | 表示浏览器可以支持的压缩类型,例如gzip, deflate等。 |
| Content-Type | 请求主体的数据类型。 |
| Content-Length | 请求主体的大小(单位:字节)。 |
* 请求方式-GET: 请求参数在请求行中,没有请求体,如:/brand/findAll?name=OPPO&status=1。GET请求大小在浏览器中是有限制的。
* 请求方式-POST: 请求参数在请求体中,POST请求大小是没有限制的。
##### 小结
Http协议中请求数据分为哪几个部分?
* 请求行(请求数据的第一行)
* 请求头(key:value)
* 请求体(与请求头之间隔了一个空行)
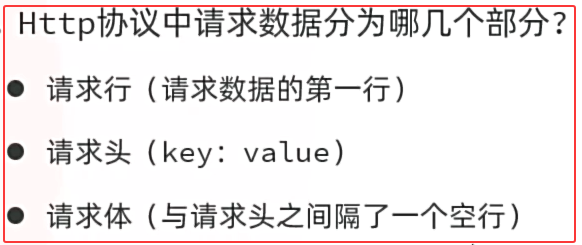 图13 http请求小结
##### HTTP协议-请求数据获取
* Web服务器(Tomcat)对HTTP协议的请求数据进行解析,并进行了封装(HttpServletRequest),在调用Controller方法的时候传递给了该方法。这样,就使得程序员不必直接对协议进行操作,让Web开发更加便捷。
图13 http请求小结
##### HTTP协议-请求数据获取
* Web服务器(Tomcat)对HTTP协议的请求数据进行解析,并进行了封装(HttpServletRequest),在调用Controller方法的时候传递给了该方法。这样,就使得程序员不必直接对协议进行操作,让Web开发更加便捷。
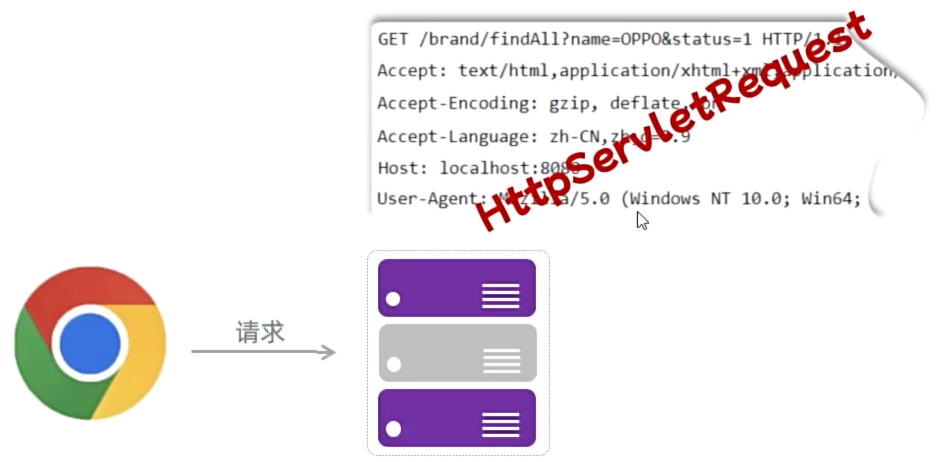 图14 HTTP协议-请求数据获取
```java
package cn.dzj;
import jakarta.servlet.http.HttpServletRequest;
import org.springframework.web.bind.annotation.RequestMapping;
import org.springframework.web.bind.annotation.RestController;
@RestController
public class RequestController {
@RequestMapping("/request")
public String request(HttpServletRequest request) {
//1.获取请求方式
//2.获取请求url地址
//3.获取请求协议
//4.获取请求参数-name
//5.获取请求头-Accept
return "请求方式:"+request.getMethod()+"
图14 HTTP协议-请求数据获取
```java
package cn.dzj;
import jakarta.servlet.http.HttpServletRequest;
import org.springframework.web.bind.annotation.RequestMapping;
import org.springframework.web.bind.annotation.RestController;
@RestController
public class RequestController {
@RequestMapping("/request")
public String request(HttpServletRequest request) {
//1.获取请求方式
//2.获取请求url地址
//3.获取请求协议
//4.获取请求参数-name
//5.获取请求头-Accept
return "请求方式:"+request.getMethod()+"
"
+"请求url地址:"+request.getRequestURL()+"
"
+"请求协议:"+request.getProtocol()+"
"
+"请求参数-name:"+request.getParameter("name")+"
"
+"请求头-Accept:"+request.getHeader("Accept");
}
}
```
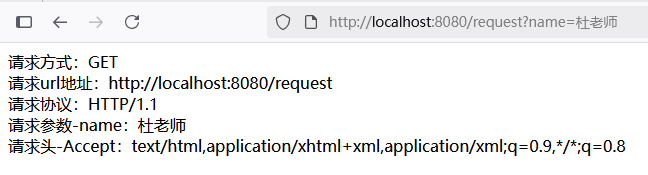 图15 HTTP协议-请求数据获取验证
##### 小结
HTTP请求数据需要程序员自己解析吗?
* 不需要,web服务器负责对HTTP请求数据进行解析,并封装为了请求对象
如何获取请求数据?
* HttpServletRequest对象里面封装了所有的请求信息
图15 HTTP协议-请求数据获取验证
##### 小结
HTTP请求数据需要程序员自己解析吗?
* 不需要,web服务器负责对HTTP请求数据进行解析,并封装为了请求对象
如何获取请求数据?
* HttpServletRequest对象里面封装了所有的请求信息
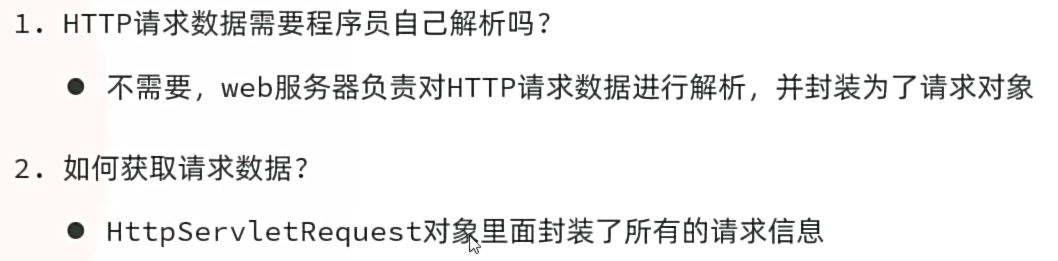 图16 HTTP协议-请求数据获取小结
#### 2.2 HTTP-响应协议
##### HTTP协议--响应数据格式
* 响应行:响应数据第一行(协议、状态码、描述)
* 响应头:第二行开始,格式key:value
* 响应体:最后一部分,存放响应数据
图16 HTTP协议-请求数据获取小结
#### 2.2 HTTP-响应协议
##### HTTP协议--响应数据格式
* 响应行:响应数据第一行(协议、状态码、描述)
* 响应头:第二行开始,格式key:value
* 响应体:最后一部分,存放响应数据
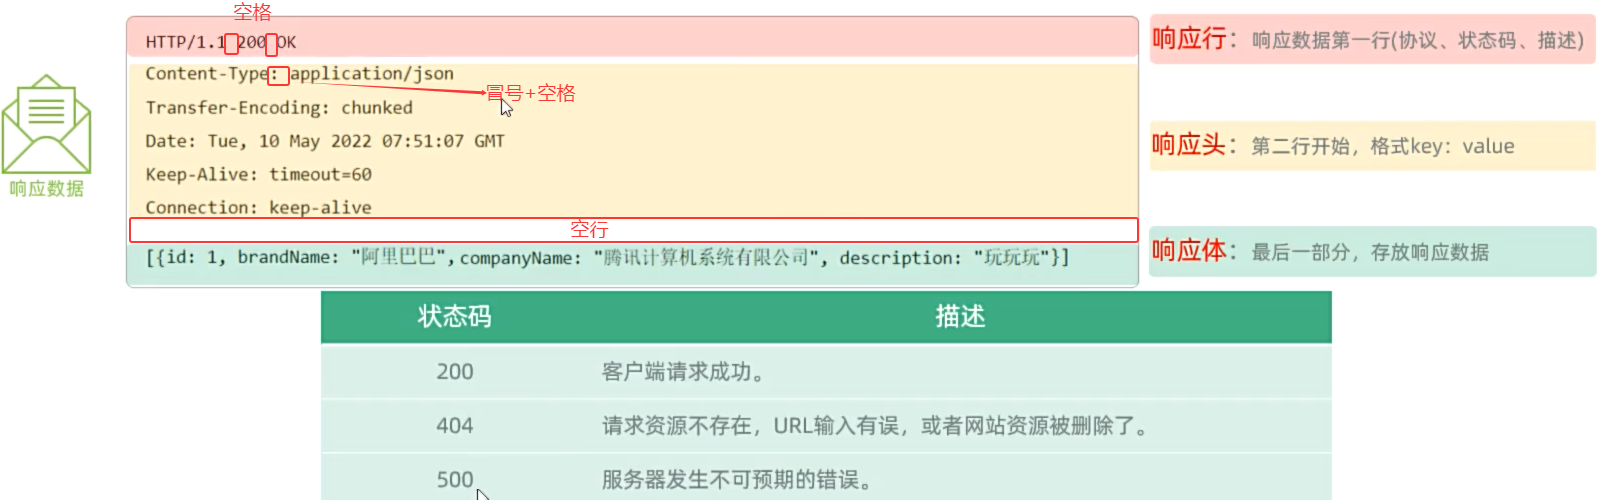 图17 HTTP协议--响应数据格式
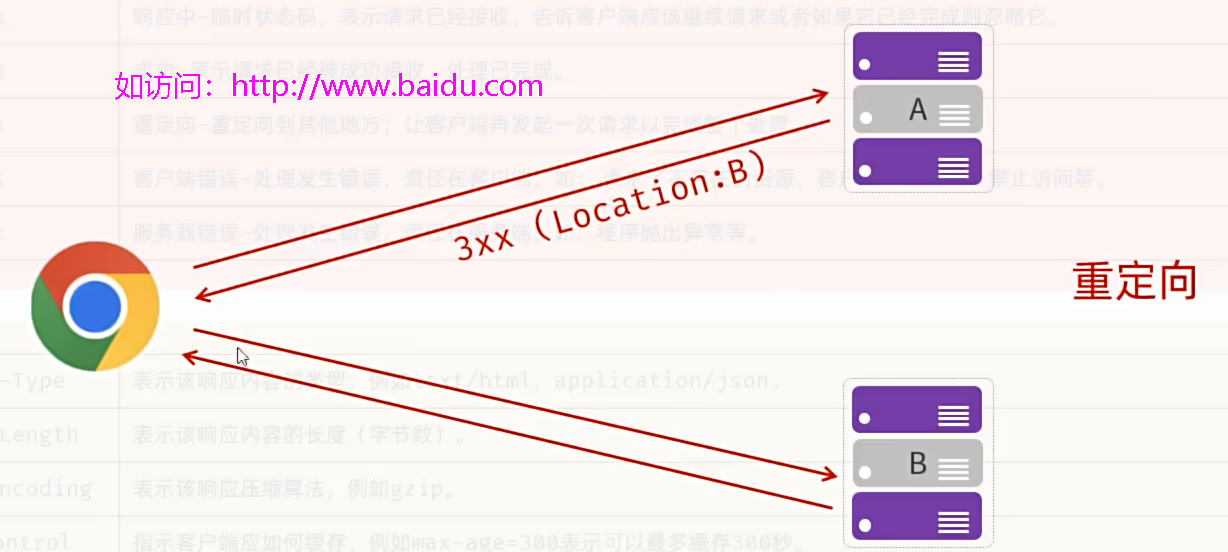 图18 HTTP协议--重定向(两次请求)
##### 常用的状态码
| 状态码 | 描述 |
| ------ | ------------------------------------------------------------ |
| 1xx | 响应中-临时状态码,表示请求已经接收,告诉客户端应该继续请求或者如果它已经完成则忽略它。 |
| 2xx | 成功-表示请求已经被成功接收,处理已完成。 |
| 3xx | 重定向-重定向到其他地方;让客户端再发起一次请求以完成整个处理。 |
| 4xx | 客户端错误-处理发生错误,责任在客户端。如: 请求了不存在的资源、客户端未被授权、禁止访问等。 |
| 5xx | 服务器错误-处理发生错误,责任在服务端。如:程序抛出异常等。 |
##### 常用的响应头
| 类型 | 描述 |
| ---------------- | ------------------------------------------------------------ |
| Content-Type | 表示该响应内容的类型,例如text/html,application/json。 |
| Content-Length | 表示该响应内容的长度(字节数)。 |
| Content-Encoding | 表示该响应压缩算法,例如gzip。 |
| Cache-Control | 指示客户端应如何缓存,例如max-age=300表示可以最多缓存300秒。 |
| Set-Cookie | 告诉浏览器为当前页面所在的域设置cookie。 |
##### 最常用的状态码
| 状态码 | 描述 |
| ------ | --------------------------------------------------- |
| 200 | 客户端请求成功。 |
| 404 | 请求资源不存在,URL输入有误,或者网站资源被删除了。 |
| 500 | 服务器发生不可预期的错误。 |
##### 小结
HTTP响应数据分为几个部分?
* 响应行、响应头、响应体
响应状态码的分类?
* 1xx:响应中,临时状态码
* 2xx:成功
* 3xx:重定向
* 4xx:客户端错误
* 5xx:服务端错误
图18 HTTP协议--重定向(两次请求)
##### 常用的状态码
| 状态码 | 描述 |
| ------ | ------------------------------------------------------------ |
| 1xx | 响应中-临时状态码,表示请求已经接收,告诉客户端应该继续请求或者如果它已经完成则忽略它。 |
| 2xx | 成功-表示请求已经被成功接收,处理已完成。 |
| 3xx | 重定向-重定向到其他地方;让客户端再发起一次请求以完成整个处理。 |
| 4xx | 客户端错误-处理发生错误,责任在客户端。如: 请求了不存在的资源、客户端未被授权、禁止访问等。 |
| 5xx | 服务器错误-处理发生错误,责任在服务端。如:程序抛出异常等。 |
##### 常用的响应头
| 类型 | 描述 |
| ---------------- | ------------------------------------------------------------ |
| Content-Type | 表示该响应内容的类型,例如text/html,application/json。 |
| Content-Length | 表示该响应内容的长度(字节数)。 |
| Content-Encoding | 表示该响应压缩算法,例如gzip。 |
| Cache-Control | 指示客户端应如何缓存,例如max-age=300表示可以最多缓存300秒。 |
| Set-Cookie | 告诉浏览器为当前页面所在的域设置cookie。 |
##### 最常用的状态码
| 状态码 | 描述 |
| ------ | --------------------------------------------------- |
| 200 | 客户端请求成功。 |
| 404 | 请求资源不存在,URL输入有误,或者网站资源被删除了。 |
| 500 | 服务器发生不可预期的错误。 |
##### 小结
HTTP响应数据分为几个部分?
* 响应行、响应头、响应体
响应状态码的分类?
* 1xx:响应中,临时状态码
* 2xx:成功
* 3xx:重定向
* 4xx:客户端错误
* 5xx:服务端错误
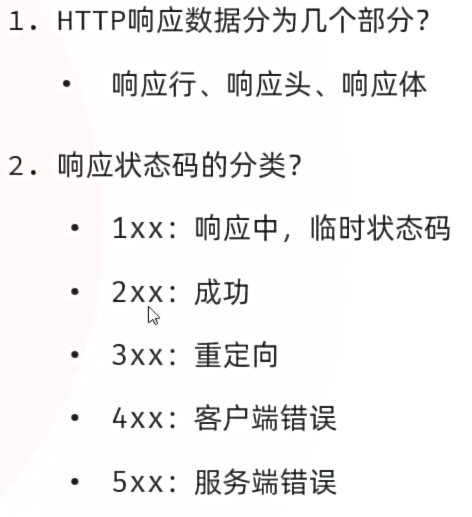 图19 HTTP协议--响应小结
##### HTTP协议-响应数据设置
* Web服务器对HTTP协议的响应数据进行了封装(HttpServletResponse),并在调用Controller方法的时候传递给了该方法。这样,就使得程序员不必直接对协议进行操作,让Web开发更加便捷。
图19 HTTP协议--响应小结
##### HTTP协议-响应数据设置
* Web服务器对HTTP协议的响应数据进行了封装(HttpServletResponse),并在调用Controller方法的时候传递给了该方法。这样,就使得程序员不必直接对协议进行操作,让Web开发更加便捷。
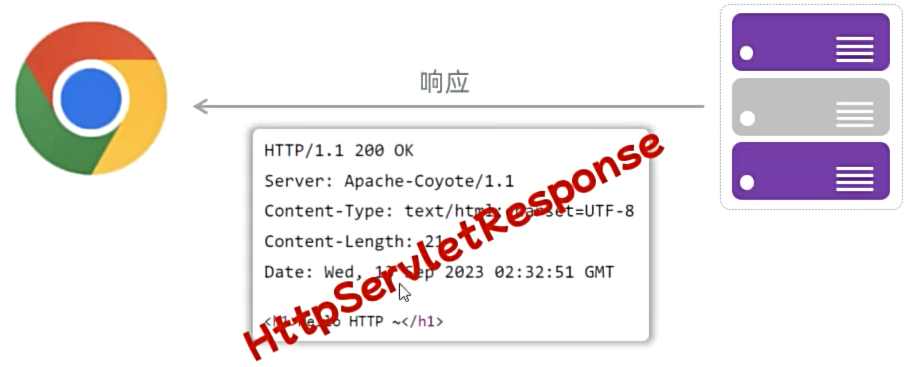 图20 HTTP协议--响应数据设置
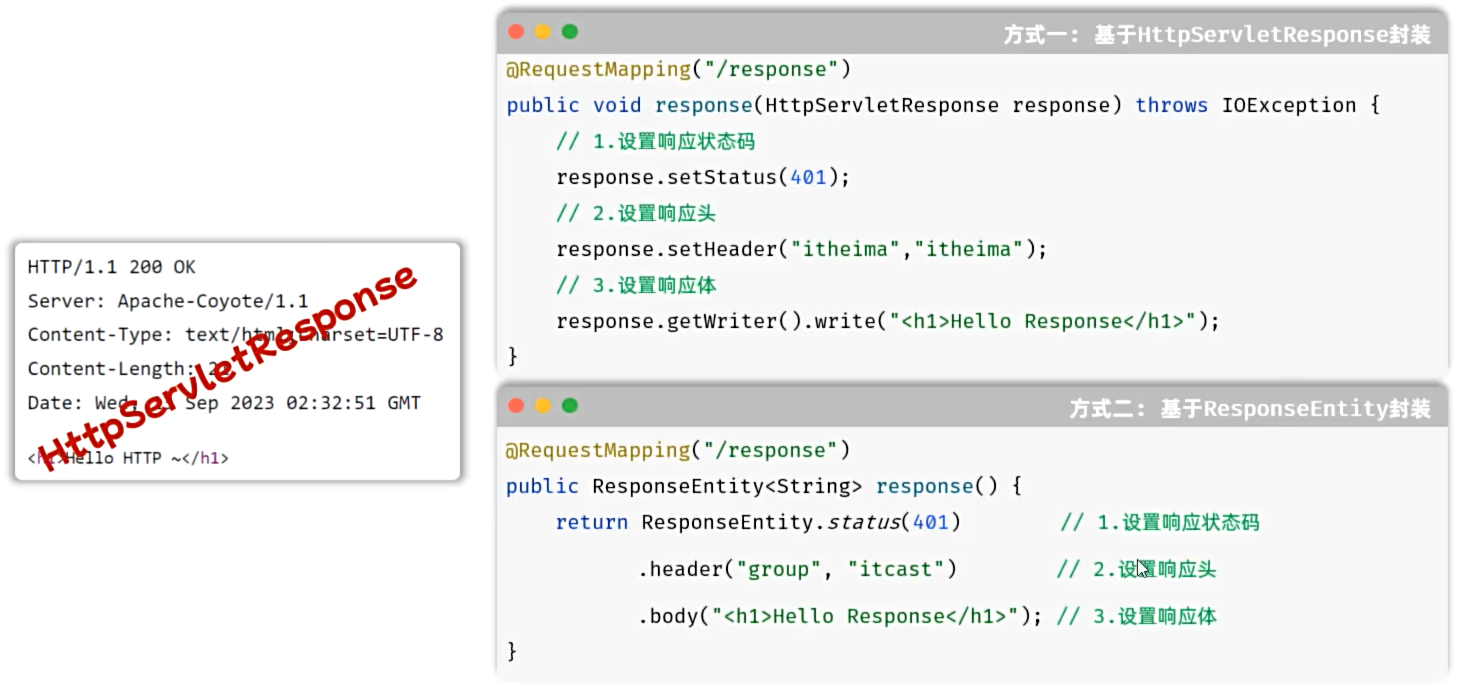 图21 HTTP协议--响应数据设置
* 注意:响应状态码 和 响应头如果没有特殊要求的话,通常不手动设定。服务器会根据请求处理的逻辑,自动设置响应状态码和响应头。
##### cn/dzj/ResponesController.java
```java
package cn.dzj;
import jakarta.servlet.http.HttpServletResponse;
import org.springframework.http.ResponseEntity;
import org.springframework.web.bind.annotation.RequestMapping;
import org.springframework.web.bind.annotation.RestController;
import java.io.IOException;
@RestController
public class ResponesController {
/**
*方式一:HttpServletResponse设置响应数据
*/
@RequestMapping("/response")
public void response(HttpServletResponse response) throws IOException {
//1.设置响应状态码
response.setStatus(401);
//2.设置响应头
response.setHeader("name", "Dzjiang");
//3.设置响应体
response.getWriter().write("
图21 HTTP协议--响应数据设置
* 注意:响应状态码 和 响应头如果没有特殊要求的话,通常不手动设定。服务器会根据请求处理的逻辑,自动设置响应状态码和响应头。
##### cn/dzj/ResponesController.java
```java
package cn.dzj;
import jakarta.servlet.http.HttpServletResponse;
import org.springframework.http.ResponseEntity;
import org.springframework.web.bind.annotation.RequestMapping;
import org.springframework.web.bind.annotation.RestController;
import java.io.IOException;
@RestController
public class ResponesController {
/**
*方式一:HttpServletResponse设置响应数据
*/
@RequestMapping("/response")
public void response(HttpServletResponse response) throws IOException {
//1.设置响应状态码
response.setStatus(401);
//2.设置响应头
response.setHeader("name", "Dzjiang");
//3.设置响应体
response.getWriter().write("hello response
");
}
/**
*方式二:ResponseEntity-Spring中提供的方式
*/
@RequestMapping("/response2")
public ResponseEntity response2(){
return ResponseEntity
. status(401)//响应状态码
.header("name","Du") //响应头
.body("hello response2
"); //响应体
}
}
```
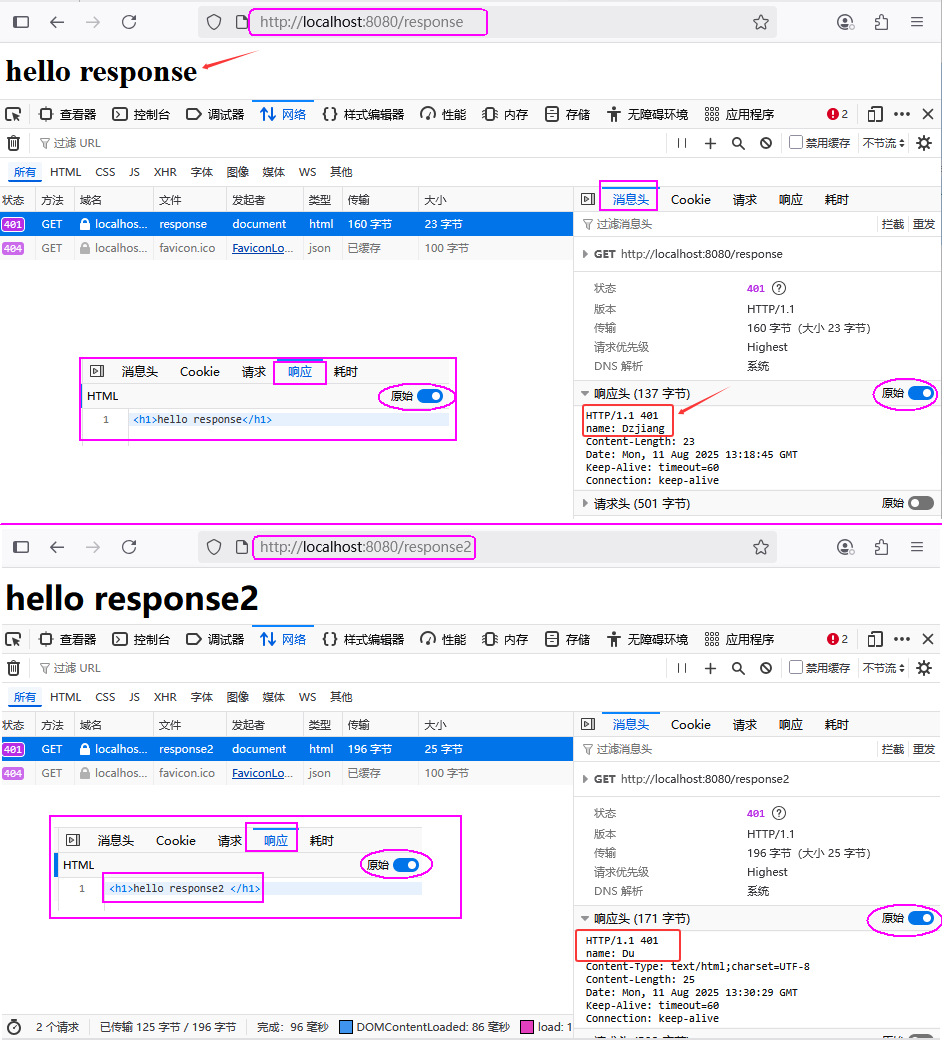 图22 HTTP协议--响应数据设置验证
##### HTTP协议-响应小结
HTTP响应数据需要程序员自己手动设置吗?
* 不需要
* Web服务器对HTTP响应数据进行了封装(HttpServletResponse)
响应状态码、响应头需要我们手动指定吗?
* 通常情况下,我们无需手动制定,服务器会根据请求逻辑自动设置
图22 HTTP协议--响应数据设置验证
##### HTTP协议-响应小结
HTTP响应数据需要程序员自己手动设置吗?
* 不需要
* Web服务器对HTTP响应数据进行了封装(HttpServletResponse)
响应状态码、响应头需要我们手动指定吗?
* 通常情况下,我们无需手动制定,服务器会根据请求逻辑自动设置
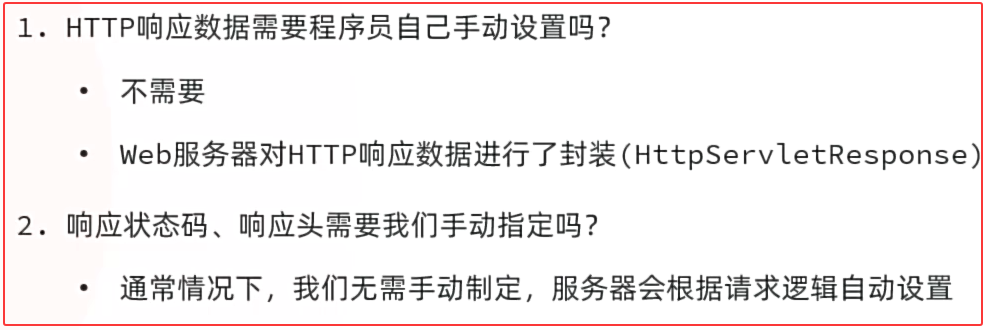 图23 HTTP协议--响应数据设置小结
### 3. SpringBoot Web案例
* 准备工作:
* ①创建一个SpringBoot工程(Maven模块springboot-web-01),并勾选web依赖、lombok。
* ②引入资料中准备好的用户数据文件(user.txt),及前端静态页面(user.html)。
* ③定义一个实体类,用来封装用户信息
* 开发服务端程序,接收请求,读取文本数据并响应。
图23 HTTP协议--响应数据设置小结
### 3. SpringBoot Web案例
* 准备工作:
* ①创建一个SpringBoot工程(Maven模块springboot-web-01),并勾选web依赖、lombok。
* ②引入资料中准备好的用户数据文件(user.txt),及前端静态页面(user.html)。
* ③定义一个实体类,用来封装用户信息
* 开发服务端程序,接收请求,读取文本数据并响应。
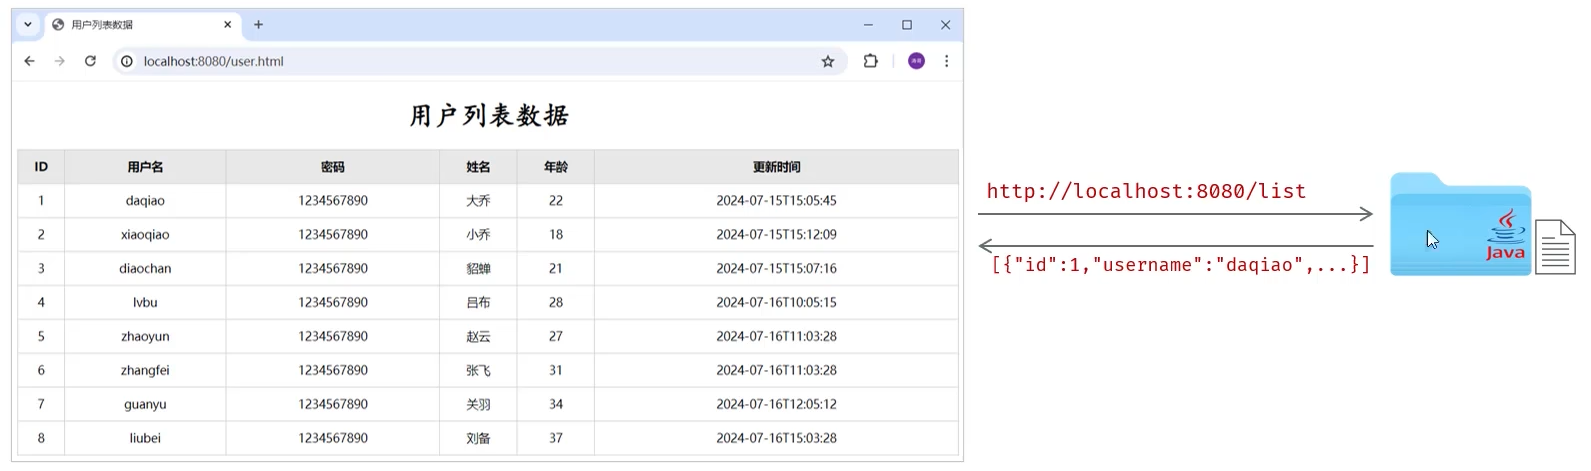 图24 SpringBoot Web案例
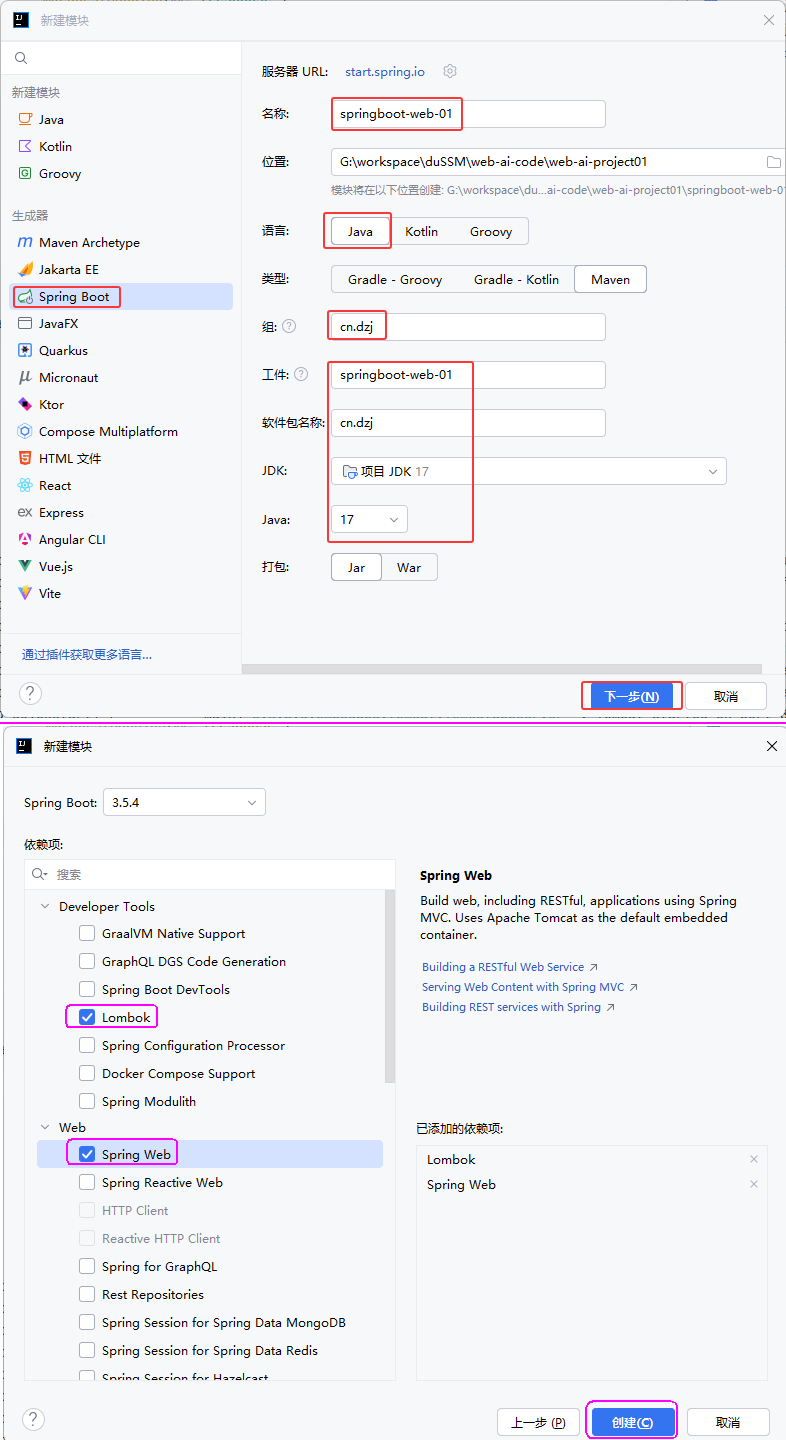 图25 创建SpringBoot Web案例项目
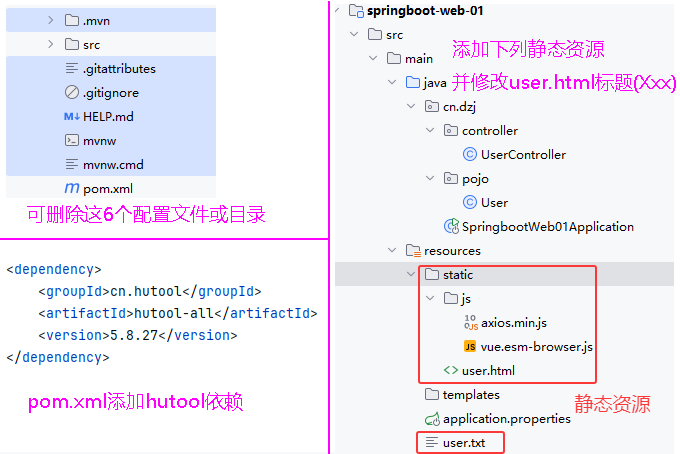 图26 案例项目添加依赖、静态资源
##### cn/dzj/pojo/User.java
```java
package cn.dzj.pojo;
import lombok.AllArgsConstructor;
import lombok.Data;
import lombok.NoArgsConstructor;
import java.time.LocalDateTime;
@Data
@NoArgsConstructor
@AllArgsConstructor
public class User {
private Integer id;
private String username;
private String password;
private String name;
private Integer age;
private LocalDateTime updateTime;
}
```
##### cn/dzj/controller/UserController.java
```java
package cn.dzj.controller;
import cn.dzj.pojo.User;
import cn.hutool.core.io.IoUtil;
import org.springframework.web.bind.annotation.RequestMapping;
import org.springframework.web.bind.annotation.RestController;
import java.io.InputStream;
import java.nio.charset.StandardCharsets;
import java.time.LocalDateTime;
import java.time.format.DateTimeFormatter;
import java.util.ArrayList;
import java.util.List;
/**
*用户信息Controller
*/
@RestController
// @Controller->作用:将controller返回值封装为响应数据
// @Controller注解中包含@ResponseBody注解
// @ResponseBody->作用:将controller返回值直接作为响应体的数据直接响应;如果返回值是对象/集合->json->响应
public class UserController {
@RequestMapping("/list")
public List list() throws Exception {
//1.加载并读取user.txt文件,获取用户数据
InputStream in = this.getClass().getClassLoader().getResourceAsStream("user.txt");
ArrayList lines = IoUtil.readLines(in, StandardCharsets.UTF_8, new ArrayList<>());
//2.解析用户信息,封装为User对象->list集合
List userList = lines.stream().map(line -> {
String[] parts = line.split(",");
Integer id = Integer.parseInt(parts[0]);
String username = parts[1];
String password = parts[2];
String name = parts[3];
Integer age = Integer.parseInt(parts[4]);
LocalDateTime updateTime = LocalDateTime.parse(parts[5], DateTimeFormatter.ofPattern("yyyy-MM-dd HH:mm:ss"));
return new User(id, username, password, name, age, updateTime);
}).toList();
//3.返回数据(json)
return userList;
}
}
```
图26 案例项目添加依赖、静态资源
##### cn/dzj/pojo/User.java
```java
package cn.dzj.pojo;
import lombok.AllArgsConstructor;
import lombok.Data;
import lombok.NoArgsConstructor;
import java.time.LocalDateTime;
@Data
@NoArgsConstructor
@AllArgsConstructor
public class User {
private Integer id;
private String username;
private String password;
private String name;
private Integer age;
private LocalDateTime updateTime;
}
```
##### cn/dzj/controller/UserController.java
```java
package cn.dzj.controller;
import cn.dzj.pojo.User;
import cn.hutool.core.io.IoUtil;
import org.springframework.web.bind.annotation.RequestMapping;
import org.springframework.web.bind.annotation.RestController;
import java.io.InputStream;
import java.nio.charset.StandardCharsets;
import java.time.LocalDateTime;
import java.time.format.DateTimeFormatter;
import java.util.ArrayList;
import java.util.List;
/**
*用户信息Controller
*/
@RestController
// @Controller->作用:将controller返回值封装为响应数据
// @Controller注解中包含@ResponseBody注解
// @ResponseBody->作用:将controller返回值直接作为响应体的数据直接响应;如果返回值是对象/集合->json->响应
public class UserController {
@RequestMapping("/list")
public List list() throws Exception {
//1.加载并读取user.txt文件,获取用户数据
InputStream in = this.getClass().getClassLoader().getResourceAsStream("user.txt");
ArrayList lines = IoUtil.readLines(in, StandardCharsets.UTF_8, new ArrayList<>());
//2.解析用户信息,封装为User对象->list集合
List userList = lines.stream().map(line -> {
String[] parts = line.split(",");
Integer id = Integer.parseInt(parts[0]);
String username = parts[1];
String password = parts[2];
String name = parts[3];
Integer age = Integer.parseInt(parts[4]);
LocalDateTime updateTime = LocalDateTime.parse(parts[5], DateTimeFormatter.ofPattern("yyyy-MM-dd HH:mm:ss"));
return new User(id, username, password, name, age, updateTime);
}).toList();
//3.返回数据(json)
return userList;
}
}
```
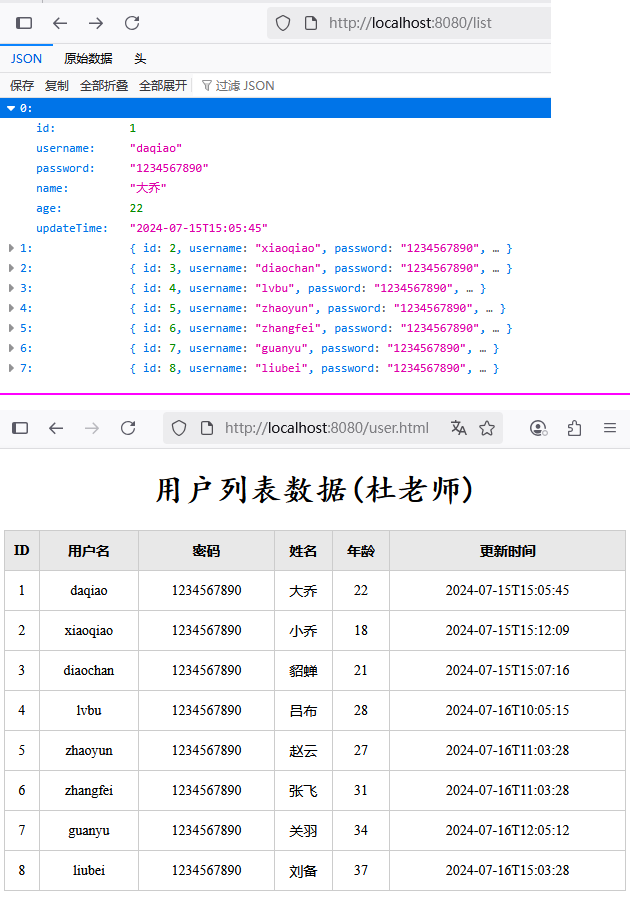 图27 项目后台验证、运行验证
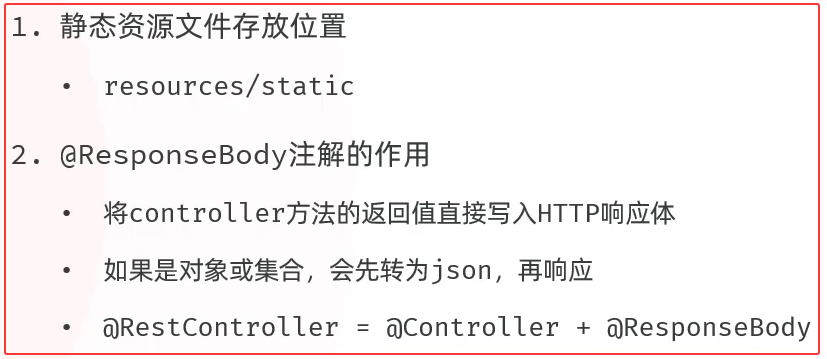 图28 springboot-web案例小结
### 4. 分层解耦
图28 springboot-web案例小结
### 4. 分层解耦
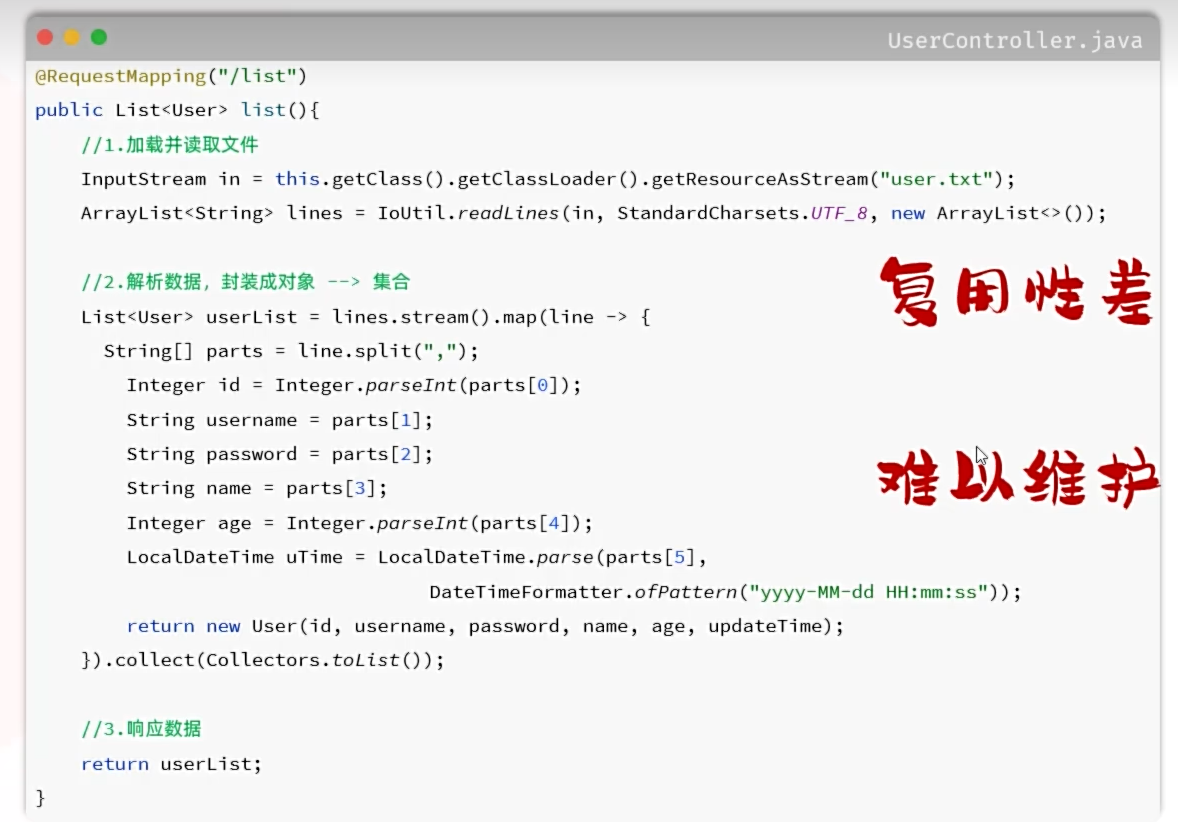 图29 思考:没有分层的问题?
##### 目录
* 三层架构
* 分层解耦
* IOC & DI入门
* lOC详解
* DI详解
#### 4.1 三层架构
图29 思考:没有分层的问题?
##### 目录
* 三层架构
* 分层解耦
* IOC & DI入门
* lOC详解
* DI详解
#### 4.1 三层架构
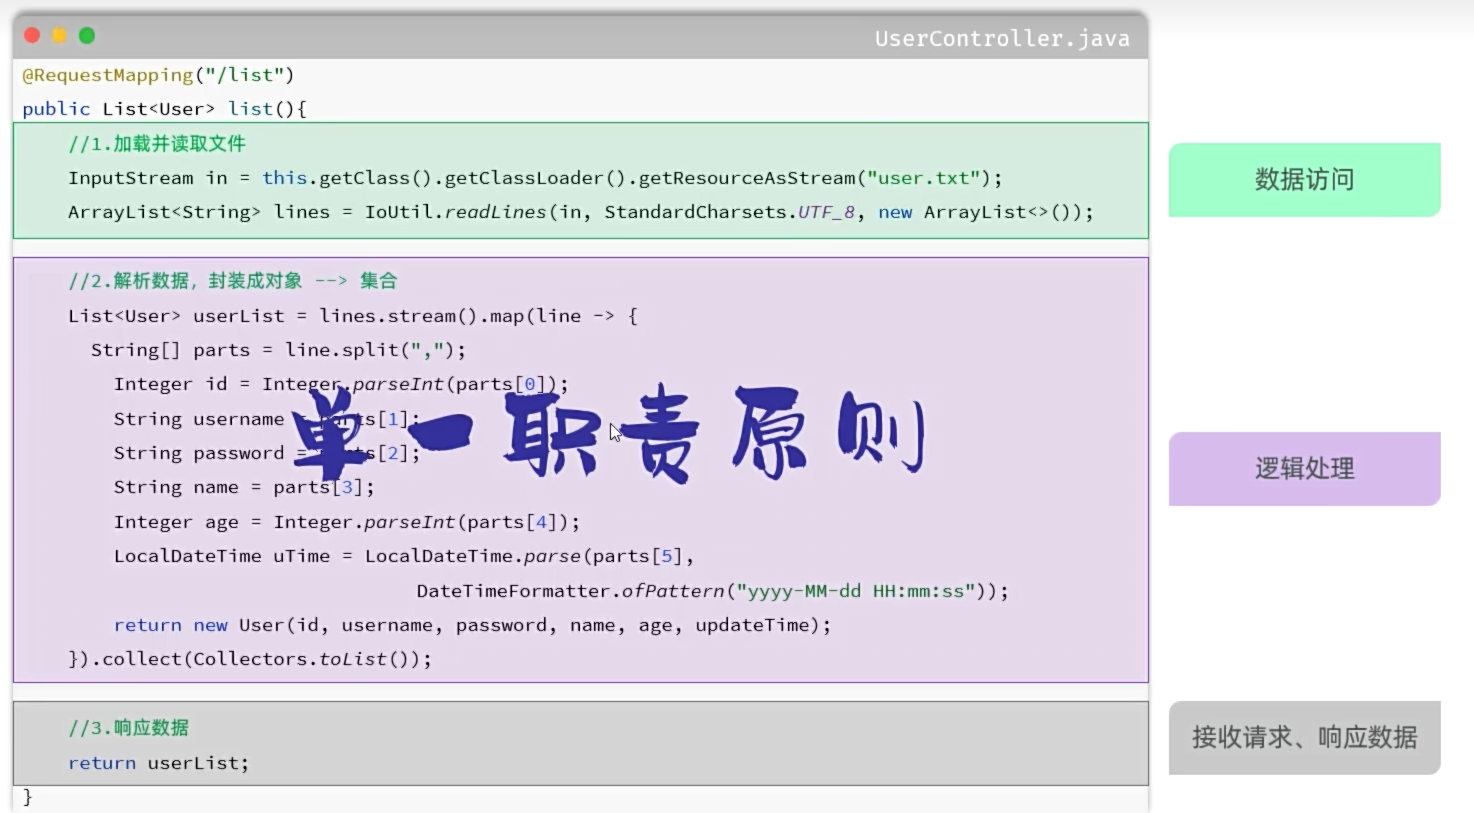 图30 分层之前
#####
图30 分层之前
#####
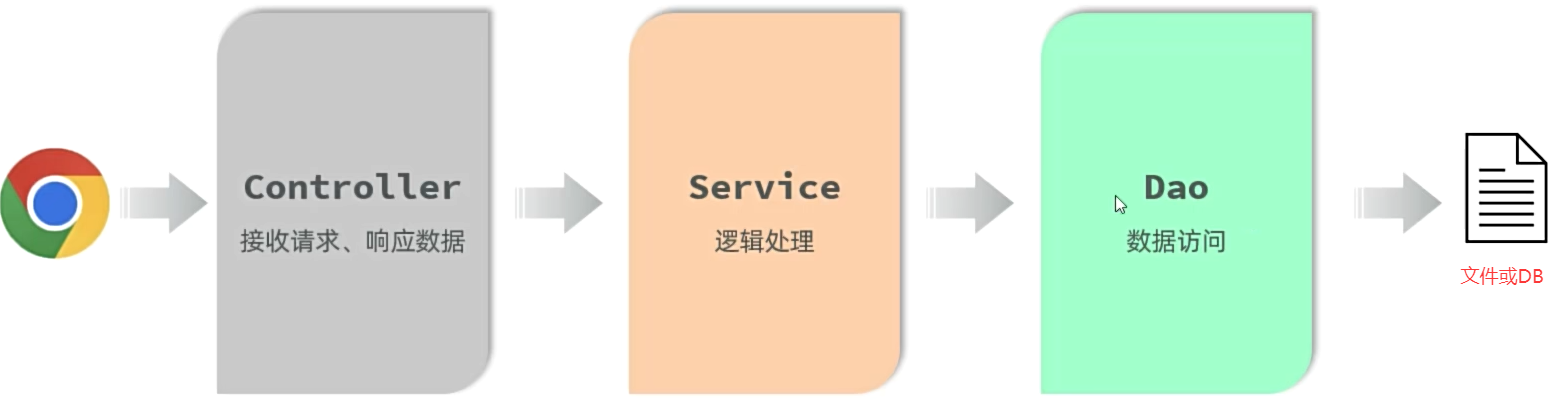 图30 三层架构
* controller:控制层,接收前端发送的请求,对请求进行处理,并响应数据。
* service:业务逻辑层,处理具体的业务逻辑。
* dao:数据访问层(Data Access Object)(持久层),负责数据访问操作,包括数据的增、删、改、查。:
图30 三层架构
* controller:控制层,接收前端发送的请求,对请求进行处理,并响应数据。
* service:业务逻辑层,处理具体的业务逻辑。
* dao:数据访问层(Data Access Object)(持久层),负责数据访问操作,包括数据的增、删、改、查。:
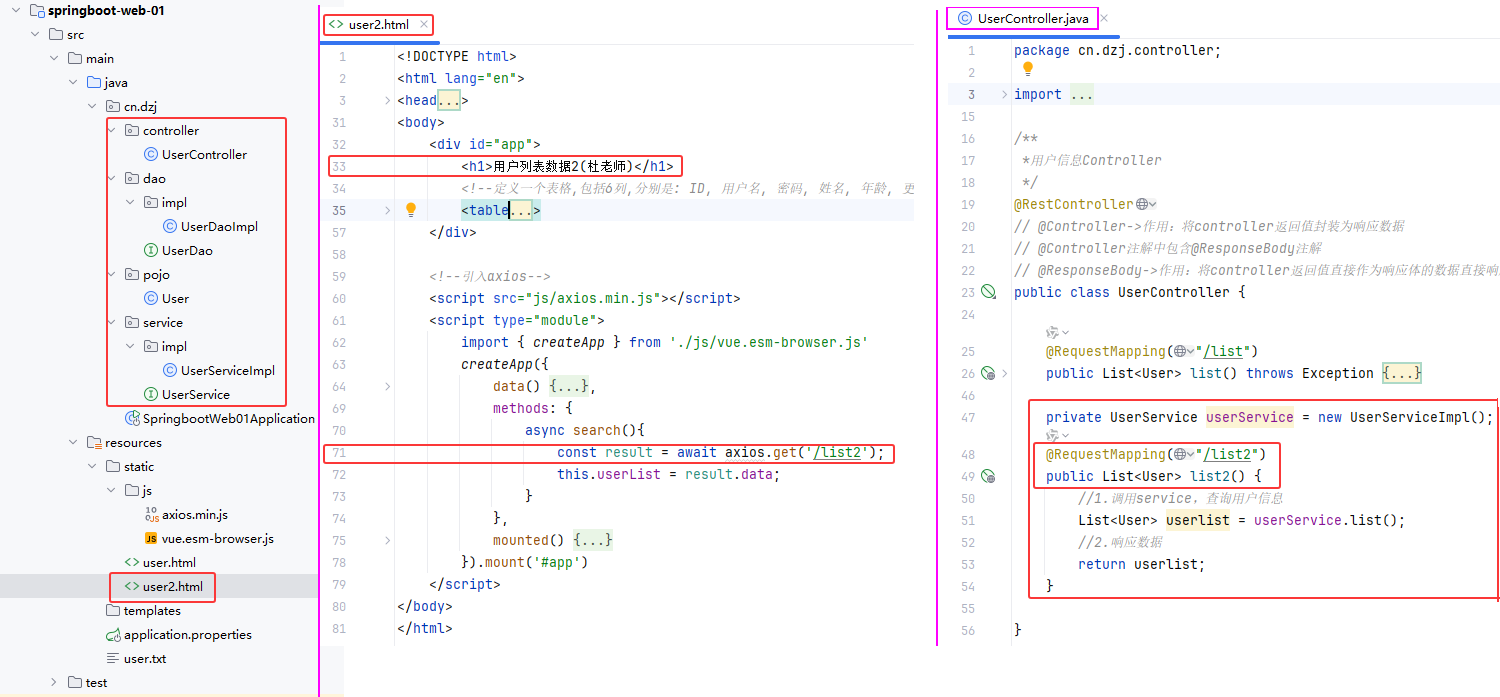 图32 创建三层架构: service,dao及其impl
* ①创建三层架构: service,dao及其impl
* ②复制user.html为user2.html,修改33、71行
* ③创建UserDao.java及其UserDaoImpl.java
* ④创建UserService.java及其UserServiceImpl.java
* ⑤修改UserController.java,添加list2()
* ⑥启动项目,浏览器测试http://localhost:8080/user2.html
##### cn/dzj/dao/UserDao.java
```java
package cn.dzj.dao;
import java.util.List;
public interface UserDao {
public List list();
}
```
##### cn/dzj/dao/impl/UserDaoImpl.java
```java
package cn.dzj.dao.impl;
import cn.dzj.dao.UserDao;
import cn.hutool.core.io.IoUtil;
import java.io.InputStream;
import java.nio.charset.StandardCharsets;
import java.util.ArrayList;
import java.util.List;
public class UserDaoImpl implements UserDao {
public List list() {
//1.加载并读取文件
InputStream in = this.getClass().getClassLoader().getResourceAsStream("user.txt");
return IoUtil.readLines(in, StandardCharsets.UTF_8, new ArrayList<>());
}
}
```
##### cn/dzj/service/UserService.java
```java
package cn.dzj.service;
import cn.dzj.pojo.User;
import java.util.List;
public interface UserService {
public List list();
}
```
##### cn/dzj/service/impl/UserServiceImpl.java
```java
package cn.dzj.service.impl;
import cn.dzj.dao.UserDao;
import cn.dzj.dao.impl.UserDaoImpl;
import cn.dzj.pojo.User;
import cn.dzj.service.UserService;
import java.time.LocalDateTime;
import java.time.format.DateTimeFormatter;
import java.util.List;
public class UserServiceImpl implements UserService {
private UserDao userDao = new UserDaoImpl();
public List list(){
//1.调用dao获取数据
List lines = userDao.list();
//2.解析数据,封装成对象—-—> 集合
List userList = lines.stream().map(line -> {
String[] parts = line.split(",");
Integer id = Integer.parseInt(parts[0]);
String username = parts[1];
String password = parts[2];
String name = parts[3];
Integer age = Integer.parseInt(parts[4]);
LocalDateTime updateTime = LocalDateTime.parse(parts[5],
DateTimeFormatter.ofPattern("yyyy-MM-dd HH:mm:ss"));
return new User(id, username, password, name, age, updateTime);
}).toList();
return userList;
}
}
```
##### cn/dzj/controller/UserController.java 添加list2()
```java
private UserService userService = new UserServiceImpl();
@RequestMapping("/list2")
public List list2() {
//1.调用service,查询用户信息
List userlist = userService.list();
//2.响应数据
return userlist;
}
```
图32 创建三层架构: service,dao及其impl
* ①创建三层架构: service,dao及其impl
* ②复制user.html为user2.html,修改33、71行
* ③创建UserDao.java及其UserDaoImpl.java
* ④创建UserService.java及其UserServiceImpl.java
* ⑤修改UserController.java,添加list2()
* ⑥启动项目,浏览器测试http://localhost:8080/user2.html
##### cn/dzj/dao/UserDao.java
```java
package cn.dzj.dao;
import java.util.List;
public interface UserDao {
public List list();
}
```
##### cn/dzj/dao/impl/UserDaoImpl.java
```java
package cn.dzj.dao.impl;
import cn.dzj.dao.UserDao;
import cn.hutool.core.io.IoUtil;
import java.io.InputStream;
import java.nio.charset.StandardCharsets;
import java.util.ArrayList;
import java.util.List;
public class UserDaoImpl implements UserDao {
public List list() {
//1.加载并读取文件
InputStream in = this.getClass().getClassLoader().getResourceAsStream("user.txt");
return IoUtil.readLines(in, StandardCharsets.UTF_8, new ArrayList<>());
}
}
```
##### cn/dzj/service/UserService.java
```java
package cn.dzj.service;
import cn.dzj.pojo.User;
import java.util.List;
public interface UserService {
public List list();
}
```
##### cn/dzj/service/impl/UserServiceImpl.java
```java
package cn.dzj.service.impl;
import cn.dzj.dao.UserDao;
import cn.dzj.dao.impl.UserDaoImpl;
import cn.dzj.pojo.User;
import cn.dzj.service.UserService;
import java.time.LocalDateTime;
import java.time.format.DateTimeFormatter;
import java.util.List;
public class UserServiceImpl implements UserService {
private UserDao userDao = new UserDaoImpl();
public List list(){
//1.调用dao获取数据
List lines = userDao.list();
//2.解析数据,封装成对象—-—> 集合
List userList = lines.stream().map(line -> {
String[] parts = line.split(",");
Integer id = Integer.parseInt(parts[0]);
String username = parts[1];
String password = parts[2];
String name = parts[3];
Integer age = Integer.parseInt(parts[4]);
LocalDateTime updateTime = LocalDateTime.parse(parts[5],
DateTimeFormatter.ofPattern("yyyy-MM-dd HH:mm:ss"));
return new User(id, username, password, name, age, updateTime);
}).toList();
return userList;
}
}
```
##### cn/dzj/controller/UserController.java 添加list2()
```java
private UserService userService = new UserServiceImpl();
@RequestMapping("/list2")
public List list2() {
//1.调用service,查询用户信息
List userlist = userService.list();
//2.响应数据
return userlist;
}
```
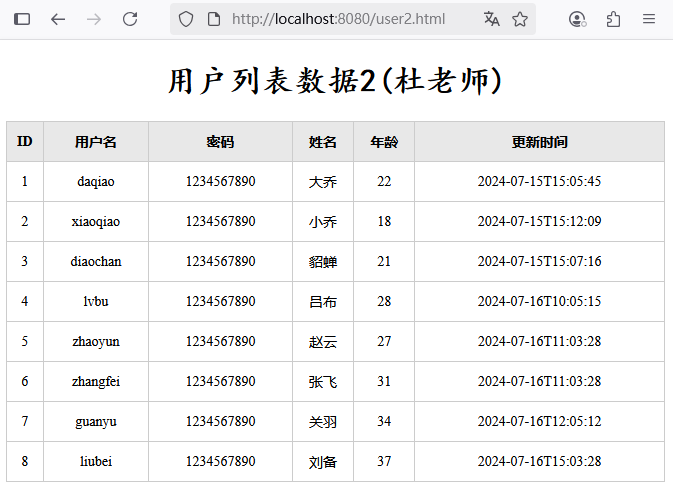 图33 三层架构验证
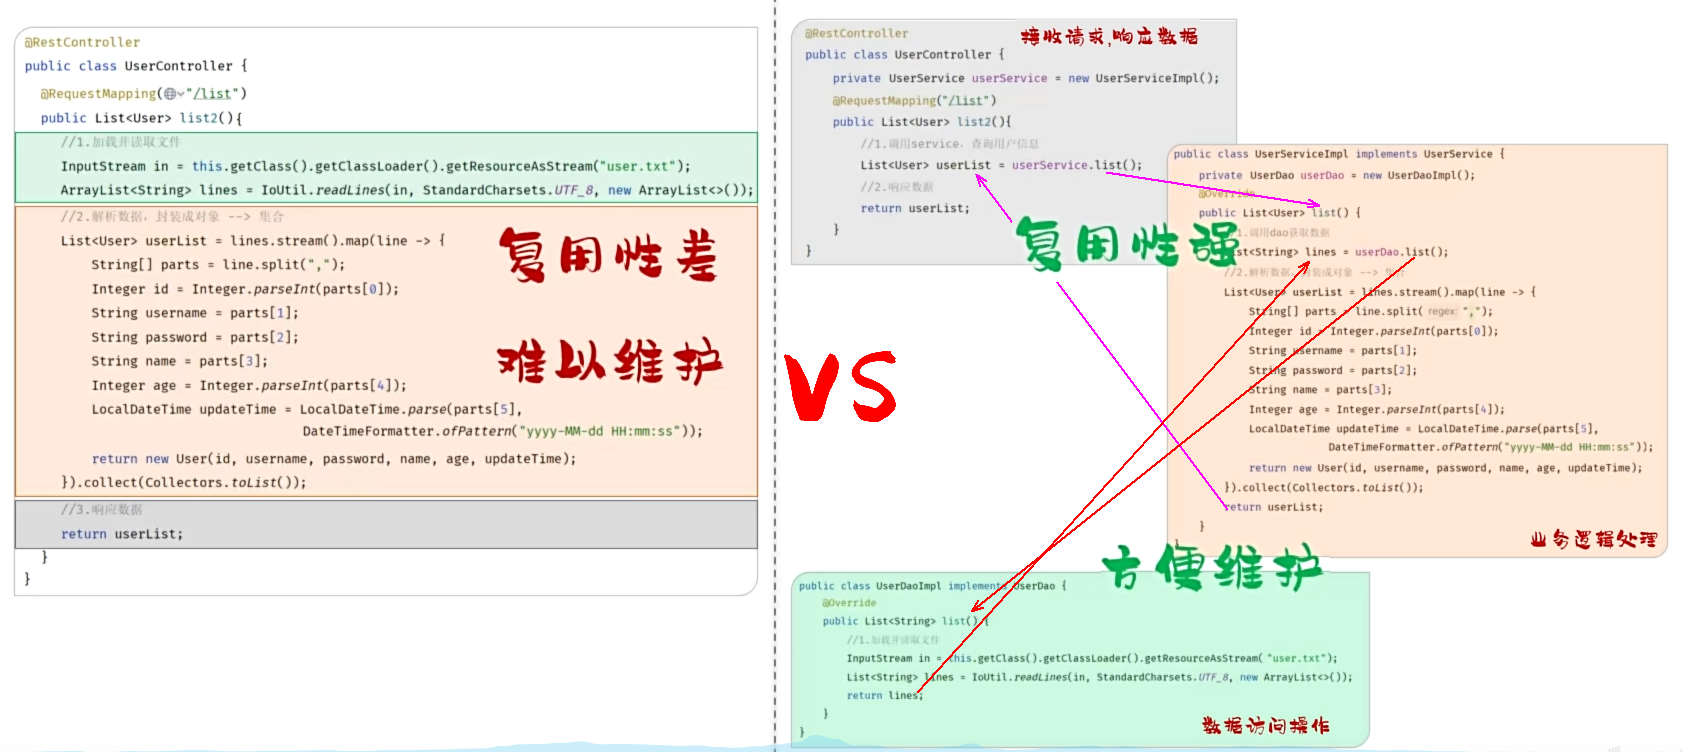 图34 划分为三层架构及其调用关系
为什么要对代码进行拆分?
* 遵循单一职责原则,便于复用、后期维护
拆分为了哪三层?每一层的职责是什么?
* controller:接受请求,响应数据
* service:逻辑处理
* dao:数据访问
图34 划分为三层架构及其调用关系
为什么要对代码进行拆分?
* 遵循单一职责原则,便于复用、后期维护
拆分为了哪三层?每一层的职责是什么?
* controller:接受请求,响应数据
* service:逻辑处理
* dao:数据访问
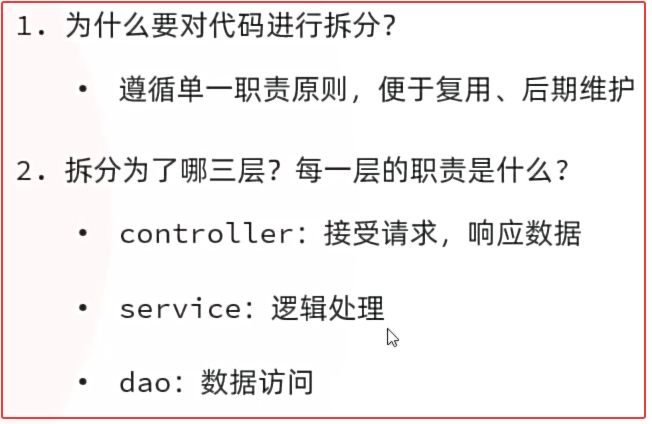 图35 三层架构小结
#### 4.2 分层解耦
* 耦合:衡量软件中各个层/各个模块的依赖关联程度。
* 内聚:软件中各个功能模块内部的功能联系。
* 软件设计原则:高内聚低耦合。
图35 三层架构小结
#### 4.2 分层解耦
* 耦合:衡量软件中各个层/各个模块的依赖关联程度。
* 内聚:软件中各个功能模块内部的功能联系。
* 软件设计原则:高内聚低耦合。
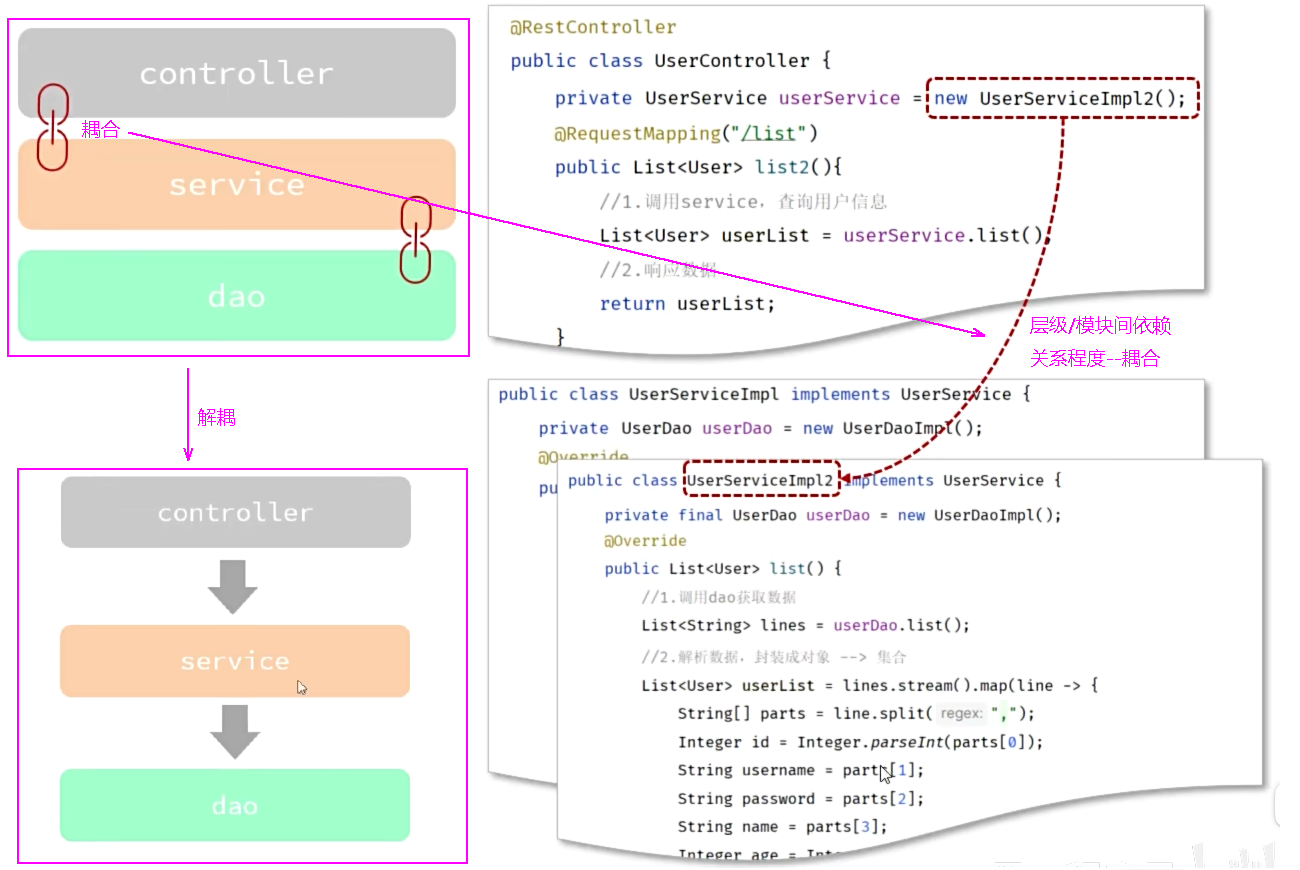 图36 耦合
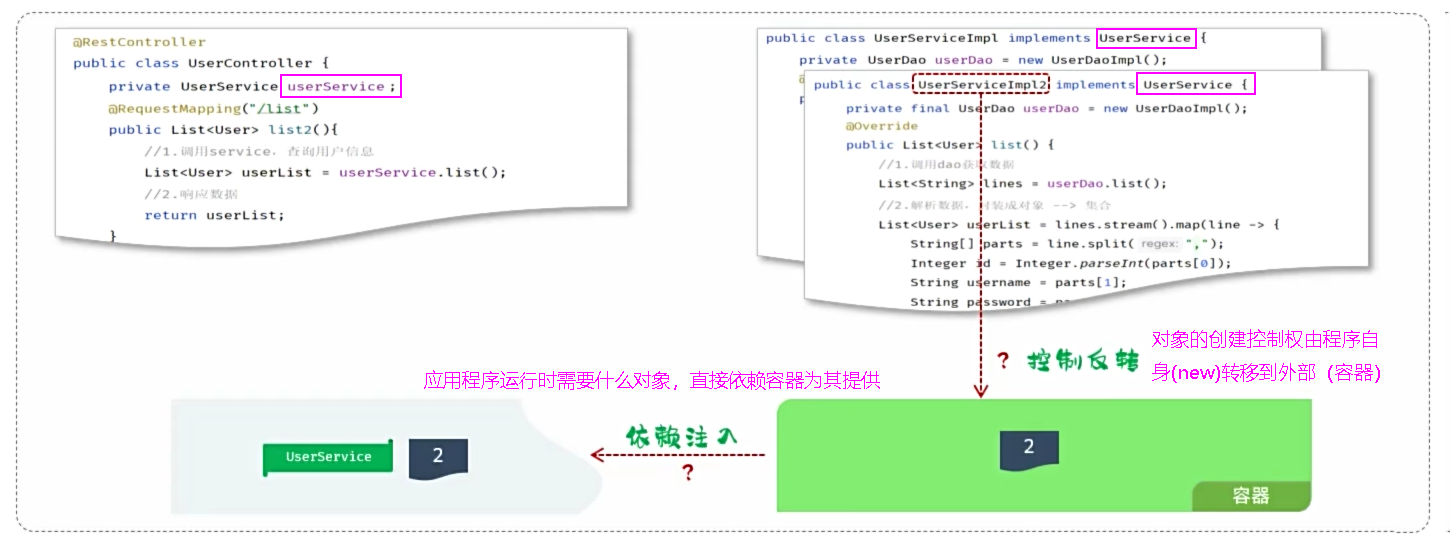 图37 分层解耦
* 控制反转: Inversion Of Control,简称IOC。对象的创建控制权由程序自身转移到外部(容器),这种思想称为控制反转。
* 依赖注入: Dependency Injection,简称DI。容器为应用程序提供运行时,所依赖的资源,称之为依赖注入。
* Bean对象:IOC容器中创建、管理的对象,称之为Bean。
图37 分层解耦
* 控制反转: Inversion Of Control,简称IOC。对象的创建控制权由程序自身转移到外部(容器),这种思想称为控制反转。
* 依赖注入: Dependency Injection,简称DI。容器为应用程序提供运行时,所依赖的资源,称之为依赖注入。
* Bean对象:IOC容器中创建、管理的对象,称之为Bean。
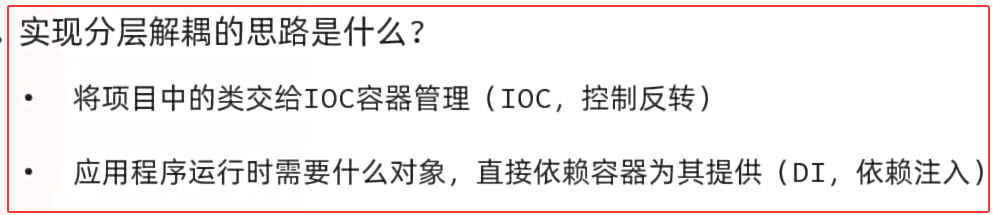 图38 分层解耦的思路
实现分层解耦的思路是什么?
* 将项目中的实现类s交给IOC容器管理(IOC,控制反转)
* 应用程序运行时需要什么对象,直接依赖容器为其提供(DI,依赖注入)
#### 4.3 IOC & DI入门
图38 分层解耦的思路
实现分层解耦的思路是什么?
* 将项目中的实现类s交给IOC容器管理(IOC,控制反转)
* 应用程序运行时需要什么对象,直接依赖容器为其提供(DI,依赖注入)
#### 4.3 IOC & DI入门
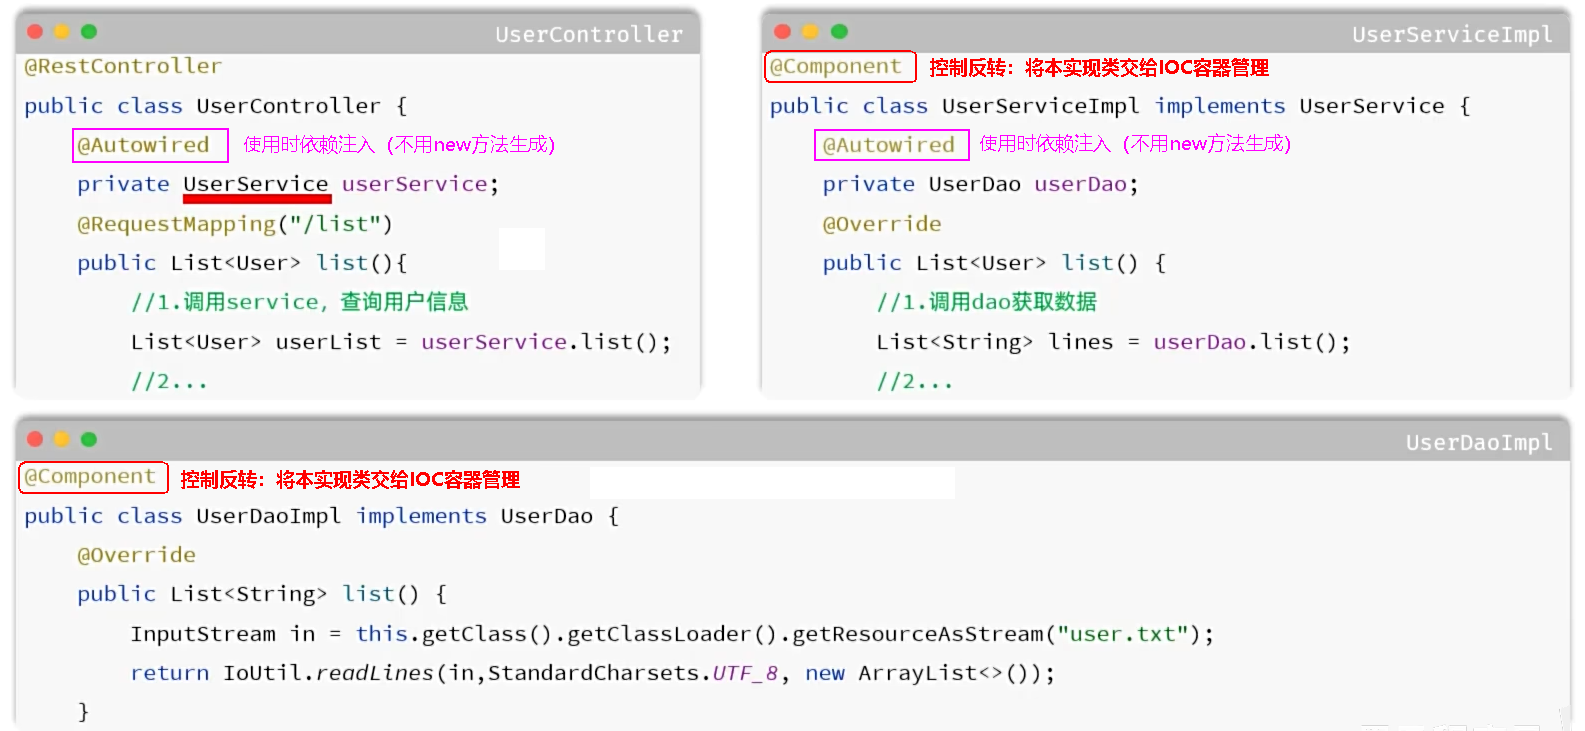 图39 Spring分层解耦
① 控制反转(IoC):将Dao 及 Service层的实现类,通过@Component交给IOC容器管理。
② 依赖注入(DI):为Controller 及 Service通过@Autowired注入运行时所依赖的对象。
##### cn/dzj/dao/impl/UserDaoImpl.java 添加@Component
```java
package cn.dzj.dao.impl;
import cn.dzj.dao.UserDao;
import cn.hutool.core.io.IoUtil;
import org.springframework.stereotype.Component;
import java.io.InputStream;
import java.nio.charset.StandardCharsets;
import java.util.ArrayList;
import java.util.List;
@Component // @Component->作用:将类交给spring管理 -- 将当前类交给IOC容器管理
public class UserDaoImpl implements UserDao {
public List list() {
//1.加载并读取文件
InputStream in = this.getClass().getClassLoader().getResourceAsStream("user.txt");
return IoUtil.readLines(in, StandardCharsets.UTF_8, new ArrayList<>());
}
}
```
##### cn/dzj/service/impl/UserServiceImpl.java 添加@Component和@Autowired注解,注释new
```java
package cn.dzj.service.impl;
import cn.dzj.dao.UserDao;
// import cn.dzj.dao.impl.UserDaoImpl;
import cn.dzj.pojo.User;
import cn.dzj.service.UserService;
import org.springframework.beans.factory.annotation.Autowired;
import org.springframework.stereotype.Component;
import java.time.LocalDateTime;
import java.time.format.DateTimeFormatter;
import java.util.List;
@Component // @Component->作用:将类交给spring管理 -- 将当前类交给IOC容器管理
public class UserServiceImpl implements UserService {
@Autowired //应用程序运行时,会自动的查询该类型的bean对象,并赋值给该成员变量
private UserDao userDao; // = new UserDaoImpl();
public List list(){
//1.调用dao获取数据
List lines = userDao.list();
//2.解析数据,封装成对象—-—> 集合
List userList = lines.stream().map(line -> {
String[] parts = line.split(",");
Integer id = Integer.parseInt(parts[0]);
String username = parts[1];
String password = parts[2];
String name = parts[3];
Integer age = Integer.parseInt(parts[4]);
LocalDateTime updateTime = LocalDateTime.parse(parts[5],
DateTimeFormatter.ofPattern("yyyy-MM-dd HH:mm:ss"));
return new User(id, username, password, name, age, updateTime);
}).toList();
return userList;
}
}
```
##### cn/dzj/controller/UserController.java 添加@Autowired注解,注释new
```java
package cn.dzj.controller;
import cn.dzj.pojo.User;
import cn.dzj.service.UserService;
// import cn.dzj.service.impl.UserServiceImpl;
import cn.hutool.core.io.IoUtil;
import org.springframework.beans.factory.annotation.Autowired;
import org.springframework.web.bind.annotation.RequestMapping;
import org.springframework.web.bind.annotation.RestController;
import java.io.InputStream;
import java.nio.charset.StandardCharsets;
import java.time.LocalDateTime;
import java.time.format.DateTimeFormatter;
import java.util.ArrayList;
import java.util.List;
/**
*用户信息Controller
*/
@RestController
// @Controller->作用:将controller返回值封装为响应数据
// @Controller注解中包含@ResponseBody注解
// @ResponseBody->作用:将controller返回值直接作为响应体的数据直接响应;如果返回值是对象/集合->json->响应
public class UserController {
@RequestMapping("/list")
public List list() throws Exception {
//1.加载并读取user.txt文件,获取用户数据
InputStream in = this.getClass().getClassLoader().getResourceAsStream("user.txt");
ArrayList lines = IoUtil.readLines(in, StandardCharsets.UTF_8, new ArrayList<>());
//2.解析用户信息,封装为User对象->list集合
List userList = lines.stream().map(line -> {
String[] parts = line.split(",");
Integer id = Integer.parseInt(parts[0]);
String username = parts[1];
String password = parts[2];
String name = parts[3];
Integer age = Integer.parseInt(parts[4]);
LocalDateTime updateTime = LocalDateTime.parse(parts[5], DateTimeFormatter.ofPattern("yyyy-MM-dd HH:mm:ss"));
return new User(id, username, password, name, age, updateTime);
}).toList();
//3.返回数据(json)
return userList;
}
@Autowired //应用程序运行时,会自动的查询该类型的bean对象,并赋值给该成员变量
private UserService userService; // = new UserServiceImpl();
@RequestMapping("/list2")
public List list2() {
//1.调用service,查询用户信息
List userlist = userService.list();
//2.响应数据
return userlist;
}
}
```
图 IOC & DI验证
图39 Spring分层解耦
① 控制反转(IoC):将Dao 及 Service层的实现类,通过@Component交给IOC容器管理。
② 依赖注入(DI):为Controller 及 Service通过@Autowired注入运行时所依赖的对象。
##### cn/dzj/dao/impl/UserDaoImpl.java 添加@Component
```java
package cn.dzj.dao.impl;
import cn.dzj.dao.UserDao;
import cn.hutool.core.io.IoUtil;
import org.springframework.stereotype.Component;
import java.io.InputStream;
import java.nio.charset.StandardCharsets;
import java.util.ArrayList;
import java.util.List;
@Component // @Component->作用:将类交给spring管理 -- 将当前类交给IOC容器管理
public class UserDaoImpl implements UserDao {
public List list() {
//1.加载并读取文件
InputStream in = this.getClass().getClassLoader().getResourceAsStream("user.txt");
return IoUtil.readLines(in, StandardCharsets.UTF_8, new ArrayList<>());
}
}
```
##### cn/dzj/service/impl/UserServiceImpl.java 添加@Component和@Autowired注解,注释new
```java
package cn.dzj.service.impl;
import cn.dzj.dao.UserDao;
// import cn.dzj.dao.impl.UserDaoImpl;
import cn.dzj.pojo.User;
import cn.dzj.service.UserService;
import org.springframework.beans.factory.annotation.Autowired;
import org.springframework.stereotype.Component;
import java.time.LocalDateTime;
import java.time.format.DateTimeFormatter;
import java.util.List;
@Component // @Component->作用:将类交给spring管理 -- 将当前类交给IOC容器管理
public class UserServiceImpl implements UserService {
@Autowired //应用程序运行时,会自动的查询该类型的bean对象,并赋值给该成员变量
private UserDao userDao; // = new UserDaoImpl();
public List list(){
//1.调用dao获取数据
List lines = userDao.list();
//2.解析数据,封装成对象—-—> 集合
List userList = lines.stream().map(line -> {
String[] parts = line.split(",");
Integer id = Integer.parseInt(parts[0]);
String username = parts[1];
String password = parts[2];
String name = parts[3];
Integer age = Integer.parseInt(parts[4]);
LocalDateTime updateTime = LocalDateTime.parse(parts[5],
DateTimeFormatter.ofPattern("yyyy-MM-dd HH:mm:ss"));
return new User(id, username, password, name, age, updateTime);
}).toList();
return userList;
}
}
```
##### cn/dzj/controller/UserController.java 添加@Autowired注解,注释new
```java
package cn.dzj.controller;
import cn.dzj.pojo.User;
import cn.dzj.service.UserService;
// import cn.dzj.service.impl.UserServiceImpl;
import cn.hutool.core.io.IoUtil;
import org.springframework.beans.factory.annotation.Autowired;
import org.springframework.web.bind.annotation.RequestMapping;
import org.springframework.web.bind.annotation.RestController;
import java.io.InputStream;
import java.nio.charset.StandardCharsets;
import java.time.LocalDateTime;
import java.time.format.DateTimeFormatter;
import java.util.ArrayList;
import java.util.List;
/**
*用户信息Controller
*/
@RestController
// @Controller->作用:将controller返回值封装为响应数据
// @Controller注解中包含@ResponseBody注解
// @ResponseBody->作用:将controller返回值直接作为响应体的数据直接响应;如果返回值是对象/集合->json->响应
public class UserController {
@RequestMapping("/list")
public List list() throws Exception {
//1.加载并读取user.txt文件,获取用户数据
InputStream in = this.getClass().getClassLoader().getResourceAsStream("user.txt");
ArrayList lines = IoUtil.readLines(in, StandardCharsets.UTF_8, new ArrayList<>());
//2.解析用户信息,封装为User对象->list集合
List userList = lines.stream().map(line -> {
String[] parts = line.split(",");
Integer id = Integer.parseInt(parts[0]);
String username = parts[1];
String password = parts[2];
String name = parts[3];
Integer age = Integer.parseInt(parts[4]);
LocalDateTime updateTime = LocalDateTime.parse(parts[5], DateTimeFormatter.ofPattern("yyyy-MM-dd HH:mm:ss"));
return new User(id, username, password, name, age, updateTime);
}).toList();
//3.返回数据(json)
return userList;
}
@Autowired //应用程序运行时,会自动的查询该类型的bean对象,并赋值给该成员变量
private UserService userService; // = new UserServiceImpl();
@RequestMapping("/list2")
public List list2() {
//1.调用service,查询用户信息
List userlist = userService.list();
//2.响应数据
return userlist;
}
}
```
图 IOC & DI验证
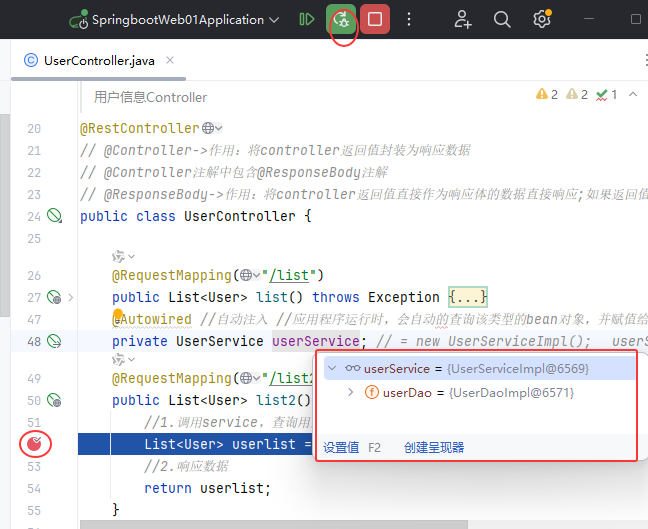 图40 调式:断点检查变量是否生成
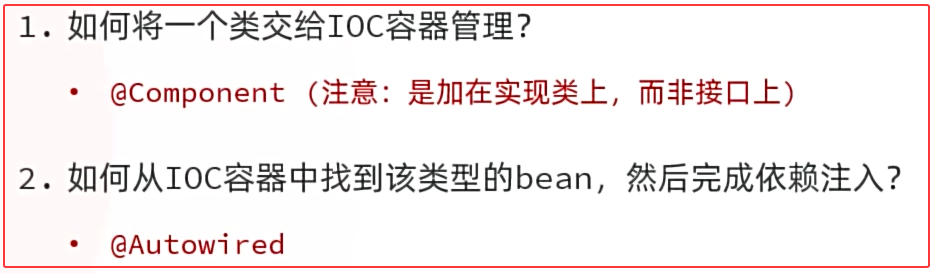 图41 分层解耦小结
#### 4.4 IOC详解
* 要把某个对象交给IOC容器管理,需要在对应的类上加上如下注解之一:
图41 分层解耦小结
#### 4.4 IOC详解
* 要把某个对象交给IOC容器管理,需要在对应的类上加上如下注解之一:
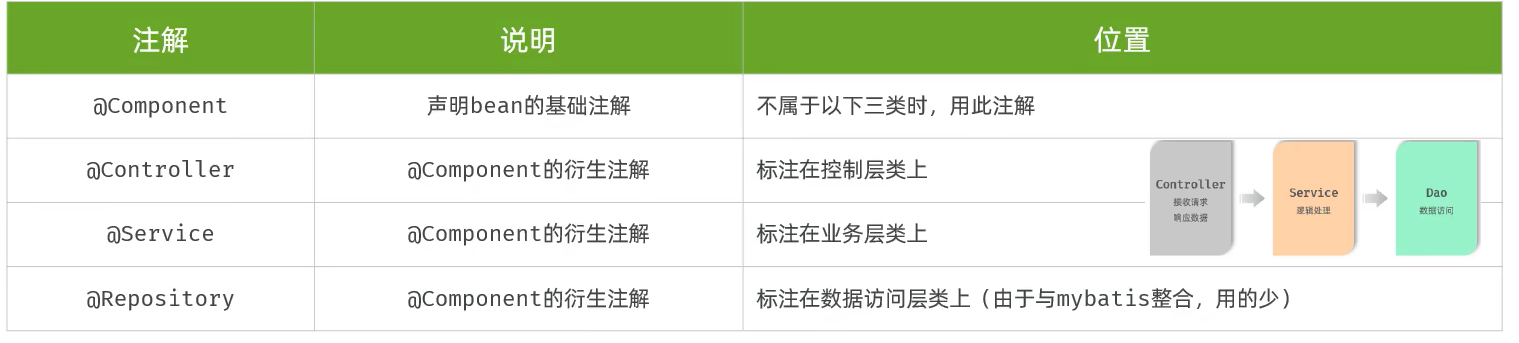 图42 IOC注解
| 注解 | 说明 | 位置 |
| ----------- | -------------------- | ------------------------------------------------- |
| @Component | 声明bean的基础注解 | 不属于以下三类时,用此注解 |
| @Controller | @Component的衍生注解 | 标注在控制层类上 |
| @Service | @Component的衍生注解 | 标注在业务层类上 |
| @Repository | @Component的衍生注解 | 标注在数据访问层类上(由于与mybatis整合,用的少) |
* @RestController注解包含了:@Targe、@Retention、@Documented、@Controller、@ResponseBody
* 声明bean的时候,可以通过注解的value属性指定bean的名字,如果没有指定,默认为类名首字母小写。
* 前面声明bean的四大注解,要想生效,还需要被组件扫描注解@ComponentScan扫描。
* 该注解虽然没有显式配置,但是实际上已经包含在了启动类声明注解 @SpringBootApplication 中,默认扫描的范围是启动类所在包及其子包。
* @SpringBootApplication注解包含了@Target、@Retention、@Documented、@Inherited、@ComponentScan、@SpringBootConfiguration、@EnableAutoConfiguration
声明bean的注解有哪几个 ?
* @Controller
* @Service
* @Repository
* @Component
注意事项
* 在Springboot集成web开发中,声明控制器bean只能用@Controller。
* 声明bean的注解要想生效,需要被扫描到,启动类默认扫描当前包及其子包。
图42 IOC注解
| 注解 | 说明 | 位置 |
| ----------- | -------------------- | ------------------------------------------------- |
| @Component | 声明bean的基础注解 | 不属于以下三类时,用此注解 |
| @Controller | @Component的衍生注解 | 标注在控制层类上 |
| @Service | @Component的衍生注解 | 标注在业务层类上 |
| @Repository | @Component的衍生注解 | 标注在数据访问层类上(由于与mybatis整合,用的少) |
* @RestController注解包含了:@Targe、@Retention、@Documented、@Controller、@ResponseBody
* 声明bean的时候,可以通过注解的value属性指定bean的名字,如果没有指定,默认为类名首字母小写。
* 前面声明bean的四大注解,要想生效,还需要被组件扫描注解@ComponentScan扫描。
* 该注解虽然没有显式配置,但是实际上已经包含在了启动类声明注解 @SpringBootApplication 中,默认扫描的范围是启动类所在包及其子包。
* @SpringBootApplication注解包含了@Target、@Retention、@Documented、@Inherited、@ComponentScan、@SpringBootConfiguration、@EnableAutoConfiguration
声明bean的注解有哪几个 ?
* @Controller
* @Service
* @Repository
* @Component
注意事项
* 在Springboot集成web开发中,声明控制器bean只能用@Controller。
* 声明bean的注解要想生效,需要被扫描到,启动类默认扫描当前包及其子包。
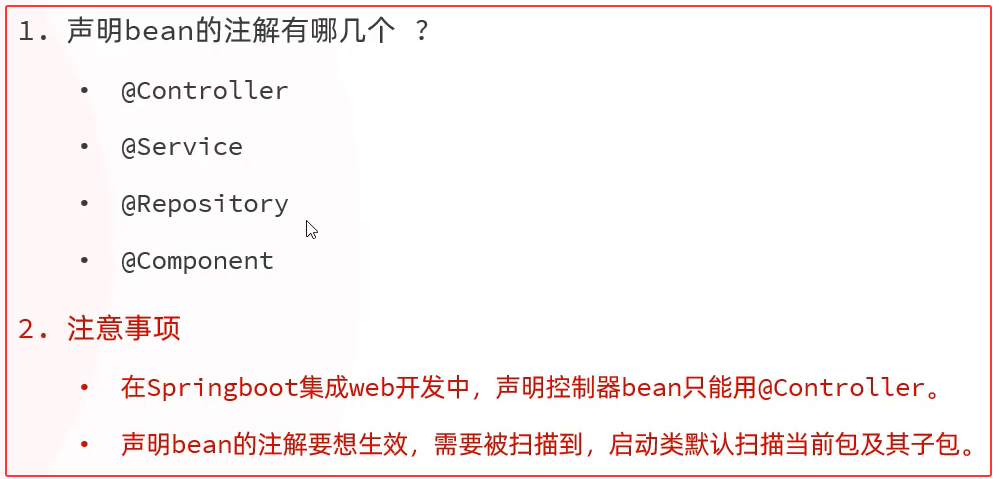 图43 IOC注解小结
#### 4.5 DI详解
基于@Autowired进行依赖注入的常见方式有如下三种:
①.属性注入
```java
@RestController
public class UserController {
@Autowired
private UserService userService;
//......
}
```
* 优点:代码简洁、方便快速开发。
* 缺点:隐藏了类之间的依赖关系、可能会破坏类的封装性。
②.构造函数注入
```java
@RestController
public class UserController {
private final UserService userService;
@Autowired
public UserController(UserService userService) {
this.userService = userService;
}
}
```
* 优点:能清晰地看到类的依赖关系、提高了代码的安全性。
* 缺点:代码繁琐、如果构造参数过多,可能会导致构造函数臃肿。
* 注意:如果只有一个构造函数,@Autowired注解可以省略。
③.setter注入
```java
@RestController
public class UserController {
private final UserService userService;
@Autowired
public UserController(UserService userService) {
this.userService = userService;
}
}
```
* 优点:保持了类的封装性,依赖关系更清晰。
* 缺点:需要额外编写setter方法,增加了代码量。
图43 IOC注解小结
#### 4.5 DI详解
基于@Autowired进行依赖注入的常见方式有如下三种:
①.属性注入
```java
@RestController
public class UserController {
@Autowired
private UserService userService;
//......
}
```
* 优点:代码简洁、方便快速开发。
* 缺点:隐藏了类之间的依赖关系、可能会破坏类的封装性。
②.构造函数注入
```java
@RestController
public class UserController {
private final UserService userService;
@Autowired
public UserController(UserService userService) {
this.userService = userService;
}
}
```
* 优点:能清晰地看到类的依赖关系、提高了代码的安全性。
* 缺点:代码繁琐、如果构造参数过多,可能会导致构造函数臃肿。
* 注意:如果只有一个构造函数,@Autowired注解可以省略。
③.setter注入
```java
@RestController
public class UserController {
private final UserService userService;
@Autowired
public UserController(UserService userService) {
this.userService = userService;
}
}
```
* 优点:保持了类的封装性,依赖关系更清晰。
* 缺点:需要额外编写setter方法,增加了代码量。
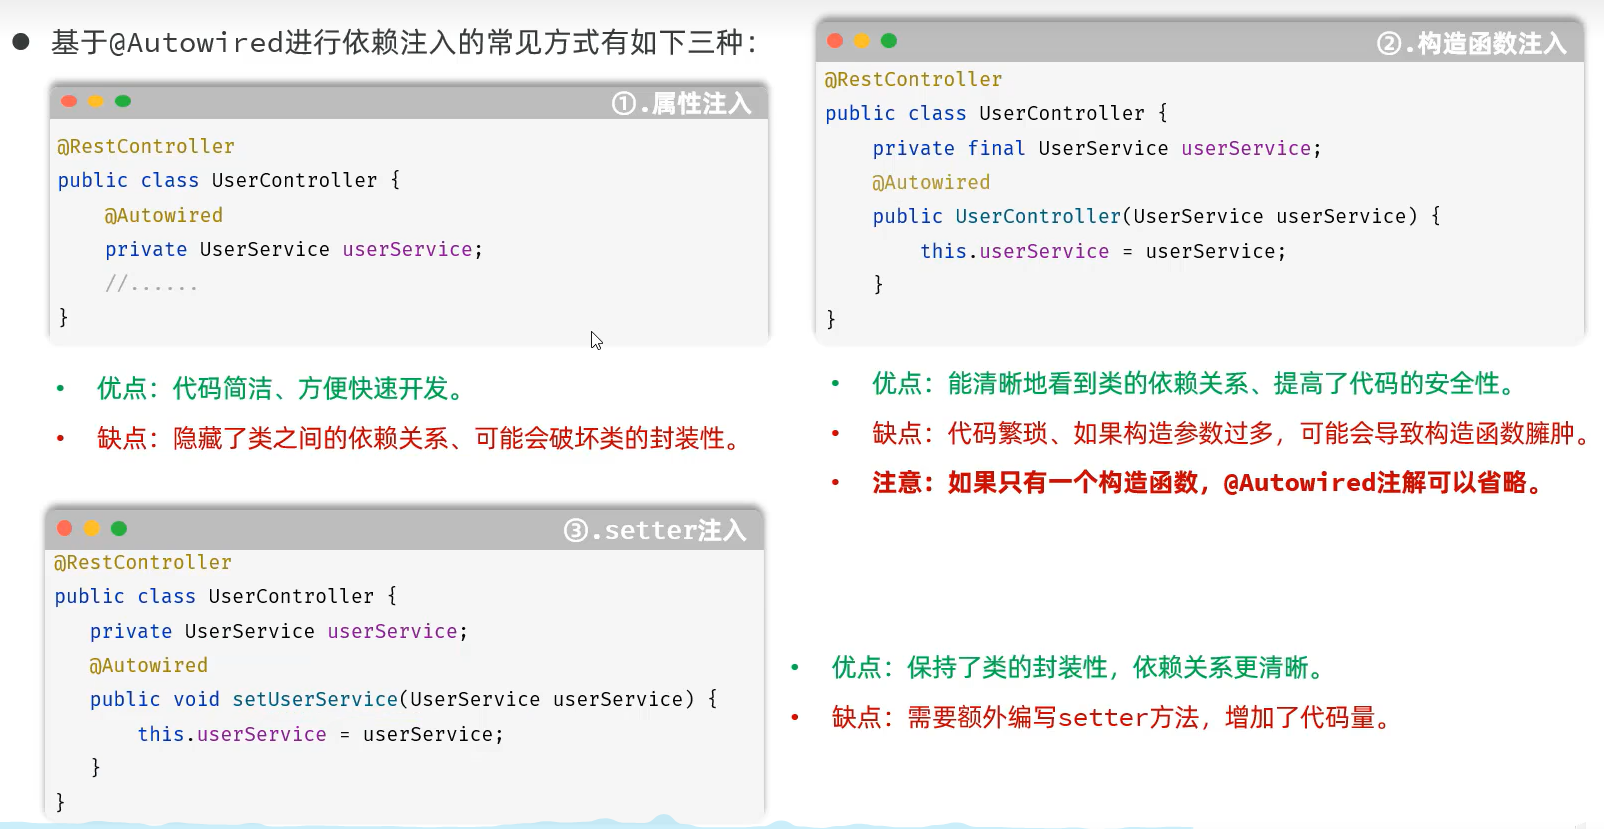 图44 依赖注入的常见方式
##### cn/dzj/controller/UserController.java 三中常见的依赖注入方式测试
```java
package cn.dzj.controller;
import cn.dzj.pojo.User;
import cn.dzj.service.UserService;
// import cn.dzj.service.impl.UserServiceImpl;
import cn.hutool.core.io.IoUtil;
import org.springframework.beans.factory.annotation.Autowired;
import org.springframework.web.bind.annotation.RequestMapping;
import org.springframework.web.bind.annotation.RestController;
import java.io.InputStream;
import java.nio.charset.StandardCharsets;
import java.time.LocalDateTime;
import java.time.format.DateTimeFormatter;
import java.util.ArrayList;
import java.util.List;
/**
*用户信息Controller
*/
@RestController
// @Controller->作用:将controller返回值封装为响应数据
// @Controller注解中包含@ResponseBody注解
// @ResponseBody->作用:将controller返回值直接作为响应体的数据直接响应;如果返回值是对象/集合->json->响应
public class UserController {
@RequestMapping("/list")
public List list() throws Exception {
//1.加载并读取user.txt文件,获取用户数据
InputStream in = this.getClass().getClassLoader().getResourceAsStream("user.txt");
ArrayList lines = IoUtil.readLines(in, StandardCharsets.UTF_8, new ArrayList<>());
//2.解析用户信息,封装为User对象->list集合
List userList = lines.stream().map(line -> {
String[] parts = line.split(",");
Integer id = Integer.parseInt(parts[0]);
String username = parts[1];
String password = parts[2];
String name = parts[3];
Integer age = Integer.parseInt(parts[4]);
LocalDateTime updateTime = LocalDateTime.parse(parts[5], DateTimeFormatter.ofPattern("yyyy-MM-dd HH:mm:ss"));
return new User(id, username, password, name, age, updateTime);
}).toList();
//3.返回数据(json)
return userList;
}
//方式一:属性注入
//@Autowired //自动注入 应用程序运行时,会自动的查询该类型的bean对象,并赋值给该成员变量
//private UserService userService; // = new UserServiceImpl();
//方式二:构造器注入
//private final UserService userService;
//@Autowired //--->如果当前类中只存在一个构造函数,@Autowired可以省略
//public UserController(UserService userService) {
// this.userService = userService;
//}
//方式三:setter注入
private UserService userService;
@Autowired
public void setUserService(UserService userService) {
this.userService = userService;
}
@RequestMapping("/list2")
public List list2() {
//1.调用service,查询用户信息
List userlist = userService.list();
//2.响应数据
return userlist;
}
}
```
##### DI详解
* @Autowired注解,默认是按照类型进行注入的。
* 如果存在多个相同类型的bean,将会报出如下错误:
图44 依赖注入的常见方式
##### cn/dzj/controller/UserController.java 三中常见的依赖注入方式测试
```java
package cn.dzj.controller;
import cn.dzj.pojo.User;
import cn.dzj.service.UserService;
// import cn.dzj.service.impl.UserServiceImpl;
import cn.hutool.core.io.IoUtil;
import org.springframework.beans.factory.annotation.Autowired;
import org.springframework.web.bind.annotation.RequestMapping;
import org.springframework.web.bind.annotation.RestController;
import java.io.InputStream;
import java.nio.charset.StandardCharsets;
import java.time.LocalDateTime;
import java.time.format.DateTimeFormatter;
import java.util.ArrayList;
import java.util.List;
/**
*用户信息Controller
*/
@RestController
// @Controller->作用:将controller返回值封装为响应数据
// @Controller注解中包含@ResponseBody注解
// @ResponseBody->作用:将controller返回值直接作为响应体的数据直接响应;如果返回值是对象/集合->json->响应
public class UserController {
@RequestMapping("/list")
public List list() throws Exception {
//1.加载并读取user.txt文件,获取用户数据
InputStream in = this.getClass().getClassLoader().getResourceAsStream("user.txt");
ArrayList lines = IoUtil.readLines(in, StandardCharsets.UTF_8, new ArrayList<>());
//2.解析用户信息,封装为User对象->list集合
List userList = lines.stream().map(line -> {
String[] parts = line.split(",");
Integer id = Integer.parseInt(parts[0]);
String username = parts[1];
String password = parts[2];
String name = parts[3];
Integer age = Integer.parseInt(parts[4]);
LocalDateTime updateTime = LocalDateTime.parse(parts[5], DateTimeFormatter.ofPattern("yyyy-MM-dd HH:mm:ss"));
return new User(id, username, password, name, age, updateTime);
}).toList();
//3.返回数据(json)
return userList;
}
//方式一:属性注入
//@Autowired //自动注入 应用程序运行时,会自动的查询该类型的bean对象,并赋值给该成员变量
//private UserService userService; // = new UserServiceImpl();
//方式二:构造器注入
//private final UserService userService;
//@Autowired //--->如果当前类中只存在一个构造函数,@Autowired可以省略
//public UserController(UserService userService) {
// this.userService = userService;
//}
//方式三:setter注入
private UserService userService;
@Autowired
public void setUserService(UserService userService) {
this.userService = userService;
}
@RequestMapping("/list2")
public List list2() {
//1.调用service,查询用户信息
List userlist = userService.list();
//2.响应数据
return userlist;
}
}
```
##### DI详解
* @Autowired注解,默认是按照类型进行注入的。
* 如果存在多个相同类型的bean,将会报出如下错误:
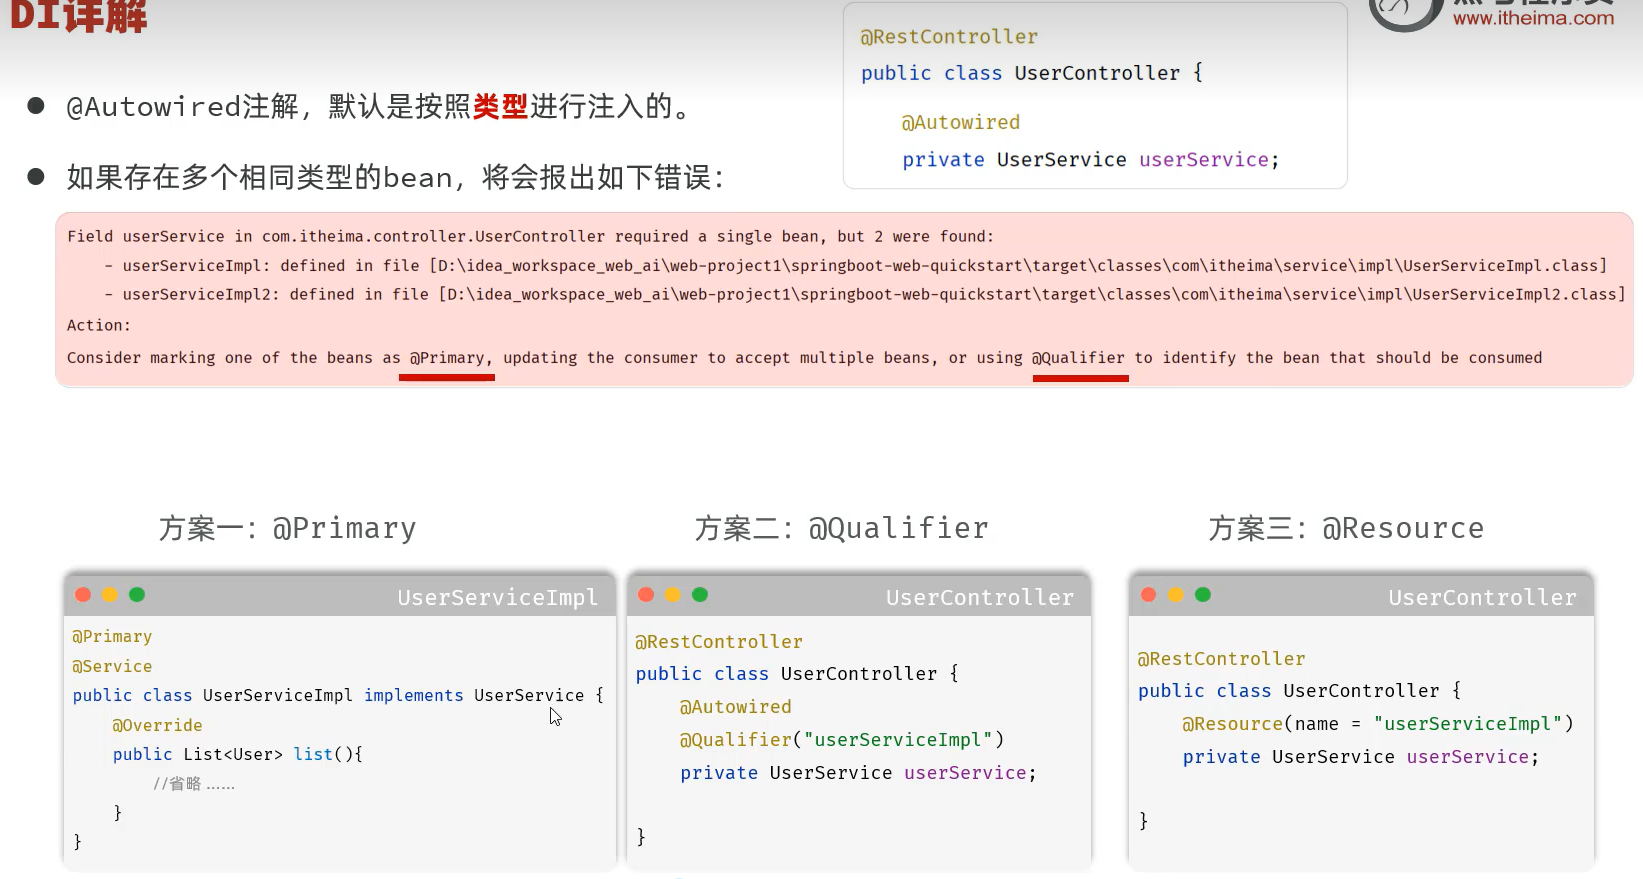 图45 依赖注入多个相同类型的bean解决方案
方案一:@Primary
```java
@Primary
@Service
public class UserServiceImpl implements UserService {
@Override
public List list(){
//省略 ……
}
}
```
方案二:@Qualifier
```java
@RestController
public class UserController {
@Autowired
@Qualifier("userServiceImpl")
private UserService userService;
}
```
方案三:@Resource
```java
@RestController
public class UserController {
@Resource(name = "userServiceImpl")
private UserService userService;
}
```
##### 验证
##### cn/dzj/service/impl/UserServiceImpl1.java 添加 // @Primary和id+100
```java
package cn.dzj.service.impl;
import cn.dzj.dao.UserDao;
import cn.dzj.pojo.User;
import cn.dzj.service.UserService;
import org.springframework.beans.factory.annotation.Autowired;
import org.springframework.context.annotation.Primary;
import org.springframework.stereotype.Service;
import java.time.LocalDateTime;
import java.time.format.DateTimeFormatter;
import java.util.List;
// @Component // @Component->作用:将类交给spring管理 -- 将当前类交给IOC容器管理
// @Primary
@Service
public class UserServiceImpl1 implements UserService {
@Autowired //应用程序运行时,会自动的查询该类型的bean对象,并赋值给该成员变量
private UserDao userDao; // = new UserDaoImpl();
public List list(){
//1.调用dao获取数据
List lines = userDao.list();
//2.解析数据,封装成对象—-—> 集合
List userList = lines.stream().map(line -> {
String[] parts = line.split(",");
Integer id = Integer.parseInt(parts[0]);
String username = parts[1];
String password = parts[2];
String name = parts[3];
Integer age = Integer.parseInt(parts[4]);
LocalDateTime updateTime = LocalDateTime.parse(parts[5],
DateTimeFormatter.ofPattern("yyyy-MM-dd HH:mm:ss"));
return new User(id+100, username, password, name, age, updateTime);
}).toList();
return userList;
}
}
```
##### cn/dzj/service/impl/UserServiceImpl2.java 添加id+200
```java
package cn.dzj.service.impl;
import cn.dzj.dao.UserDao;
import cn.dzj.pojo.User;
import cn.dzj.service.UserService;
import org.springframework.beans.factory.annotation.Autowired;
import org.springframework.context.annotation.Primary;
import org.springframework.stereotype.Service;
import java.time.LocalDateTime;
import java.time.format.DateTimeFormatter;
import java.util.List;
// @Component // @Component->作用:将类交给spring管理 -- 将当前类交给IOC容器管理
@Service
public class UserServiceImpl1 implements UserService {
@Autowired //应用程序运行时,会自动的查询该类型的bean对象,并赋值给该成员变量
private UserDao userDao; // = new UserDaoImpl();
public List list(){
//1.调用dao获取数据
List lines = userDao.list();
//2.解析数据,封装成对象—-—> 集合
List userList = lines.stream().map(line -> {
String[] parts = line.split(",");
Integer id = Integer.parseInt(parts[0]);
String username = parts[1];
String password = parts[2];
String name = parts[3];
Integer age = Integer.parseInt(parts[4]);
LocalDateTime updateTime = LocalDateTime.parse(parts[5],
DateTimeFormatter.ofPattern("yyyy-MM-dd HH:mm:ss"));
return new User(id+200, username, password, name, age, updateTime);
}).toList();
return userList;
}
}
```
##### cn/dzj/service/impl/UserServiceImpl3.java 添加id+300
```java
package cn.dzj.service.impl;
import cn.dzj.dao.UserDao;
import cn.dzj.pojo.User;
import cn.dzj.service.UserService;
import org.springframework.beans.factory.annotation.Autowired;
import org.springframework.context.annotation.Primary;
import org.springframework.stereotype.Service;
import java.time.LocalDateTime;
import java.time.format.DateTimeFormatter;
import java.util.List;
// @Component // @Component->作用:将类交给spring管理 -- 将当前类交给IOC容器管理
@Service
public class UserServiceImpl1 implements UserService {
@Autowired //应用程序运行时,会自动的查询该类型的bean对象,并赋值给该成员变量
private UserDao userDao; // = new UserDaoImpl();
public List list(){
//1.调用dao获取数据
List lines = userDao.list();
//2.解析数据,封装成对象—-—> 集合
List userList = lines.stream().map(line -> {
String[] parts = line.split(",");
Integer id = Integer.parseInt(parts[0]);
String username = parts[1];
String password = parts[2];
String name = parts[3];
Integer age = Integer.parseInt(parts[4]);
LocalDateTime updateTime = LocalDateTime.parse(parts[5],
DateTimeFormatter.ofPattern("yyyy-MM-dd HH:mm:ss"));
return new User(id+300, username, password, name, age, updateTime);
}).toList();
return userList;
}
}
```
##### cn/dzj/controller/UserController.java 依赖注入处局部修改如下测试
```java
private UserService userService;
// 方案1 @Autowired不变 UserServiceImpl1添加@Primary使该类生效
// @Autowired
// 方案2 @Autowired不变 UserServiceImpl1去掉@Primary使该类失效 使用@Qualifier注解
//@Qualifier("userServiceImpl2")
// 方案3 @Autowired去掉 UserServiceImpl1去掉@Primary使该类失效 使用@Resource注解
//@Resource(name = "userServiceImpl3")
```
图45 依赖注入多个相同类型的bean解决方案
方案一:@Primary
```java
@Primary
@Service
public class UserServiceImpl implements UserService {
@Override
public List list(){
//省略 ……
}
}
```
方案二:@Qualifier
```java
@RestController
public class UserController {
@Autowired
@Qualifier("userServiceImpl")
private UserService userService;
}
```
方案三:@Resource
```java
@RestController
public class UserController {
@Resource(name = "userServiceImpl")
private UserService userService;
}
```
##### 验证
##### cn/dzj/service/impl/UserServiceImpl1.java 添加 // @Primary和id+100
```java
package cn.dzj.service.impl;
import cn.dzj.dao.UserDao;
import cn.dzj.pojo.User;
import cn.dzj.service.UserService;
import org.springframework.beans.factory.annotation.Autowired;
import org.springframework.context.annotation.Primary;
import org.springframework.stereotype.Service;
import java.time.LocalDateTime;
import java.time.format.DateTimeFormatter;
import java.util.List;
// @Component // @Component->作用:将类交给spring管理 -- 将当前类交给IOC容器管理
// @Primary
@Service
public class UserServiceImpl1 implements UserService {
@Autowired //应用程序运行时,会自动的查询该类型的bean对象,并赋值给该成员变量
private UserDao userDao; // = new UserDaoImpl();
public List list(){
//1.调用dao获取数据
List lines = userDao.list();
//2.解析数据,封装成对象—-—> 集合
List userList = lines.stream().map(line -> {
String[] parts = line.split(",");
Integer id = Integer.parseInt(parts[0]);
String username = parts[1];
String password = parts[2];
String name = parts[3];
Integer age = Integer.parseInt(parts[4]);
LocalDateTime updateTime = LocalDateTime.parse(parts[5],
DateTimeFormatter.ofPattern("yyyy-MM-dd HH:mm:ss"));
return new User(id+100, username, password, name, age, updateTime);
}).toList();
return userList;
}
}
```
##### cn/dzj/service/impl/UserServiceImpl2.java 添加id+200
```java
package cn.dzj.service.impl;
import cn.dzj.dao.UserDao;
import cn.dzj.pojo.User;
import cn.dzj.service.UserService;
import org.springframework.beans.factory.annotation.Autowired;
import org.springframework.context.annotation.Primary;
import org.springframework.stereotype.Service;
import java.time.LocalDateTime;
import java.time.format.DateTimeFormatter;
import java.util.List;
// @Component // @Component->作用:将类交给spring管理 -- 将当前类交给IOC容器管理
@Service
public class UserServiceImpl1 implements UserService {
@Autowired //应用程序运行时,会自动的查询该类型的bean对象,并赋值给该成员变量
private UserDao userDao; // = new UserDaoImpl();
public List list(){
//1.调用dao获取数据
List lines = userDao.list();
//2.解析数据,封装成对象—-—> 集合
List userList = lines.stream().map(line -> {
String[] parts = line.split(",");
Integer id = Integer.parseInt(parts[0]);
String username = parts[1];
String password = parts[2];
String name = parts[3];
Integer age = Integer.parseInt(parts[4]);
LocalDateTime updateTime = LocalDateTime.parse(parts[5],
DateTimeFormatter.ofPattern("yyyy-MM-dd HH:mm:ss"));
return new User(id+200, username, password, name, age, updateTime);
}).toList();
return userList;
}
}
```
##### cn/dzj/service/impl/UserServiceImpl3.java 添加id+300
```java
package cn.dzj.service.impl;
import cn.dzj.dao.UserDao;
import cn.dzj.pojo.User;
import cn.dzj.service.UserService;
import org.springframework.beans.factory.annotation.Autowired;
import org.springframework.context.annotation.Primary;
import org.springframework.stereotype.Service;
import java.time.LocalDateTime;
import java.time.format.DateTimeFormatter;
import java.util.List;
// @Component // @Component->作用:将类交给spring管理 -- 将当前类交给IOC容器管理
@Service
public class UserServiceImpl1 implements UserService {
@Autowired //应用程序运行时,会自动的查询该类型的bean对象,并赋值给该成员变量
private UserDao userDao; // = new UserDaoImpl();
public List list(){
//1.调用dao获取数据
List lines = userDao.list();
//2.解析数据,封装成对象—-—> 集合
List userList = lines.stream().map(line -> {
String[] parts = line.split(",");
Integer id = Integer.parseInt(parts[0]);
String username = parts[1];
String password = parts[2];
String name = parts[3];
Integer age = Integer.parseInt(parts[4]);
LocalDateTime updateTime = LocalDateTime.parse(parts[5],
DateTimeFormatter.ofPattern("yyyy-MM-dd HH:mm:ss"));
return new User(id+300, username, password, name, age, updateTime);
}).toList();
return userList;
}
}
```
##### cn/dzj/controller/UserController.java 依赖注入处局部修改如下测试
```java
private UserService userService;
// 方案1 @Autowired不变 UserServiceImpl1添加@Primary使该类生效
// @Autowired
// 方案2 @Autowired不变 UserServiceImpl1去掉@Primary使该类失效 使用@Qualifier注解
//@Qualifier("userServiceImpl2")
// 方案3 @Autowired去掉 UserServiceImpl1去掉@Primary使该类失效 使用@Resource注解
//@Resource(name = "userServiceImpl3")
```
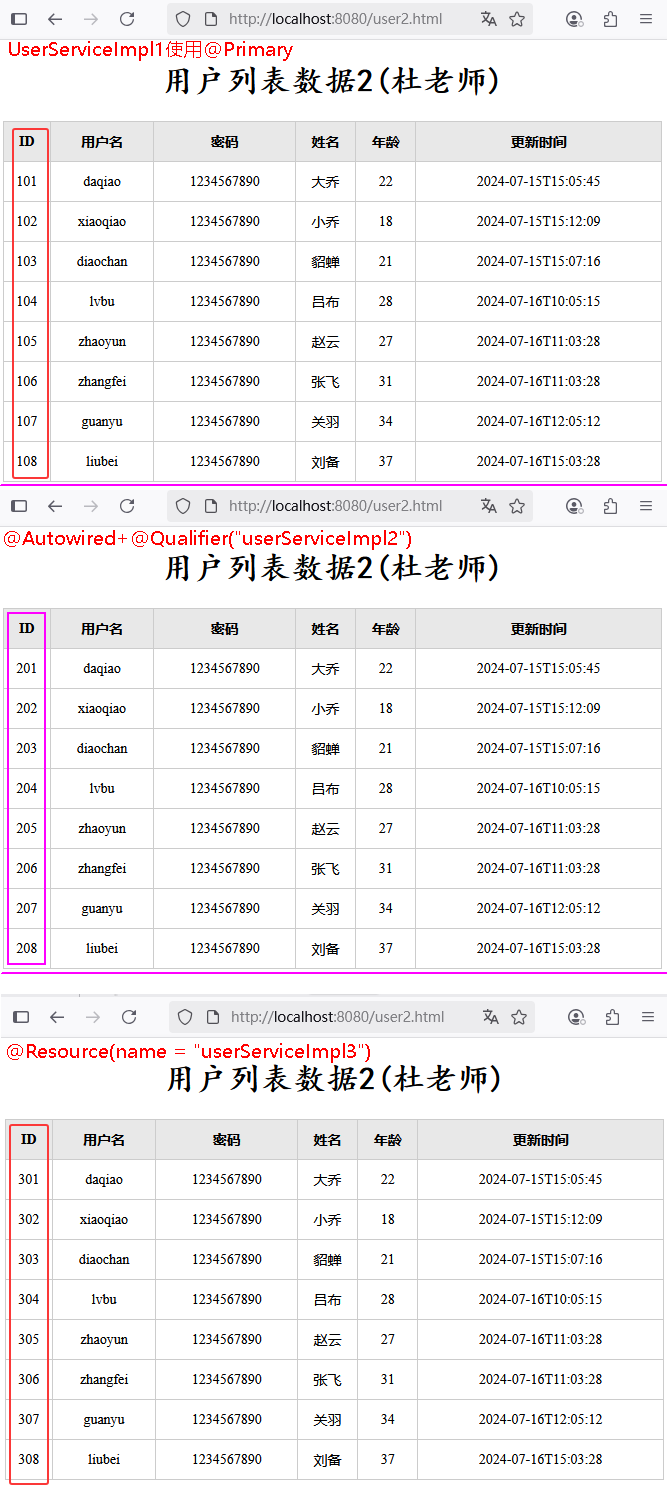 图46 依赖注入验证
##### 依赖注入小结
①依赖注入的注解
* @Autowired:默认按照类型自动装配
* 如果同类型的bean存在多个:
* @Primary
* @Autowired + @Qualifier
* @Resource
②@Resource 与 @Autowired区别 ?
* @Autowired是Spring框架提供的注解,而@Resource是JavaEE规范提供的
* @Autowired默认是按照类型注入,而@Resource默认是按照名称注入
图46 依赖注入验证
##### 依赖注入小结
①依赖注入的注解
* @Autowired:默认按照类型自动装配
* 如果同类型的bean存在多个:
* @Primary
* @Autowired + @Qualifier
* @Resource
②@Resource 与 @Autowired区别 ?
* @Autowired是Spring框架提供的注解,而@Resource是JavaEE规范提供的
* @Autowired默认是按照类型注入,而@Resource默认是按照名称注入
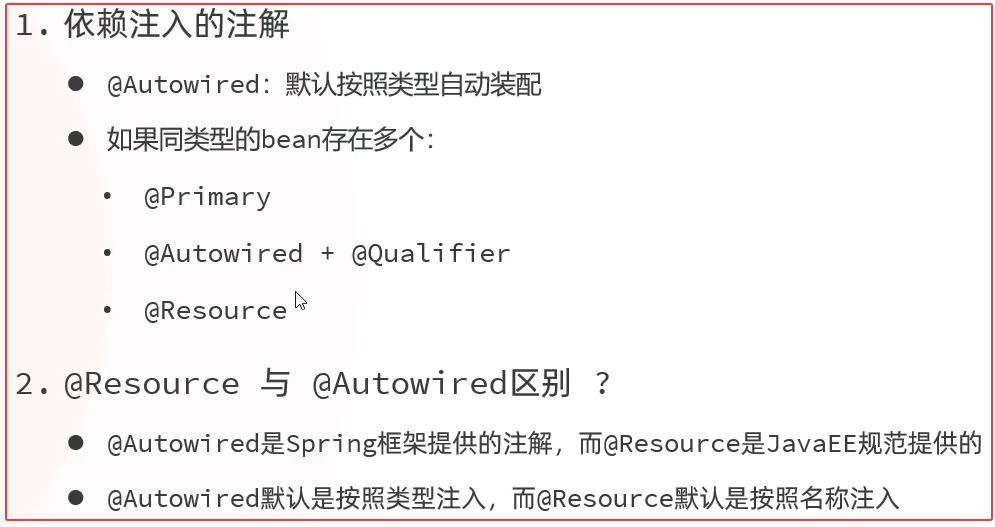 图47 依赖注入小结
①②③④⑤⑥⑦⑧⑨⑩
---
在 Spring Boot 中,Spring MVC 的核心内容可简明概括为:
1. **核心组件**:DispatcherServlet(前端控制器,统一分发请求)、Controller(处理请求的控制器)、HandlerMapping(映射请求到处理器)、HandlerAdapter(执行处理器)、ViewResolver(解析视图)。
2. **请求处理流程**:请求经 DispatcherServlet 转发,通过 HandlerMapping 找到对应 Controller,处理器执行后返回 ModelAndView,再由 ViewResolver 解析视图并渲染响应。
3. **常用注解**:@Controller(标识控制器)、@RestController(组合 @Controller 和 @ResponseBody,返回数据而非视图)、@RequestMapping(映射请求路径 / 方法)、@GetMapping/@PostMapping 等(特定 HTTP 方法映射)、@RequestParam/@PathVariable(获取请求参数)、@RequestBody(接收 JSON 请求体)等。
4. **视图支持**:整合 Thymeleaf、JSP 等视图技术,也常用于构建 RESTful API(返回 JSON/XML 数据)。
5. **扩展机制**:包括拦截器(HandlerInterceptor)、全局异常处理(@ControllerAdvice + @ExceptionHandler)等。
在 Spring Boot 中,包含的 Spring 核心内容可简明概括为:
1. **核心容器**:IoC(控制反转)容器、Bean 管理(依赖注入、生命周期管理等),基于`@Component`、`@Autowired`等注解。
2. **AOP**:面向切面编程,支持事务管理、日志、权限等横切逻辑,通过`@Aspect`、`@Transactional`等实现。
3. **数据访问**:整合 Spring JDBC、ORM(如与 Hibernate、MyBatis 适配),提供统一的数据访问抽象。
4. **事务管理**:声明式事务支持,通过注解或配置管理事务边界。
5. **安全框架**:集成 Spring Security,提供认证、授权等安全功能。
6. **测试支持**:基于 Spring Test,支持单元测试、集成测试。
7. **其他基础功能**:事件机制、资源管理、国际化等。
Spring Boot 本质是对 Spring 框架的简化封装,保留其核心功能并通过自动配置减少配置工作量。
图47 依赖注入小结
①②③④⑤⑥⑦⑧⑨⑩
---
在 Spring Boot 中,Spring MVC 的核心内容可简明概括为:
1. **核心组件**:DispatcherServlet(前端控制器,统一分发请求)、Controller(处理请求的控制器)、HandlerMapping(映射请求到处理器)、HandlerAdapter(执行处理器)、ViewResolver(解析视图)。
2. **请求处理流程**:请求经 DispatcherServlet 转发,通过 HandlerMapping 找到对应 Controller,处理器执行后返回 ModelAndView,再由 ViewResolver 解析视图并渲染响应。
3. **常用注解**:@Controller(标识控制器)、@RestController(组合 @Controller 和 @ResponseBody,返回数据而非视图)、@RequestMapping(映射请求路径 / 方法)、@GetMapping/@PostMapping 等(特定 HTTP 方法映射)、@RequestParam/@PathVariable(获取请求参数)、@RequestBody(接收 JSON 请求体)等。
4. **视图支持**:整合 Thymeleaf、JSP 等视图技术,也常用于构建 RESTful API(返回 JSON/XML 数据)。
5. **扩展机制**:包括拦截器(HandlerInterceptor)、全局异常处理(@ControllerAdvice + @ExceptionHandler)等。
在 Spring Boot 中,包含的 Spring 核心内容可简明概括为:
1. **核心容器**:IoC(控制反转)容器、Bean 管理(依赖注入、生命周期管理等),基于`@Component`、`@Autowired`等注解。
2. **AOP**:面向切面编程,支持事务管理、日志、权限等横切逻辑,通过`@Aspect`、`@Transactional`等实现。
3. **数据访问**:整合 Spring JDBC、ORM(如与 Hibernate、MyBatis 适配),提供统一的数据访问抽象。
4. **事务管理**:声明式事务支持,通过注解或配置管理事务边界。
5. **安全框架**:集成 Spring Security,提供认证、授权等安全功能。
6. **测试支持**:基于 Spring Test,支持单元测试、集成测试。
7. **其他基础功能**:事件机制、资源管理、国际化等。
Spring Boot 本质是对 Spring 框架的简化封装,保留其核心功能并通过自动配置减少配置工作量。